CREATE CHILD THEME
STEPS TO CREATE CHILD THEME IN MAGENTO 2
1. Create a child theme folder named as {parent-theme-name}_child in the following folder path
Name your child theme related to the parent theme. It can be anything that is developer friendly!
2. Create file theme.xml inside the child theme to specify the parent theme inherited by the child theme
<theme xmlns:xsi="http://www.w3.org/2001/XMLSchema-instance"

      xsi:noNamespaceSchemaLocation="urn:magento:framework:Config/etc/theme.xsd">
      <title>{Child Theme Name}</title>
      <parent>{parent-theme-vendor-name}/{parent-theme-name}</parent>
      <media>
              <preview_image>media/preview.png</preview_image>
      </media>
</theme>
3. Create a registration.php file for registering your child theme
<?php
    \Magento\Framework\Component\ComponentRegistrar::register(
    \Magento\Framework\Component\ComponentRegistrar::THEME,
   'frontend/Meetanshi/luma_child',
   __DIR__
);
4. The admin panel shows the created child theme
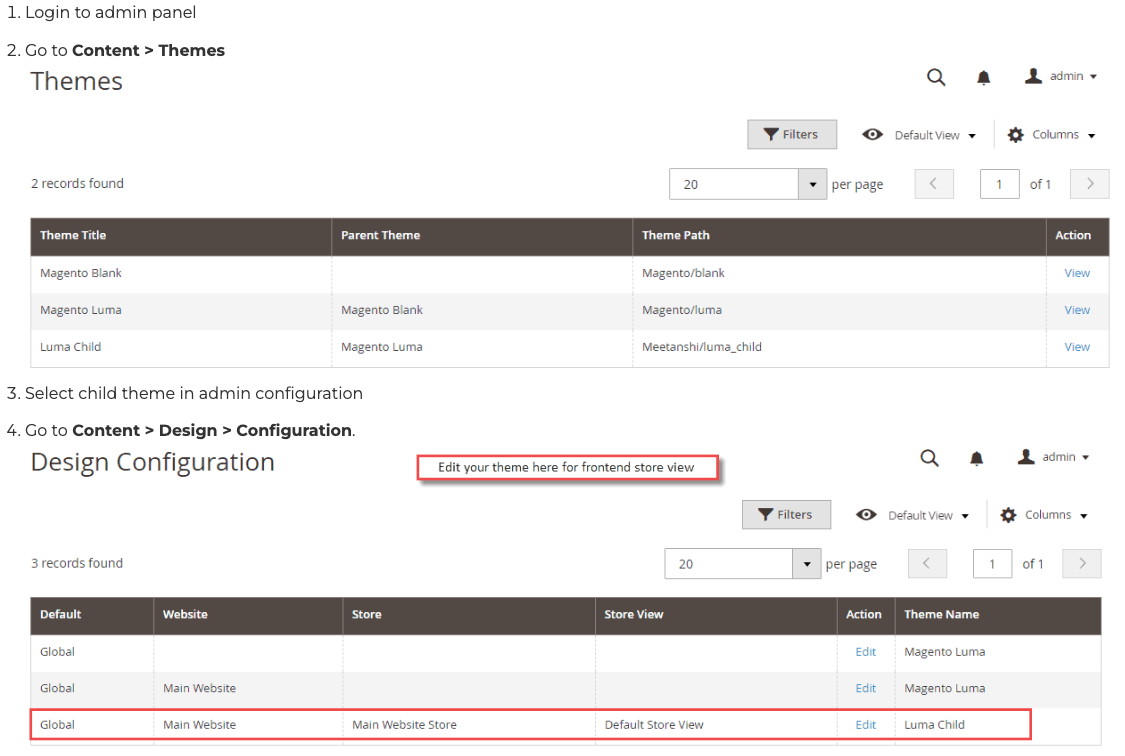

5. Take a backup of pub/static folder for images, CSS, and js. Also, delete the static folder and run static content deploy.
6. Go to the Magento root folder in your terminal and deploy static content using the following command php bin/magento setup:static-content:deploy -f
Click download child theme example
CONFIGURATION MGS_AJAXLAYERNAVIGATION
Go to Admin -> STORES -> Configuration -> MGS -> Ajax Layer Navigation
GENERAL SETTING
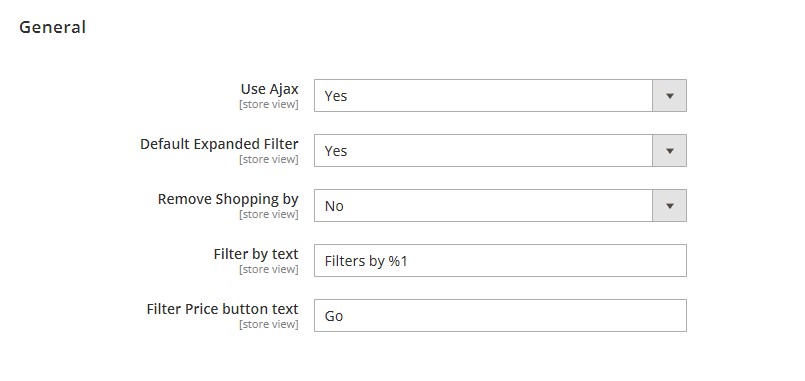
- Use Ajax: Enable or Disable
- Default Expanded Filter: Enable or Disable
- Remove Shopping By :
- Filter By Text :
- Filter Price button text:
VIDEO BANNER BLOCK
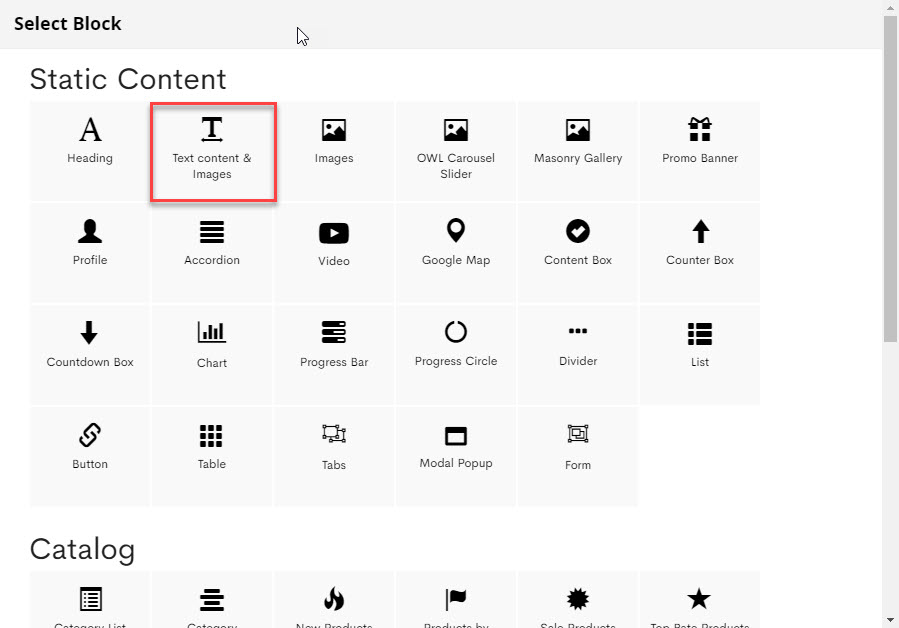
On Home page builder, click Add New Block button.

On popup list blocks, click "Text Content & Images"
Step 1: Create element html:
Step 2: Call the plugin function and your carousel is ready.
<script type="text/javascript" xml="space">
	require([
		'jquery',
		'mgs/bgvideo'
        ], function ($) {

              $(document).ready(function ()
                   $('#video').YTPlayer({
				fitToBackground: true,
				videoId: 'your_video_id',
				pauseOnScroll: false
		   });
	      });
	});
</script>
BANNER VIDEO DEMO CODE
<div class="video-banner">
    <div id="video-background"></div>
    <div class="text"
	style="background-image: url('pub/media/wysiwyg/panel/bg_video_replace.jpg');">
	<h5 class="lh__1 sub-title"><em class="text-colour-white">Spring – Summer 2016</em></h5>
	<h2 class="margin-top20 margin-bottom20 lh__1" style="font-size: 60px;"><span
		class="text-colour-white">FLASH SALE OFF 70%</span></h2>
	<p class="text-center"><a class="btn btn-default2" href="#">Shop Now</a></p>
    </div>
</div>
<script type="text/javascript" xml="space">
	require([
		'jquery',
		'mgs/bgvideo'
	], function ($) {
			$(document).ready(function () {
				$('#video-background').YTPlayer({
						fitToBackground: true,
						videoId: 'your_video_id',
						pauseOnScroll: false
				});
			});
	});
</script>
SETUP MULTI LANGUAGES
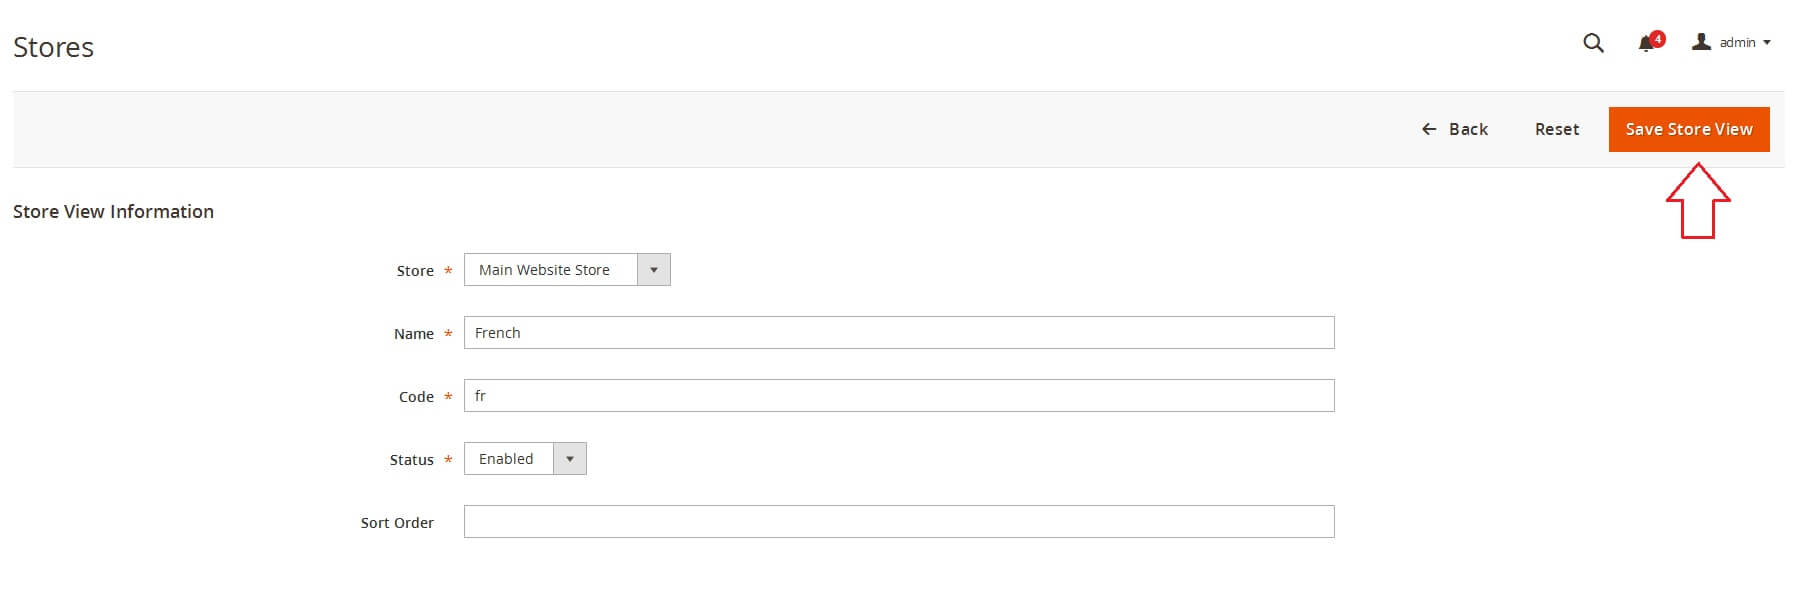
To setup multi languages, you can go to Admin -> Stores -> All Stores -> Create Store View

Example with French
- Name:
French - Code:
fr - Status:
Enable
SETUP CURRENCY
To setup currency, you can go to Store -> Configuration -> General -> Currency. Set Allowed Currencies are the currency you want on your store.
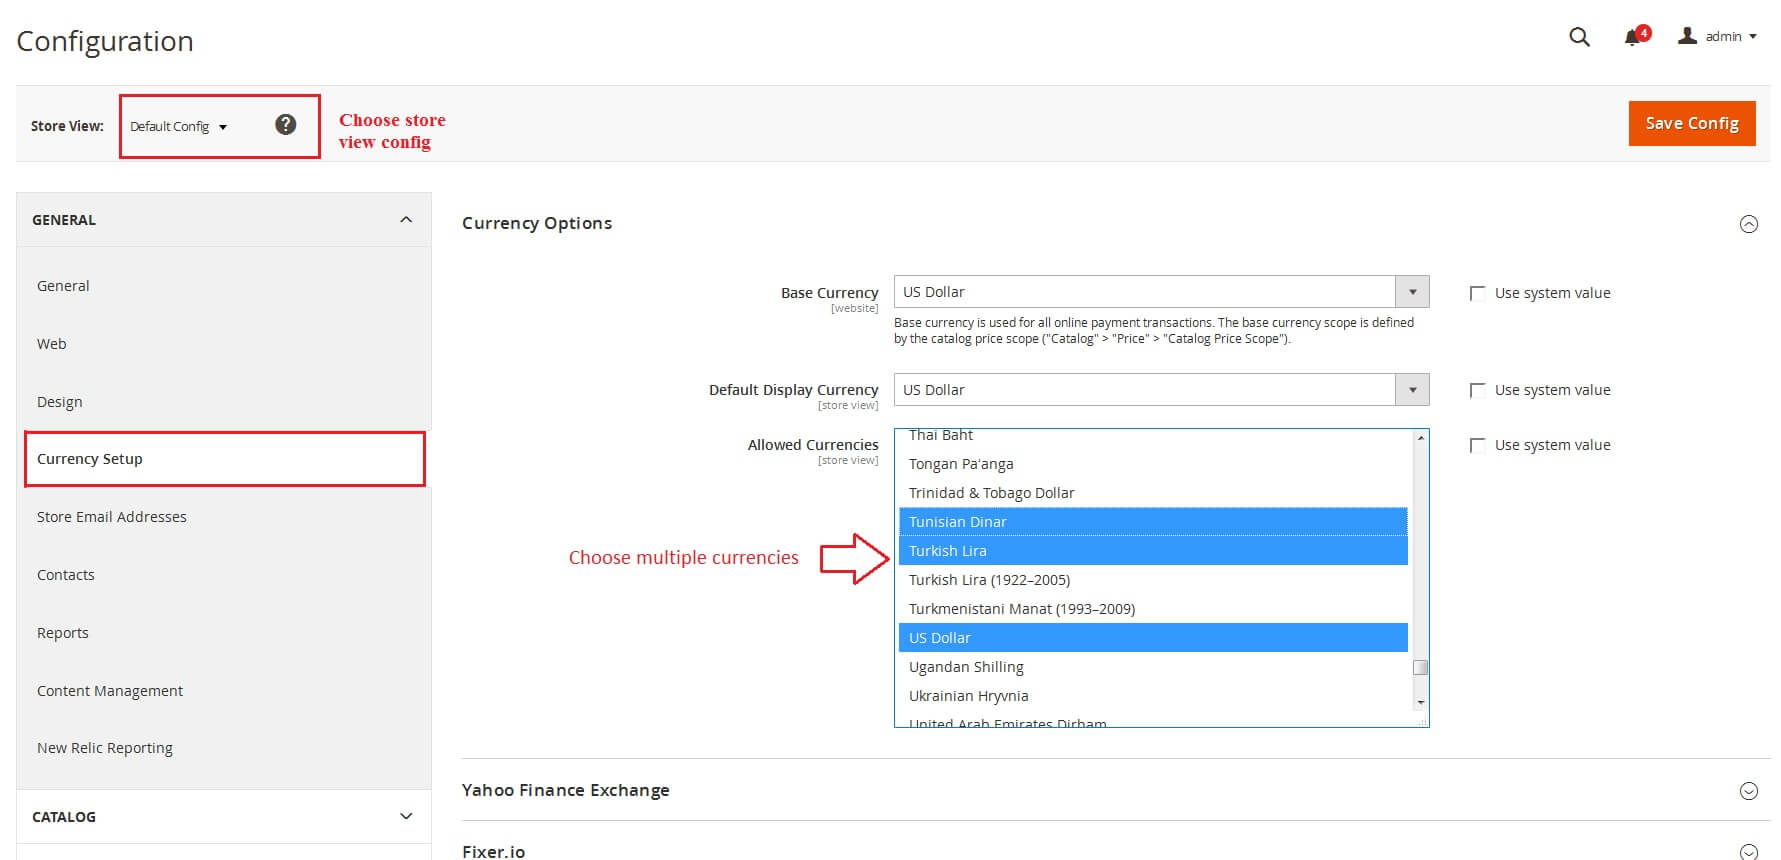
Go to Store -> Currency Rates, press Import. Wait for the system to import currency exchange rate.

If currency rate can’t auto create, you can input value for it

Click Save Currency Rates button to finish config.
Go to System -> Cache Management and refresh the cache. Now you should see currency dropdown on the top left corner.
MAKE CHILD THEME
We recommend you to create the child theme, if you need to customize the theme.
Make the child theme in the same directory with “mgsblank”. Sample “mgs_blank_child” theme was already provided in the theme package.
/app/design/frontend/Mgs/mgsblank_child- Declare your themeCreate file theme.xml on mgsblank_child folder. The path:
/app/design/frontend/Mgs/mgsblank_child/theme.xmlFile content: You can replace
 Mgs/mgsblanktoMgs/suproif you want use Supro as parent theme.
After you create theme.xml file, you need to open or reload any Magento Admin page for your theme to be saved in the database.
- Make your theme a Composer package (optional)
Create file composer.json on mgsblank_child folder. The path:
/app/design/frontend/Mgs/mgsblank_child/composer.json
Magento default themes are distributed as Composer packages.
To distribute your theme as a package, add a composer.json file to the theme directory and register the package on a packaging server. A default public packaging server is https://packagist.org/.
composer.json provides theme dependency information.
Example of a theme composer.json:
{


"name"
:

"magento/mgsblank_child"
,


"description"
:

"N/A"
,


"require"
:

{


"php"
:

"~5.5.0|~5.6.0|~7.0.0"
,


"magento/theme-frontend-blank"
:

"100.0.*"
,


"magento/framework"
:

"100.0.*"


},


"type"
:

"magento2-theme"
,


"version"
:

"100.0.1"
,


"license"
:

[


"OSL-3.0"
,


"AFL-3.0"


],


"autoload"
:

{


"files"
:

[


"registration.php"


]


}

}
You can find details about the Composer integration in the Magento system in Composer integration.
- Add registration.php
To register your theme in the system, in your theme directory add a registration.php file with the following content:
<?php

/**

 * Copyright © 2015 Magento. All rights reserved.

 * See COPYING.txt for license details.

 */

\Magento\Framework\Component\ComponentRegistrar
::
register
(

\Magento\Framework\Component\ComponentRegistrar
::
THEME
,

'frontend/Mgs/mgsblank_child'
,

__DIR__

);
- Configure images
Product image sizes and other properties used on the storefront are configured in a view.xml configuration file. It is required for a theme, but is optional if exists in the parent theme.
If the product image sizes of your theme differ from those of the parent theme, or if your theme does not inherit from any theme, add view.xml using the following steps:
- Log in to your Magento server as a user with permissions to create directories and files in the Magento installation directory. (Typically, this is the the Magento file system owner.)
- Create the
etcdirectory in your theme folder - Copy
view.xmlfrom theetcdirectory of an existing theme (for example, from the Blank theme) to your theme’setcdirectory. - Configure all storefront product image sizes in
view.xml.
For details about images configuration in view.xml, see the Configure images properties for a theme topic.
- Create directories for static files
Your theme will likely contain several types of static files: styles, fonts, JavaScript and images. Each type should be stored in a separate sub-directory of web in your theme folder:
app/design/<area>/<Vendor>/<theme>/
								├── web/
								│ ├── css/
								│ │ ├── source/
								│ ├── fonts/
								│ ├── images/
								│ ├── js/
In the .../<theme>/web/images you store the general theme related static files. For example, a theme logo is stored in ...<theme>/web/images. It is likely that your theme will also contain module-specific files, which are stored in the corresponding sub-directories, like .../<theme>/<Namespace_Module>/web/css and similar. Managing the module-specific theme files is discussed in the following sections of this Guide.
- The files has to copy from parent theme to the child theme
1) Copying app\design\frontend\Mgs\{parent_theme}\Magento_Theme\templates\html\header.html and app\design\frontend\Mgs\{parent_theme}\Magento_Theme\templates\html\footer.html to app\design\frontend\Mgs\{child_theme}\Magento_Theme\templates\html\ folder
2) Copying the content of pub\media\mgs\{parent_theme}\ folder to pub\media\mgs\{child_theme}\ folder
3) Copying app\code\MGS\Mpanel\data\themes\{parent_theme}\theme_style.xml file to papp\code\MGS\Mpanel\data\themes\{child_theme}\
Note: you have to create {child_folder} folder
During theme development, when you change any files stored here, you need to clear pub/static and var/view_preprocessed directories, and then reload the pages. Otherwise the old versions of files are displayed on the storefront.
ADD NEW GOOGLE FONT
Open file Data.php on your web folder. The path:
/app/code/MGS/Fbuilder/Helper/Data.phpFind function getFonts(). This function look like:
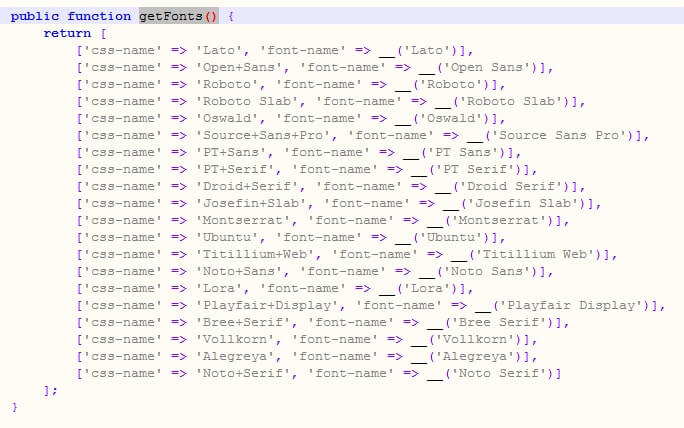
Add new row follow default font.
['css-name' => 'Font_Css_Name', 'font-name' => __('Font Name')]To get Font_Css_Name, go to https://fonts.google.com/. Choose the font you want add. This sample with font Supermercado One
Google Font returns the code <link href="https://fonts.googleapis.com/css?family=Supermercado+One" rel="stylesheet">
Look at to the link, you can see text family=Sansita. Font_Css_Name is text after character (=)
Code to add Supermercado One font:
['css-name' => 'Supermercado+One', 'font-name' => __('Supermercado One')]ADD BUILDER FOR STATIC BLOCK
Add static block in .phtml file.
In .phtml file, you can get static block with code:
<?php echo $this->getLayout()->createBlock('Magento\Cms\Block\Block')->setBlockId('static_block_identifier')->toHtml() ?>
Add static block in .xml file.
In .xml file, you can get static block with code:
<block class="Magento\Cms\Block\Block" name="block.name">
	<arguments>
		<argument name="block_id" xsi:type="string">static_block_identifier</argument>
	</arguments>
</block>
To can edit static block with MGS Front-end Builder. You must add code <argument name="enabled_builder" xsi:type="string">1</argument> as child of <arguments> tag.
Final code look like:
<block class="Magento\Cms\Block\Block" name="block.name">
	<arguments>
		<argument name="block_id" xsi:type="string">static_block_identifier</argument>
		<argument name="enabled_builder" xsi:type="string">1</argument>
	</arguments>
</block>
