1. MGS Brands
ENABLE / DISABLE MODULE
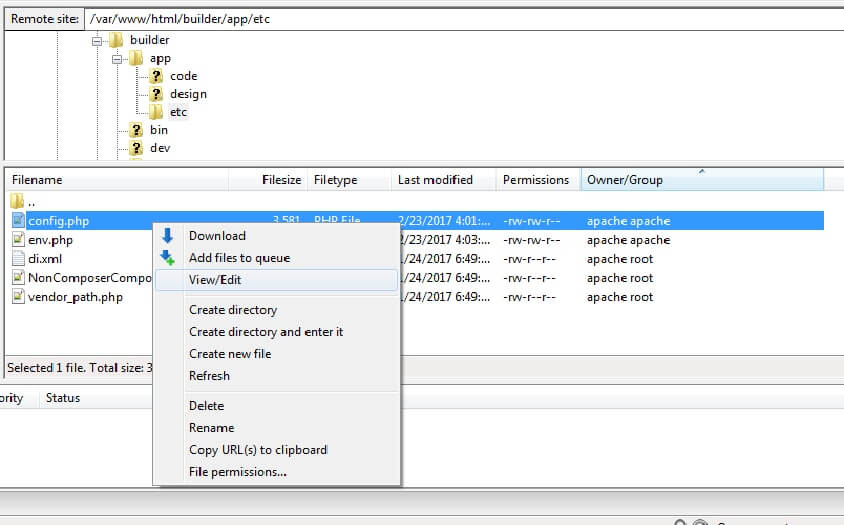
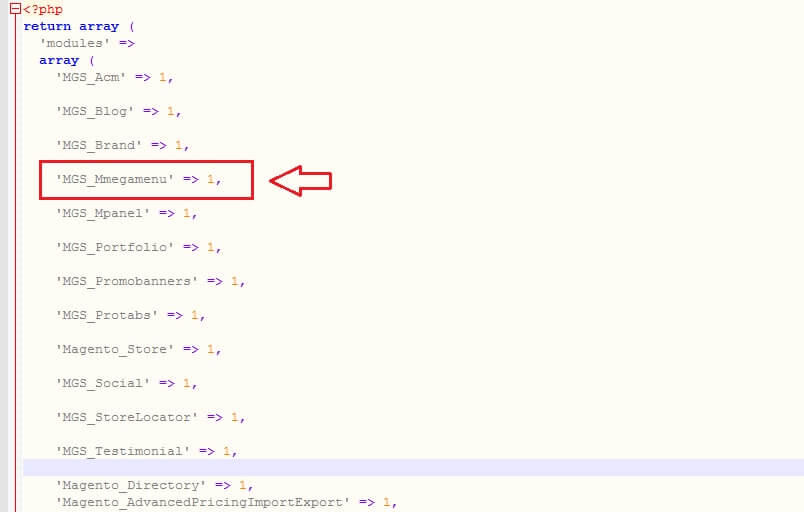
EDIT FILE CONFIG.PHP
Go to the root folder on your Web Server, open file config.php on path app/etc/config.php
Find row 'MGS_Brand' => 1, field. Edit row:
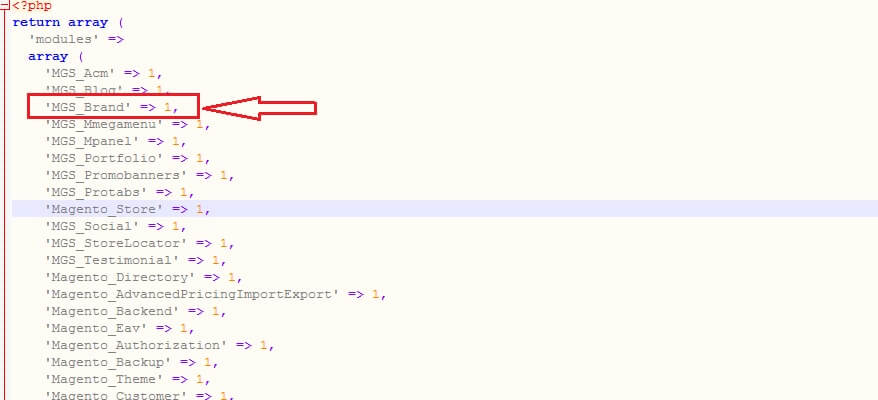
- ‘MGS_Brand’ => 1: Enable module
- ‘MGS_Brand’ => 0: Disable module
BRAND CONFIGURATION
Go to Admin -> MGS -> [Shop By Brand] Configuration
GENERAL SETTINGS
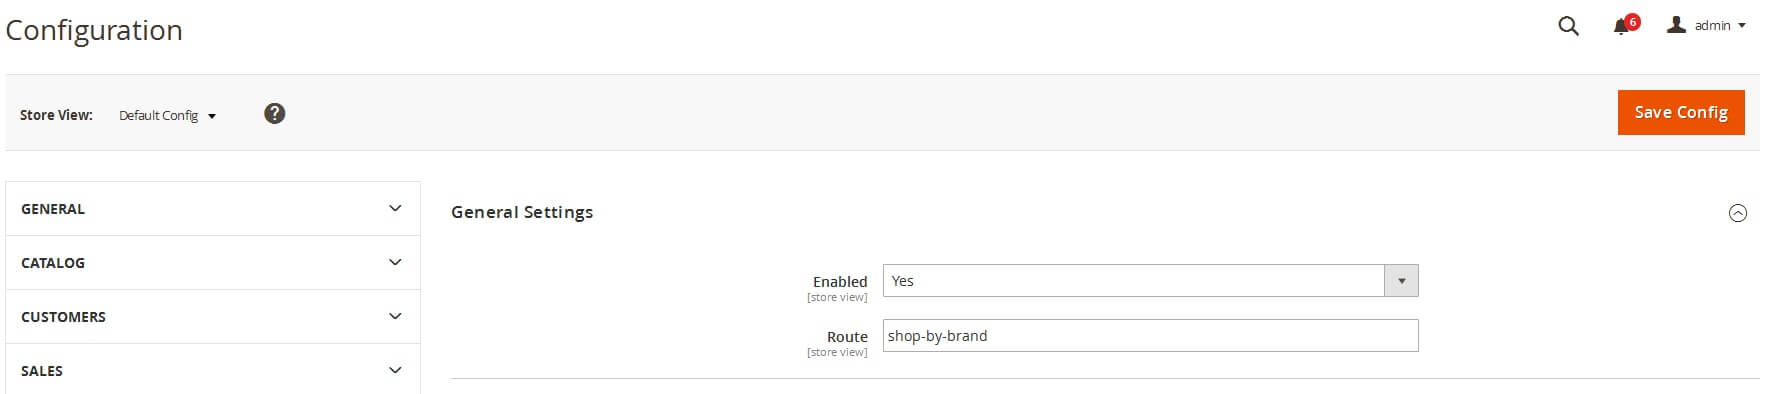
- Enable: Enabled or Disabled brand
- Route: Url of brand list page.
LIST PAGE SETTINGS
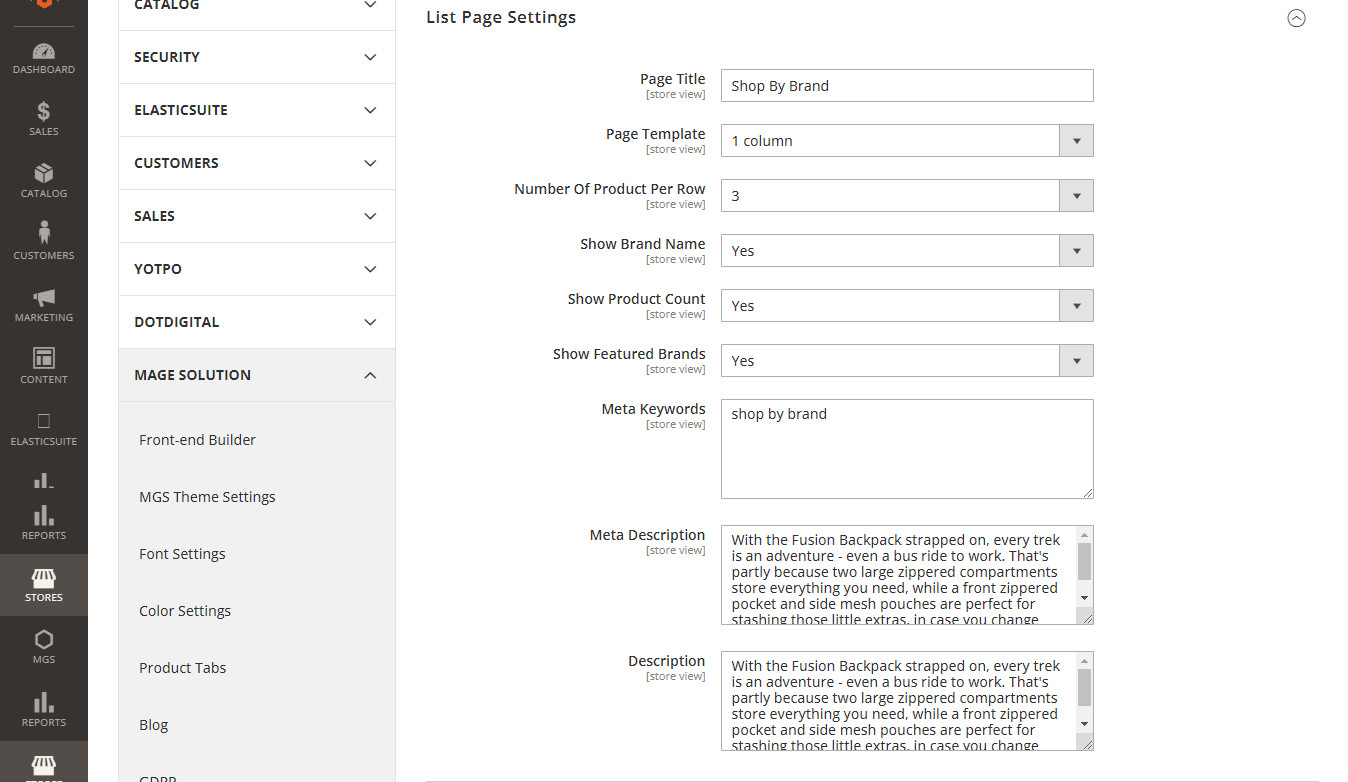
- Page Title: Enter Page Title
- Page Template: Choose page template
- Number Of Product Per Row: Set number of product per row
- Show Brand Name: Enable or Disable
- Show Product Count: Enable or Disable
- Show Featured Brands: Enable or Disable
- Meta Keywords, Meta Description, Description: Enter keywords and description of brand list
VIEW PAGE SETTINGS

- Page Template: Choose template for brand page
PRODUCT PAGE SETTINGS
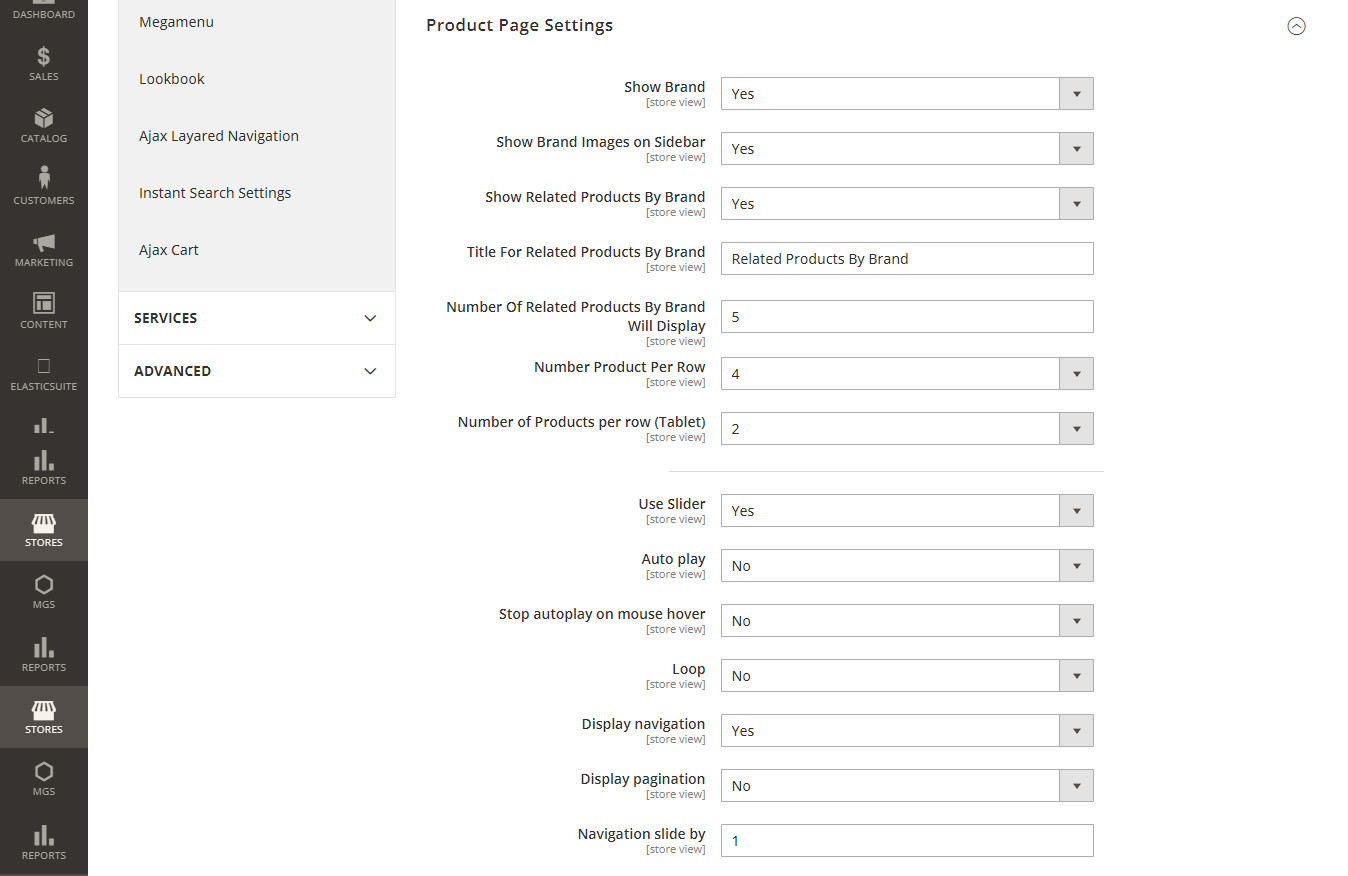
- Show Brand: Enable or Disable
- Show Brand Images on Sidebar: Enable or Disable
- Show Related Products By Brand: Enable or Disable
- Title For Related Products By Brand: Enter title of related prducts
- Number Of Related Products By Brand Will Display: Number of related products show on brand page
- Number Product Per Row: Set number of products per row (default, tablet, mobile)
- Use Slider: Enable or Disable
SIDEBAR SETTINGS
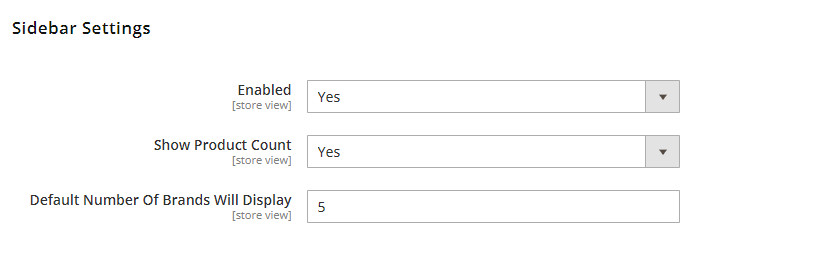
- Enable: Enabled or Disabled
- Show Product Count: Enabled or Disabled
- Default Number Of Brands Will Display: Set number of brand show on sidebar
CREATE NEW BRAND
Go to Admin -> MGS -> [Shop By Brand] Manage Brands
Click Add New Brand button.

Input brand information
General Tab

Meta Information
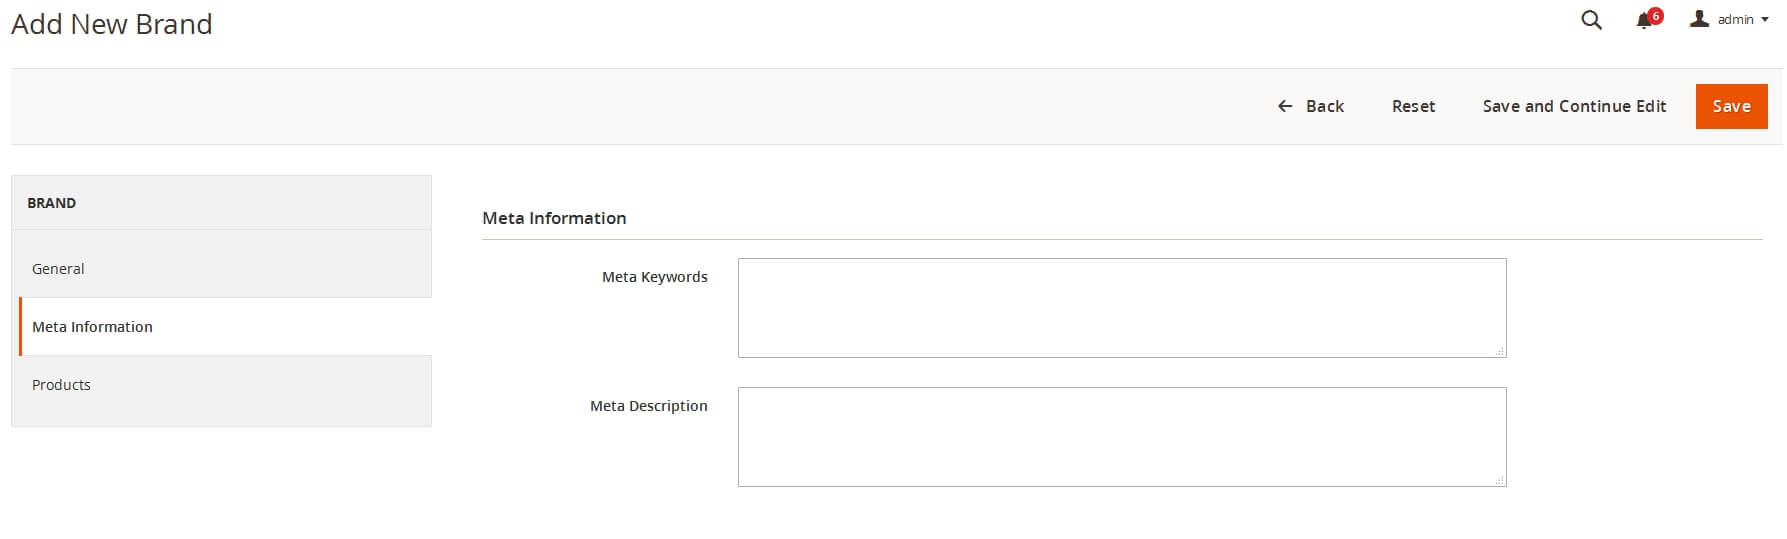
Products
Select Product to set this brand for product.
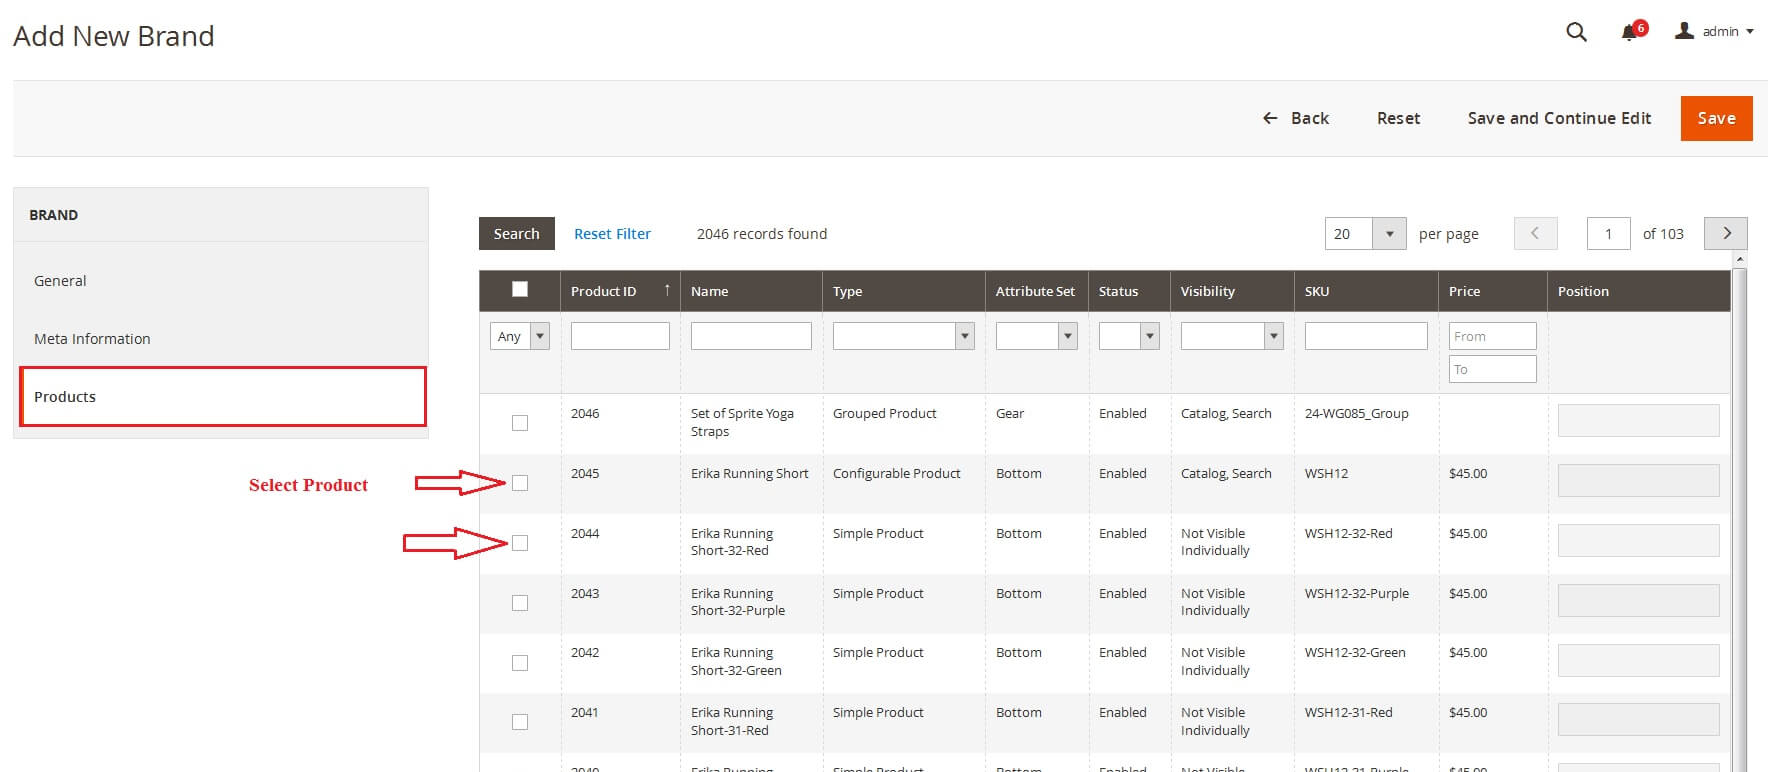
Click Save button to save this brand.
2. MGS Megamenu
ENABLE / DISABLE MODULE MGS_MEGAMENU
EDIT FILE CONFIG.PHP
Go to the root folder on your Web Server, open file config.php on path app/etc/config.php
Find row 'MGS_Megamenu' => 1, field. Edit row:
- ‘MGS_Megamenu’ => 1: Enable module
- ‘MGS_Megamenu’ => 0: Disable module
CREATE NEW MEGAMENU
Important: don’t delete default Megamenu with ID is 1, you will must use it when select “Menu” when create Megamenu Items

To add new Megamenu Item, you can go to Admin -> MGS -> Megamenu -> Manage Menu -> Click Add Menu button.

Input Menu Information
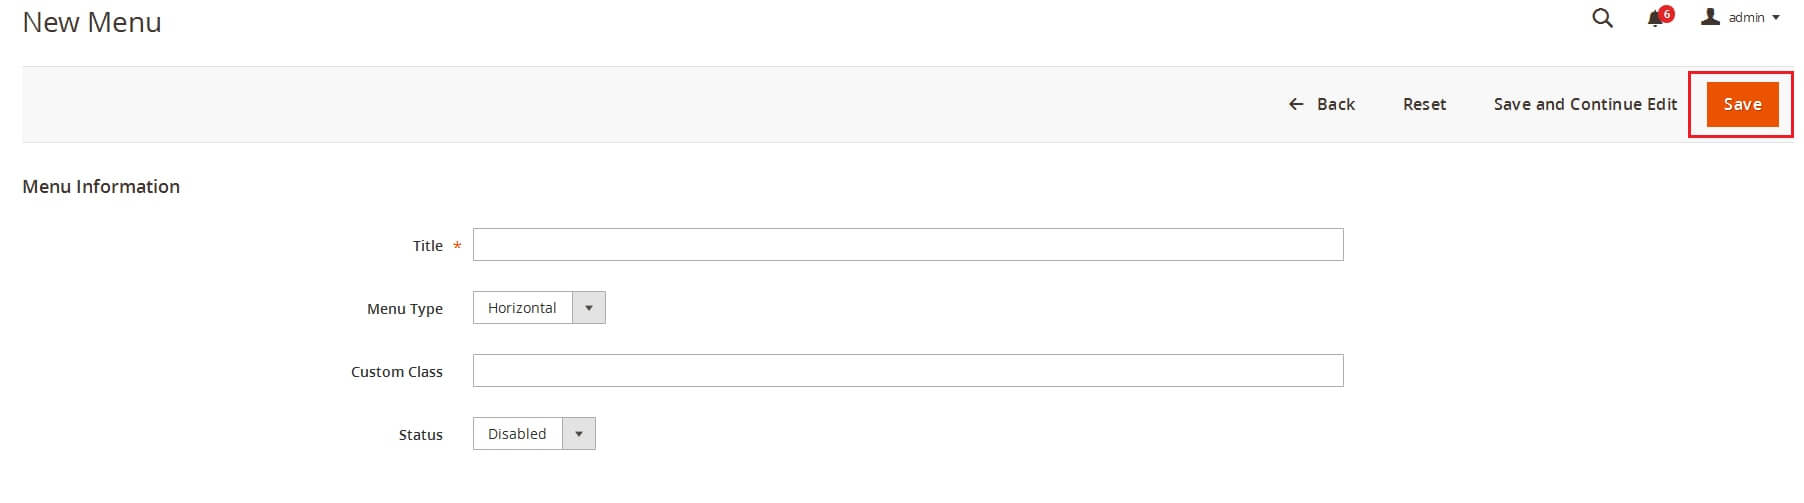
- Title
- Menu Type: Vertical menu or Horizontal menu
- Custom Class
- Status: Enabled or Disabled
Click Save button to save this menu.
CREATE MEGAMENU ITEM
To add new Megamenu Item, you can go to Admin -> MGS -> Megamenu -> Manage Megamenu Items -> Click Add Item button.
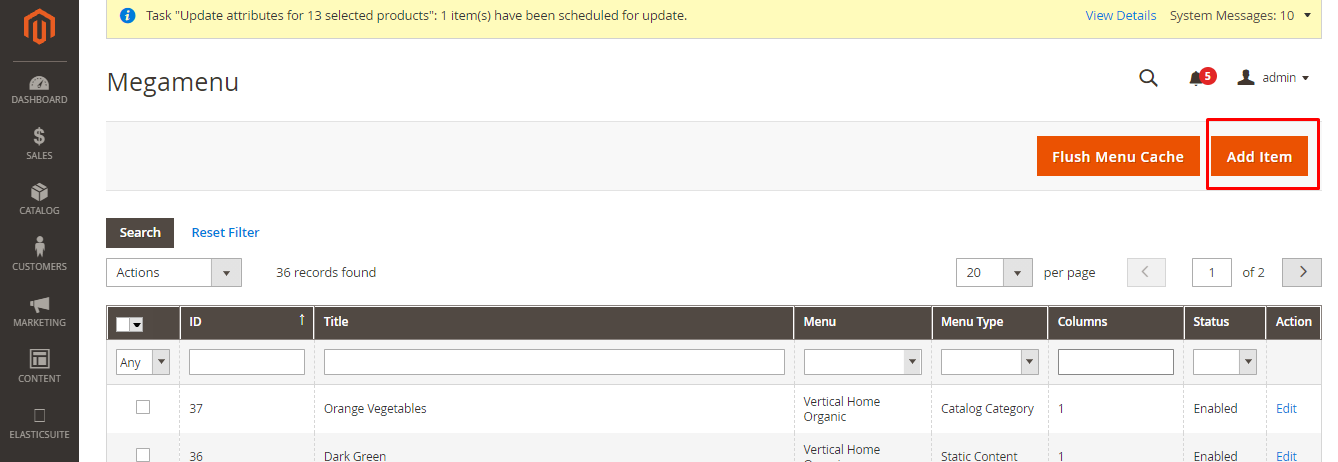
MENU ITEM INFORMATION
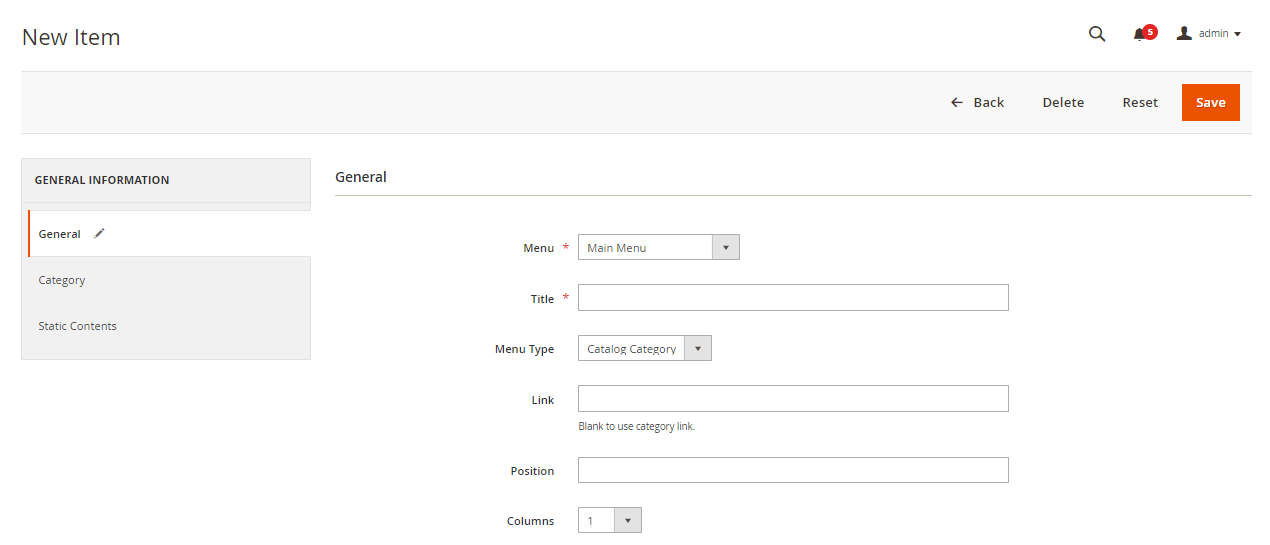
- Menu: Choose parent Megamenu
- Title: Title show on menu.
- Menu Type: You can select “Catalog Category” or “Static Content”
- Link: Url of this menu item ( please use an absolute url, for example: “your_url_site/about-us”, not only “about-us” )
- Position: Position on this menu item with other items
- Columns: Column sub menu of this.
- Custom Class: If you want add orther style for this.
- Special Html: Add label for menu item, like this http://prntscr.com/my3n5w with sameple data: <span class=”label-menu”>New</span>
Custom Setting
- Catalog Category:
- Menu Type: Catalog Category
- Categories: Choose Categories to show

- Static Contents:
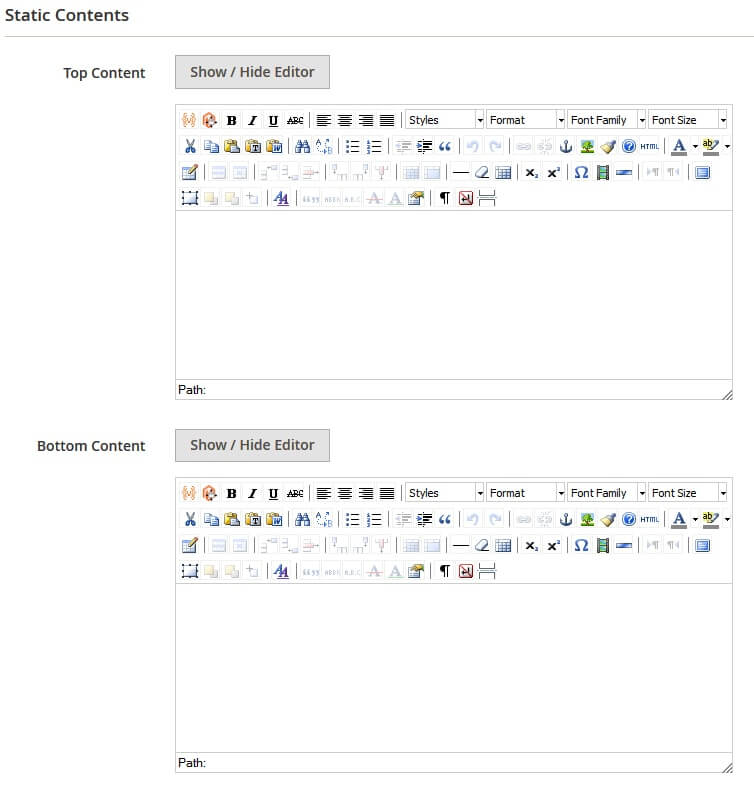
- Top Content: Content on top megamenu
- Bottom Content: Content on bottom megamenu
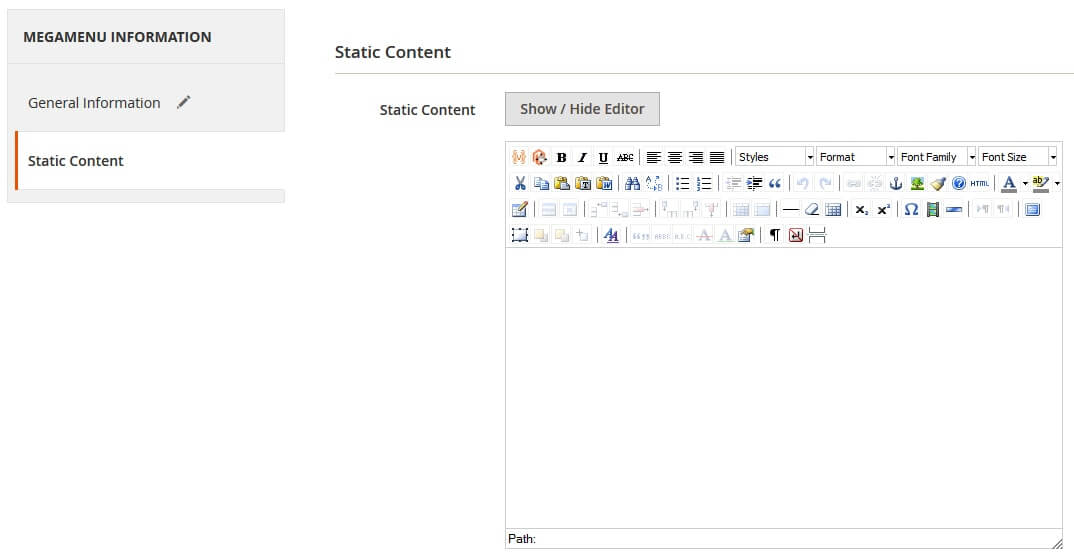
- Static Content:
- Menu Type: Static Content
- Static Contents:
To load new content Megamenu on front-end, Do not forget to Flush the cache and Flush Menu Cache after the change.
3. MGS Promo Banner
ENABLE / DISABLE MODULE MGS_PROMOBANNERS
EDIT FILE CONFIG.PHP
Go to the root folder on your Web Server, open file config.php in directory app/etc/config.php
Find row 'MGS_Promobanners' => 1, field. Edit row:
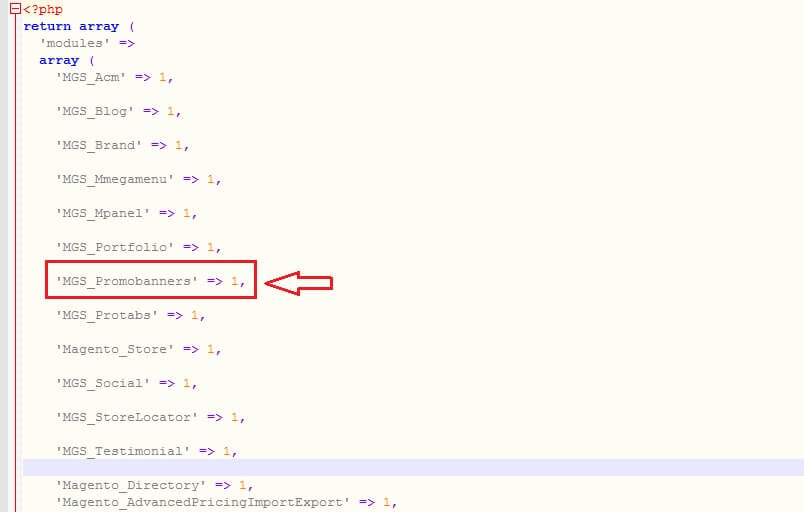
- ‘MGS_Promobanners’ => 1: Enable module
- ‘MGS_Promobanners’ => 0: Disable module
CREATE PROMO BANNER
Go to Admin -> MGS -> [Promo Banners] Manage Banners
Click Add Banner button.
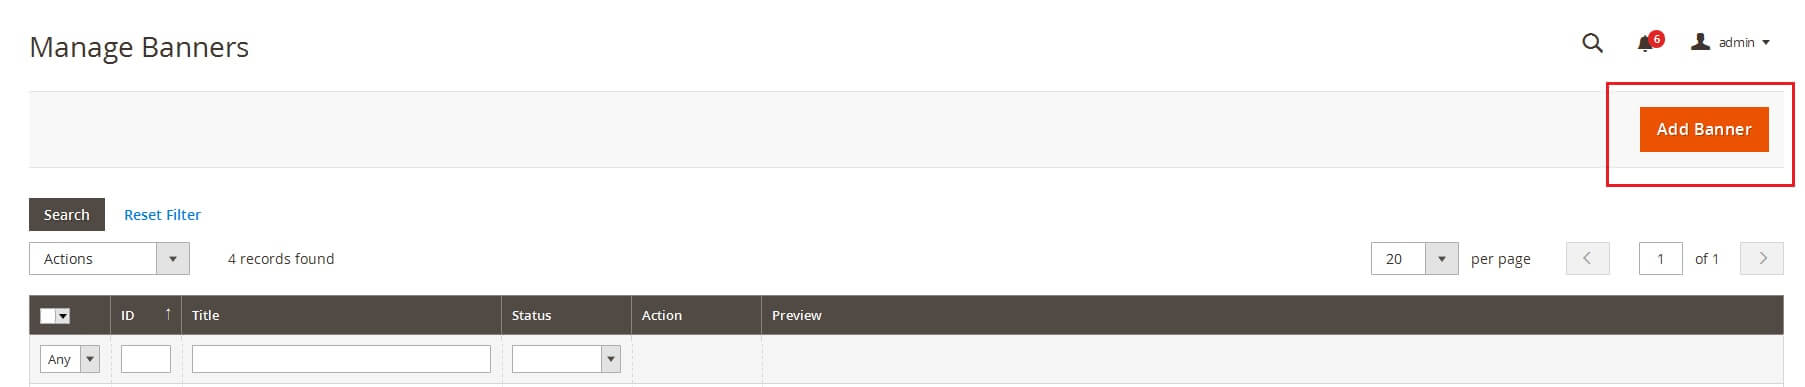
Input all Banner Information:
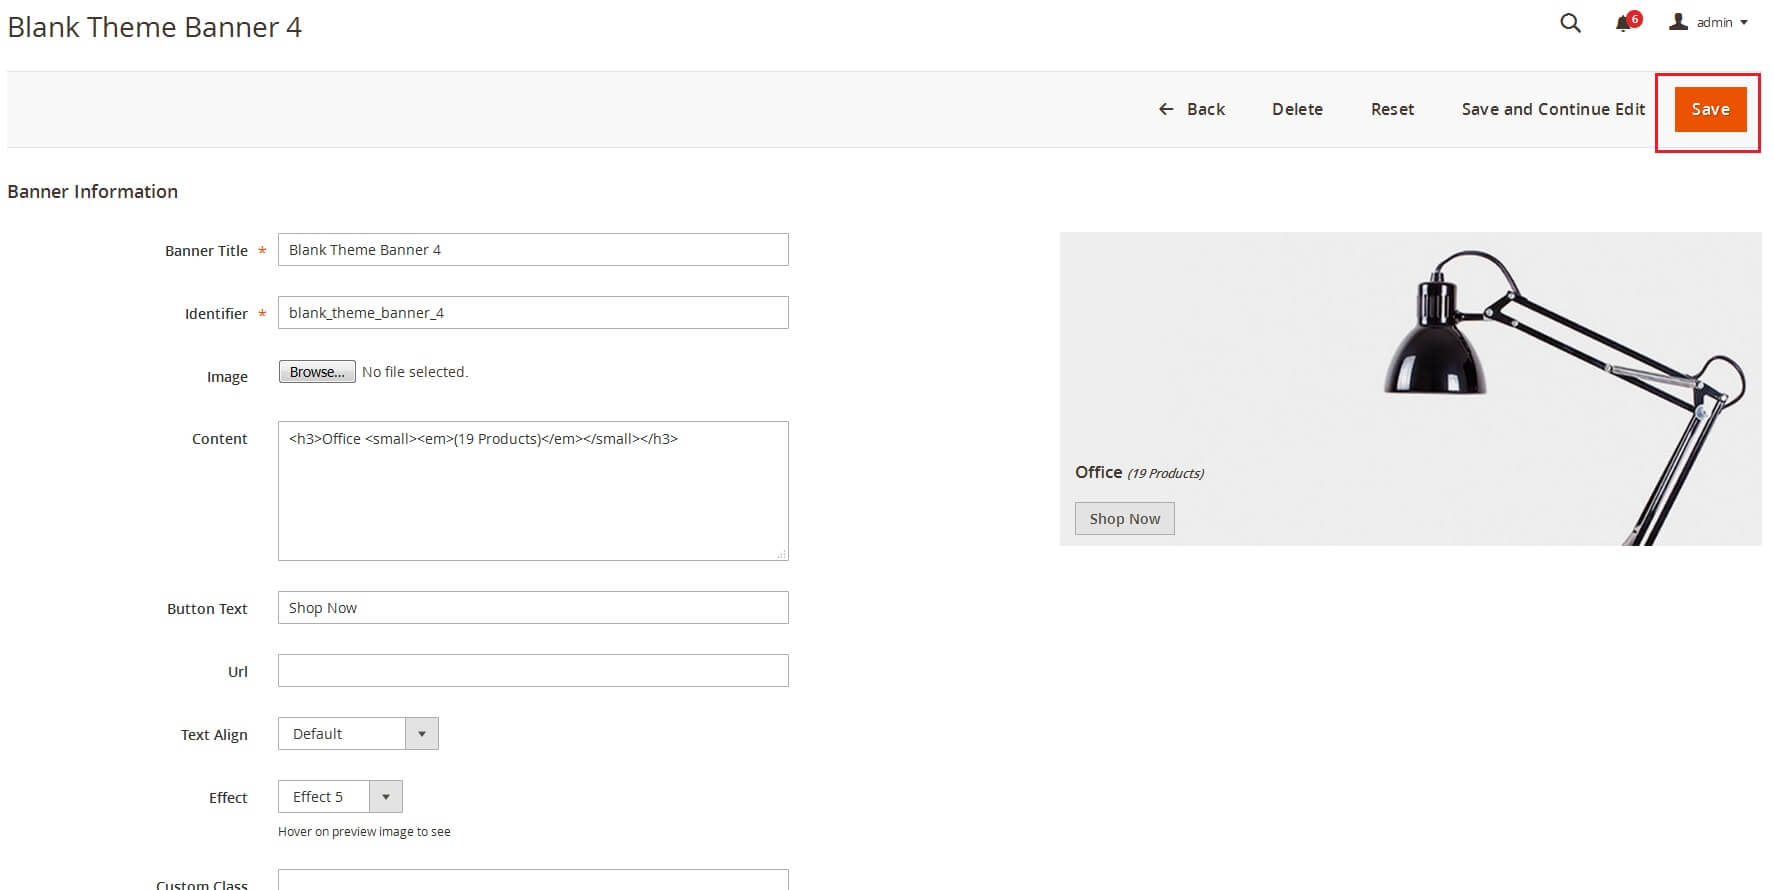
- Title
- Identifier
- Image
- Content: Html, text for banner
- Url: Link for Banner or button banner
- Text Align: Content Banner Position
- Effect: Choose effect hover for banner. MGS_Promobanners has 11 default effects
- Custom Class: Add custom class to style css for this.
- Status: Enabled or Disabled this banner
Click Save button to finish creating new banner.
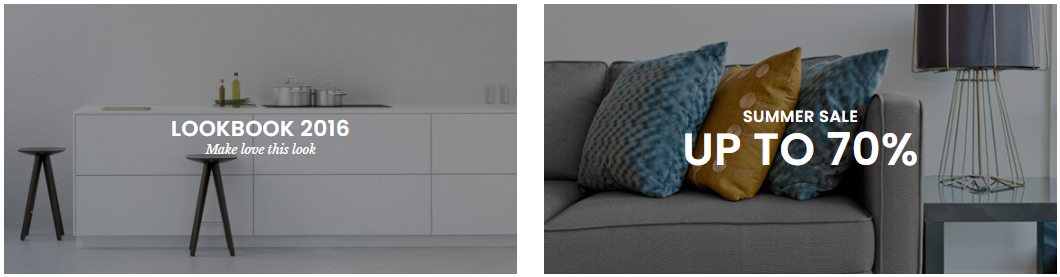
PROMO BANNER BLOCK
If you imported a sample homepage and had some sample promo banners, you only need to enable the builder then edit directly on the frontend.
Demo
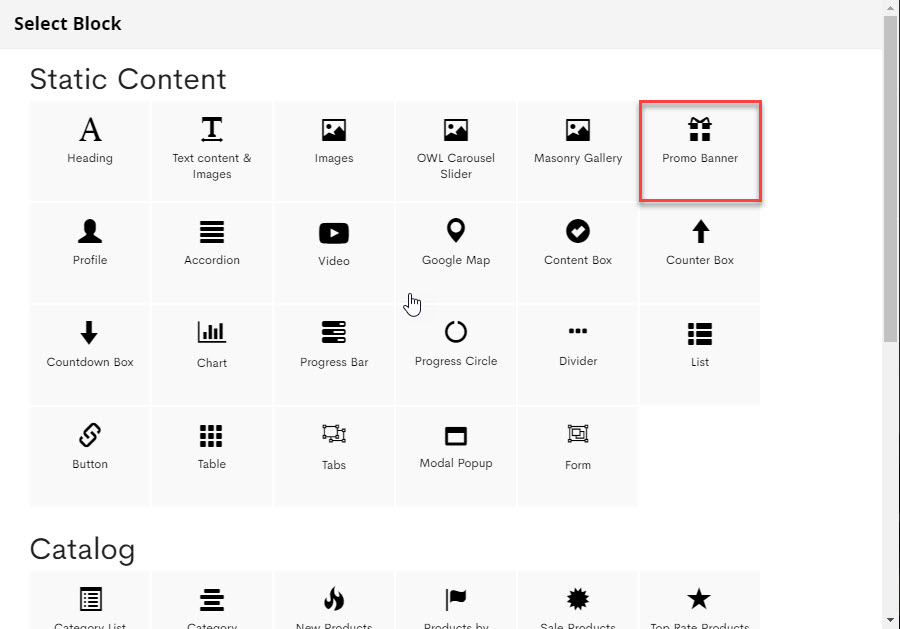
On Home page builder, click Add New Block button.

On popup list blocks, click "Promo Banner" item.
BANNER CONFIG TAB
GENERAL
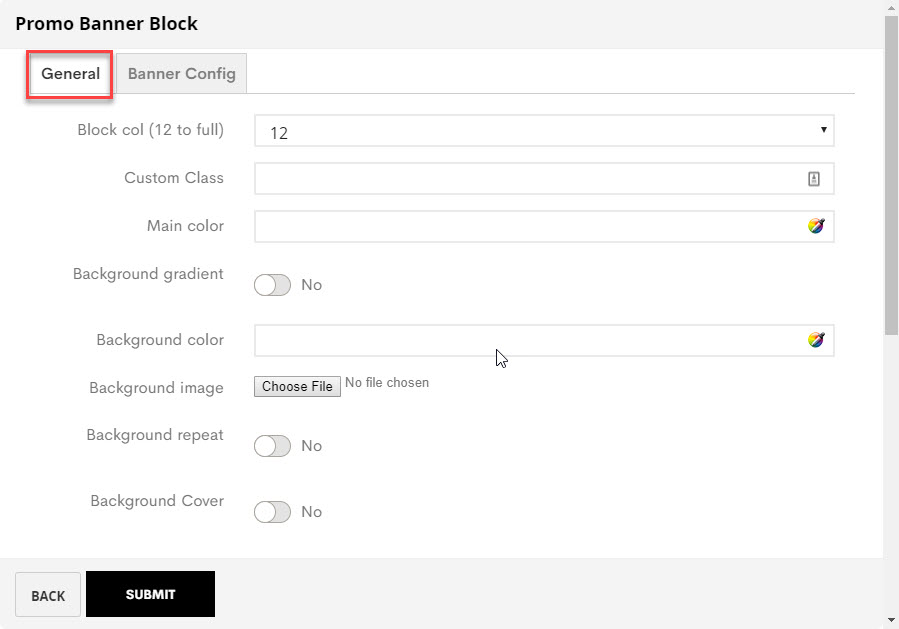
Here you can set some general options for your banner as general color, background color or image and some other settings, just select and experient
BANNER CONFIG

Here you can upload banner image, set url when you click on the banner, add text to banner, add button, adjust text's position, color of button,....
After configuring your banner is completed, just click Submit button to save your banner
4. MGS Blog
ENABLE / DISABLE MODULE MGS_BLOG
EDIT FILE CONFIG.PHP
Go to the root folder on your Web Server, open file config.php on path app/etc/config.php
Find row 'MGS_Blog' => 1, field. Edit row:
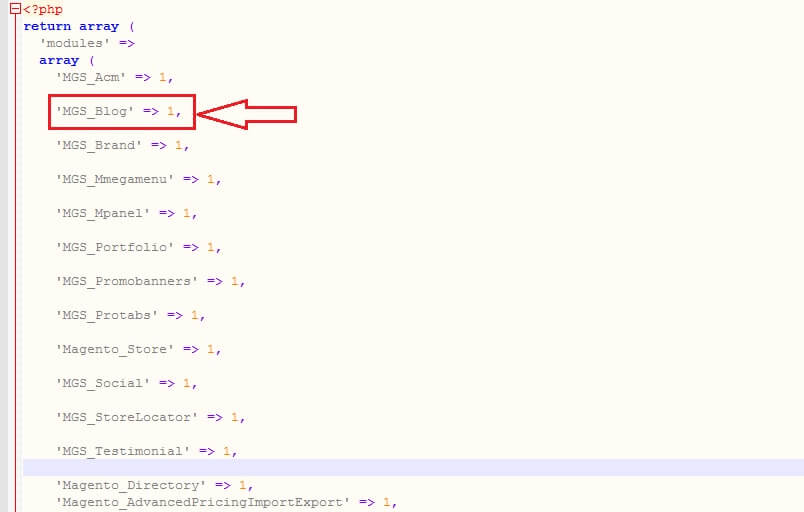
- ‘MGS_Blog’ => 1: Enable module
- ‘MGS_Blog’ => 0: Disable module
BLOG CONFIGURATION
Go to Admin -> MGS -> [Blog] Configuration
GENERAL SETTINGS
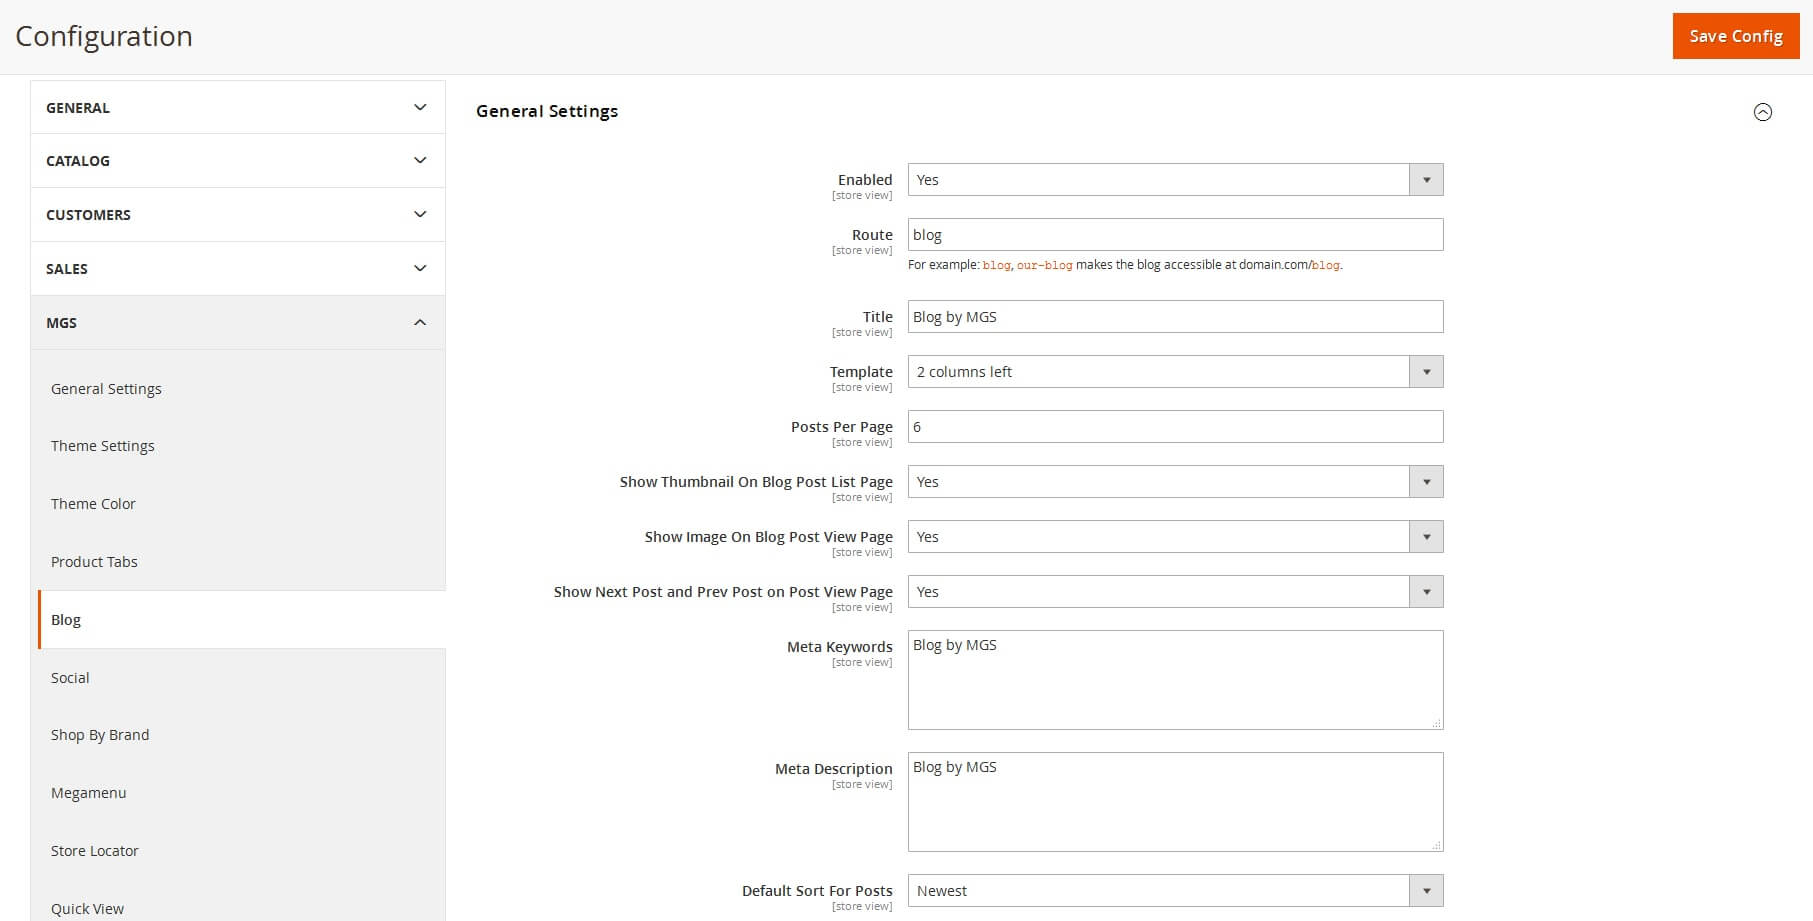
- Enabled: Enable blog
- Route: path for url blog page.
- Title: Title of blog page.
- Template: 1 column, 2 columns left, 2 columns right, 3 columns for blog page.
- Posts Per Page: Set limit post for list post page (Blog page,blog category page, blog tag page)
- Show Thumbnail On Blog Post List Page
- Show Image On Blog Post View Page
- Show Next Post and Prev Post on Post View Page
- Meta Keywords
- Meta Description
- Default Sort For Posts: Sorting post on list page by this value
SIDEBAR SETTINGS
Blog Sidebar Settings
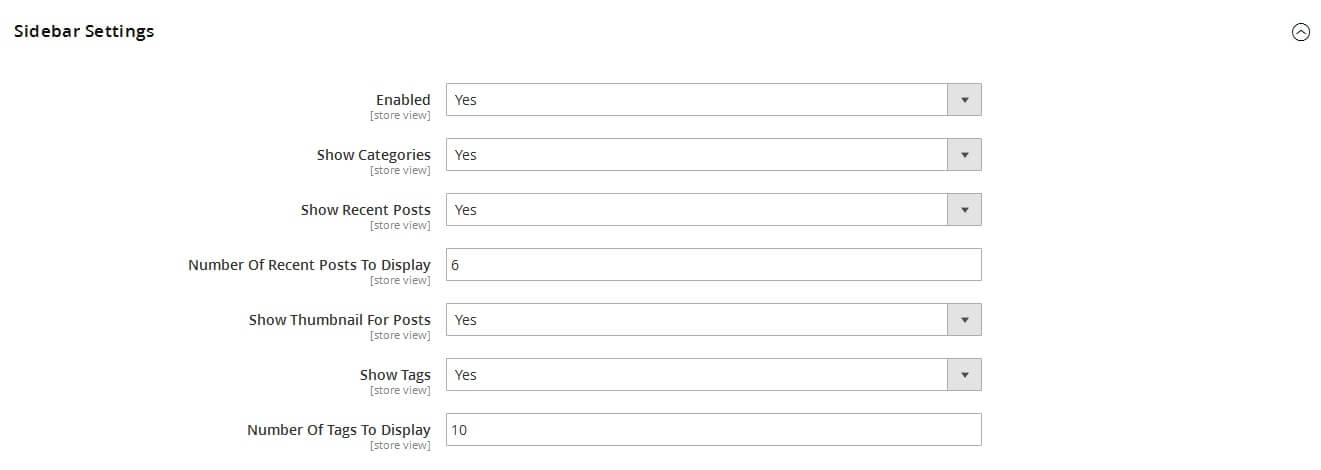
- Enabled: Enable sidebar blog block
- Show Categories: Show list categories on sidebar (Yes/No)
- Show Recent Posts: Show recent posts on sidebar (Yes/No)
- Number Of Recent Posts To Display
- Show Thumbnail For Posts: Thumbnail for recent post
- Show Tags: Show tags on sidebar (Yes/No)
- Number Of Tags To Display
COMMENT SETTINGS
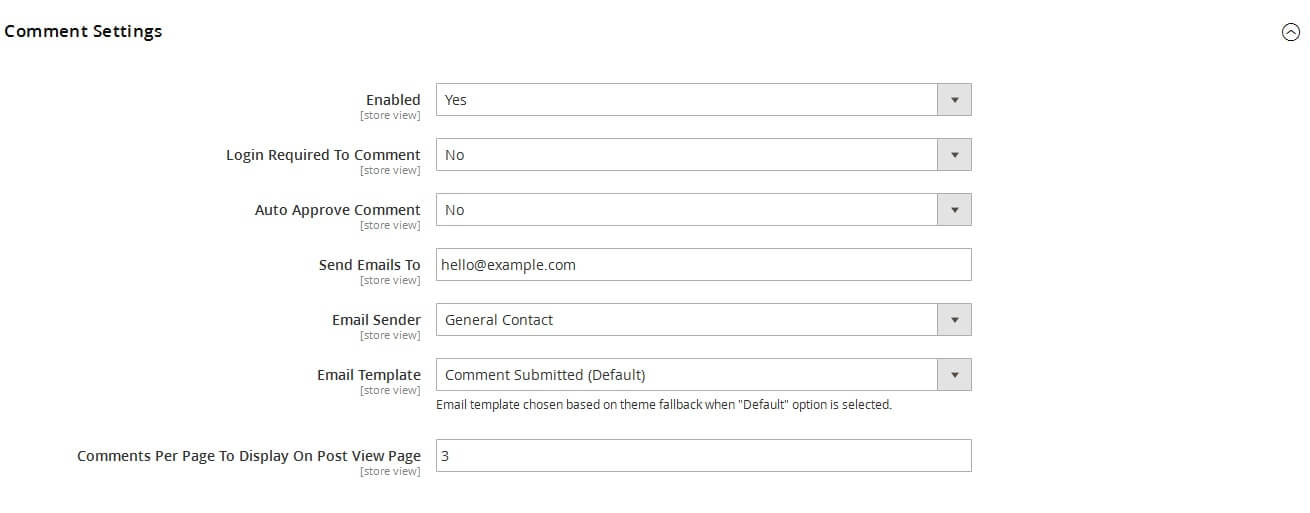
- Enabled: Enable comment for blog
- Login Required to Comment: Disable guest comment
- Auto Approve Comment
- Send Emails to: Send email to administrator when customer comment
- Email Sender: Choose Email Addresses to send mail.You can go to
ADMIN -> Configuration -> [General] Store Email Addressesto config email sender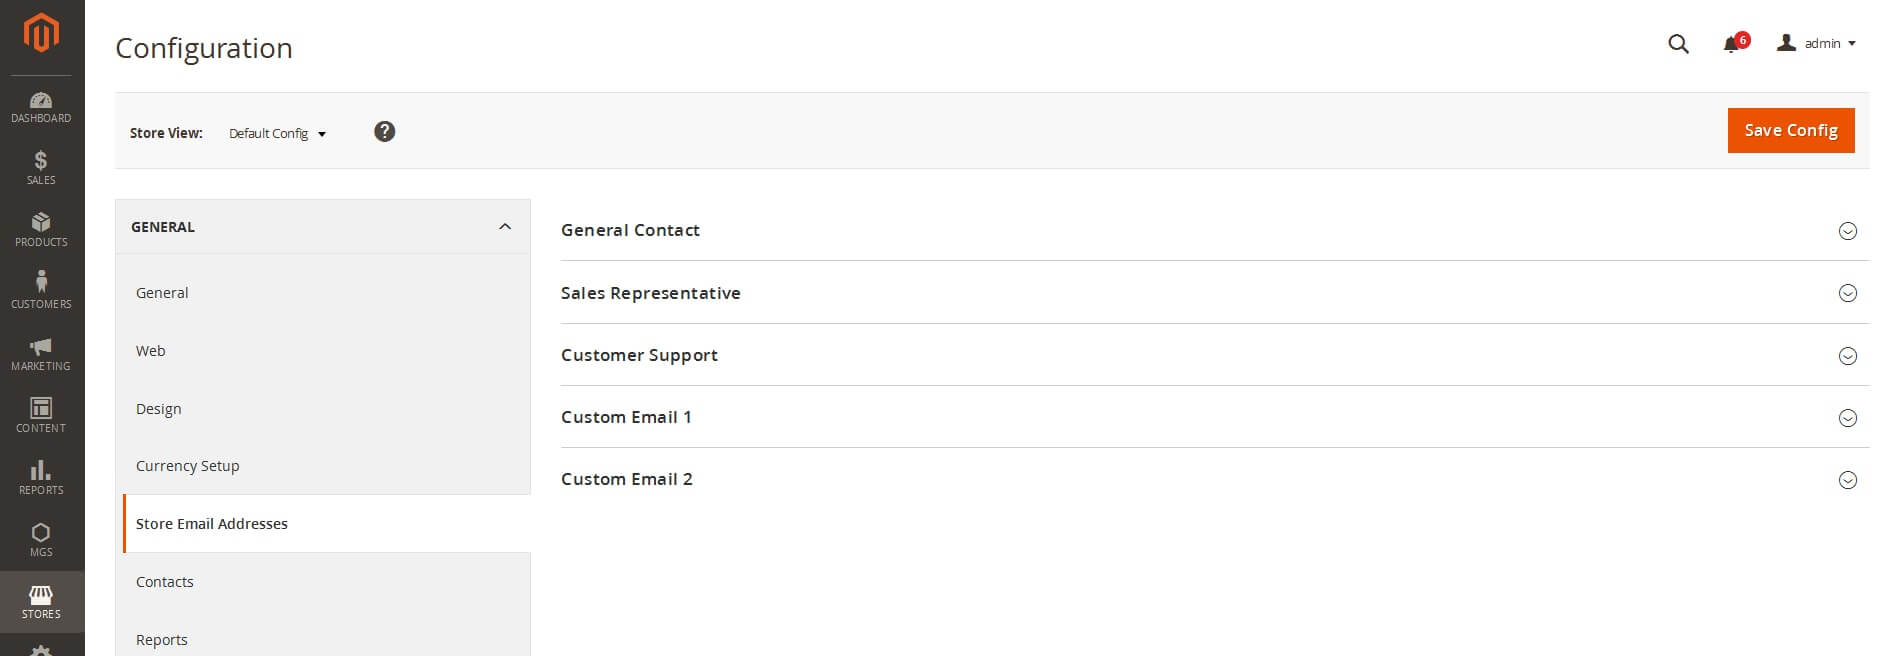
- Emails Template
- Comments Per Page To Display On Post View Page: Number of comments show first and number of comments show on next load more comment.
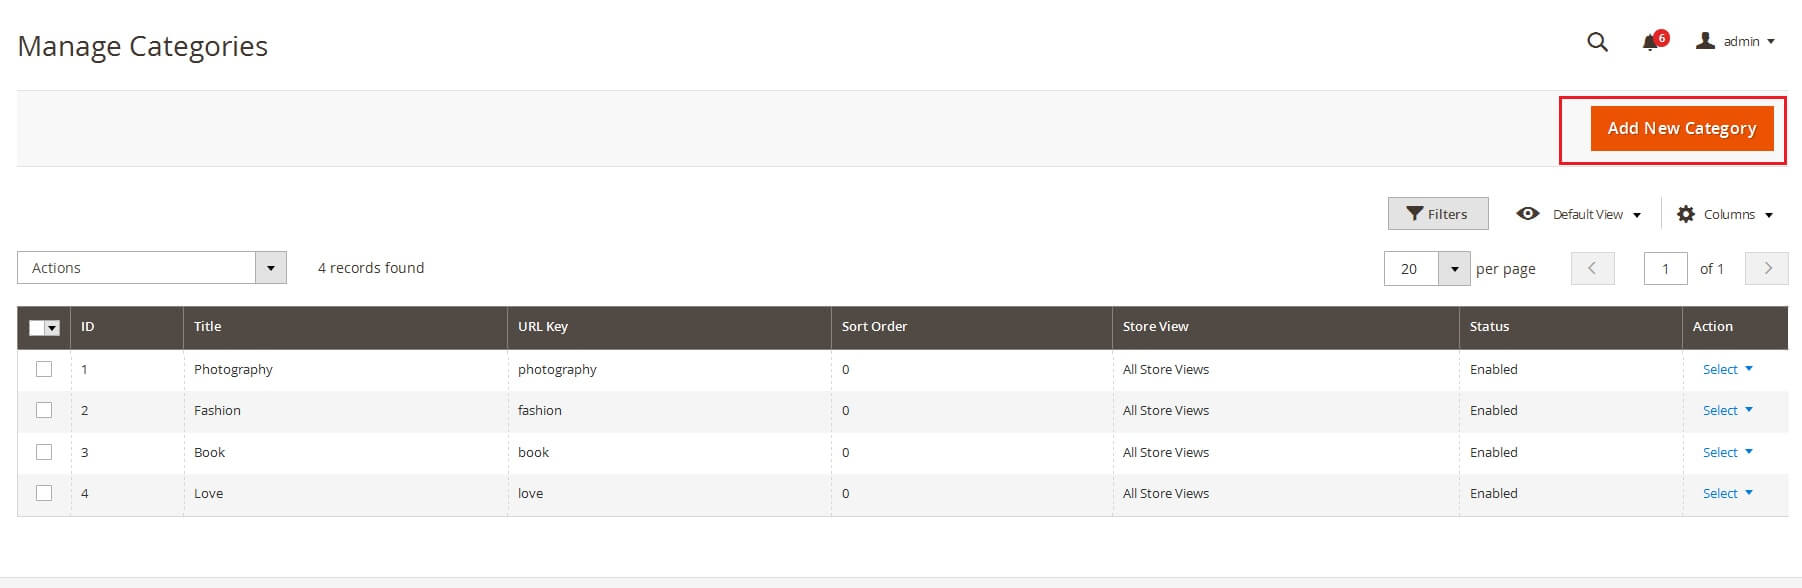
CREATE BLOG CATEGORY
Go to Admin -> MGS -> [Blog] Manage Categories
Click Add New Category button.
Input Category Information
- General Tab

- Title: This blog category name
- URL Key: You can config url key for blog category page. If blank this field, url key wull be auto created from category title.
- Store View: Store view to enable this blog category
- Status: Enabled or Disabled
- Sort Order: This blog category position
- Meta Information Tab
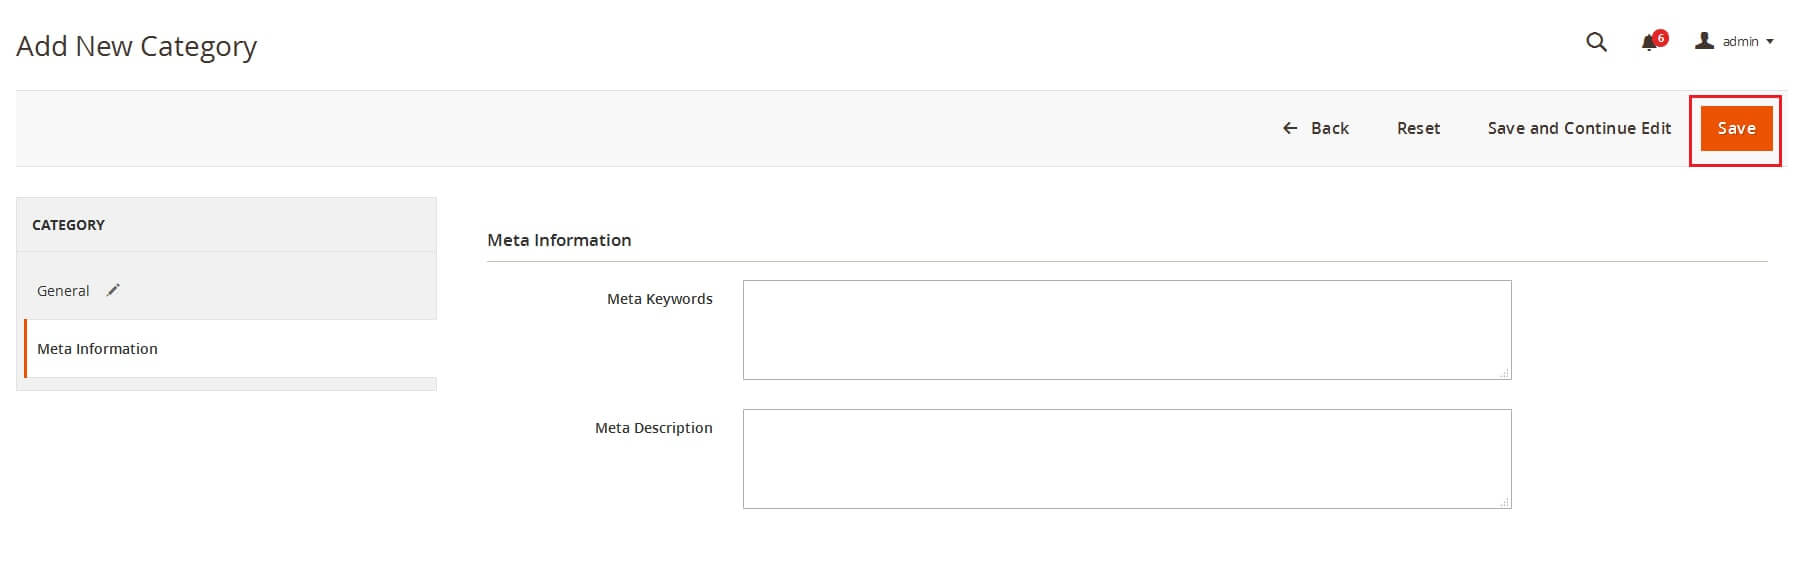
- You can config Meta Keywords, Meta Description for blog category page.
- Click Save button to save blog category
CREATE BLOG ITEM
Go to Admin -> MGS -> [Blog] Manage Post
Click Add New Post button.

Input Post Information
- General Tab
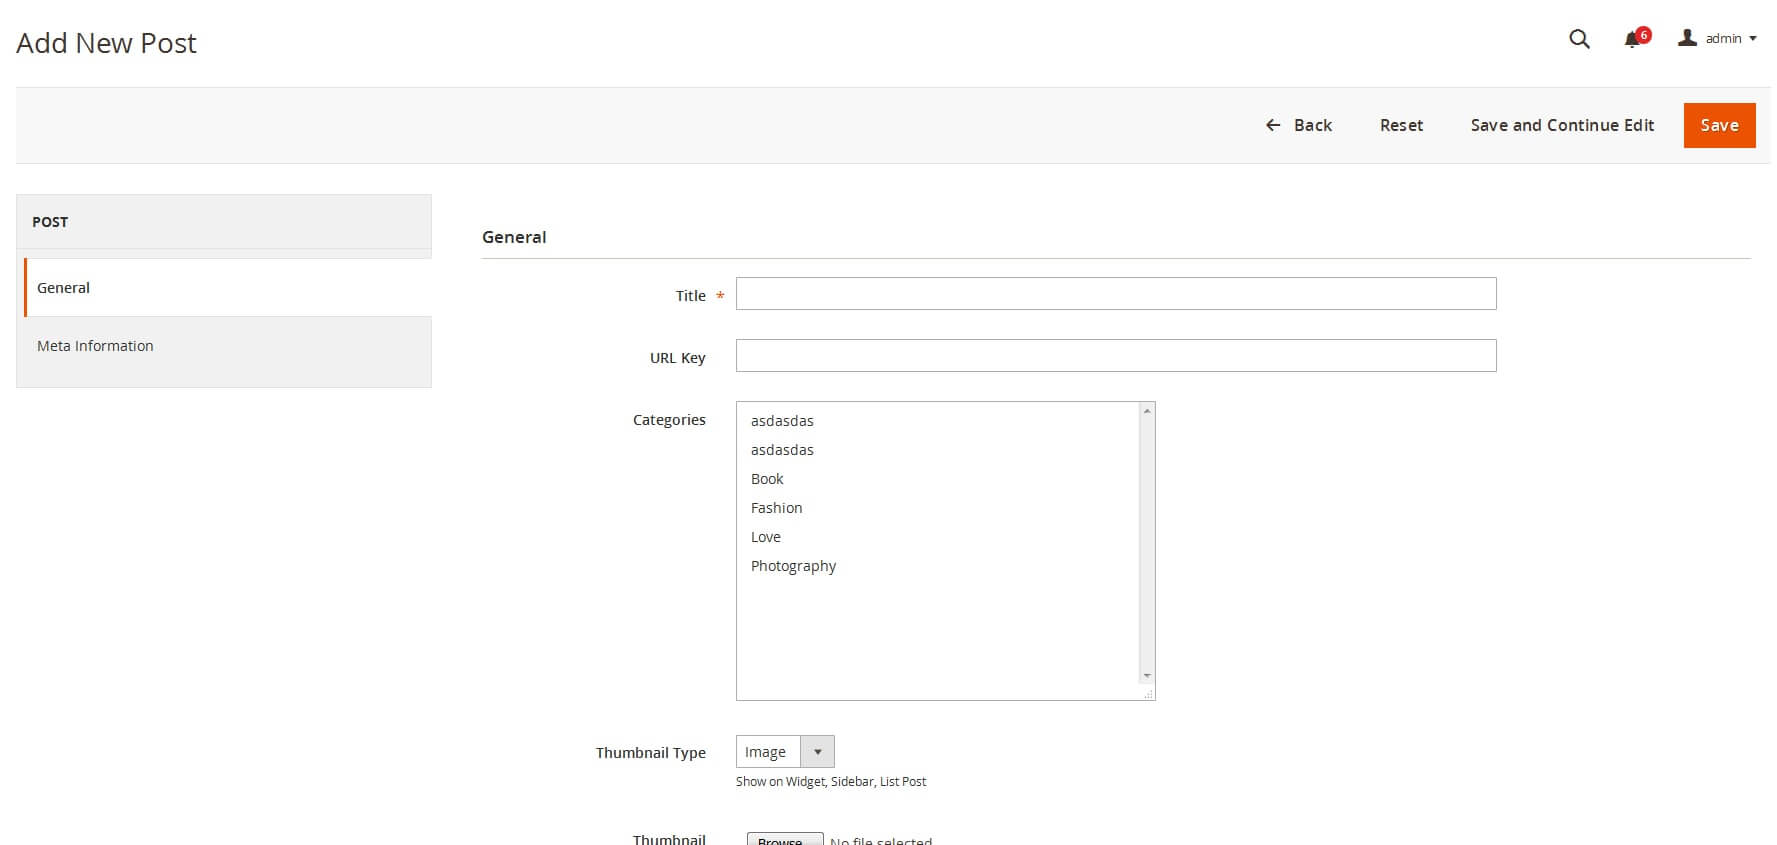
- Title: This blog name
- URL Key: You can config url key for this blog detail page. If blank this field, url key will be auto created from blog title.
- Thumbnail Type: You can use image or video for thumbnail blog. Thumbnail of blog can show on recent post sidebar, blog widget, blog list page.
- Thumbnail Type is Images
 Browse image from your computer to field Thumbnail
 - Thumbnail Type is Video

- Video Thumbnail Type: You can use Youtube or Vimeo video
- Video Thumbnail Id: Input video id
- YoutubeLink: https://www.youtube.com/watch?v=BBvsB5PcitQVideoID: BBvsB5PcitQ
- VimeoLink: https://vimeo.com/145947876VideoID: 145947876
- Thumbnail Type is Images
- Image Type: You can use image or video for base image/video blog. Base image/video of blog show on blog detail page.
- Image Type is Images
 Browse image from your computer to field Thumbnail
 - ThumImagebnail Type is Video
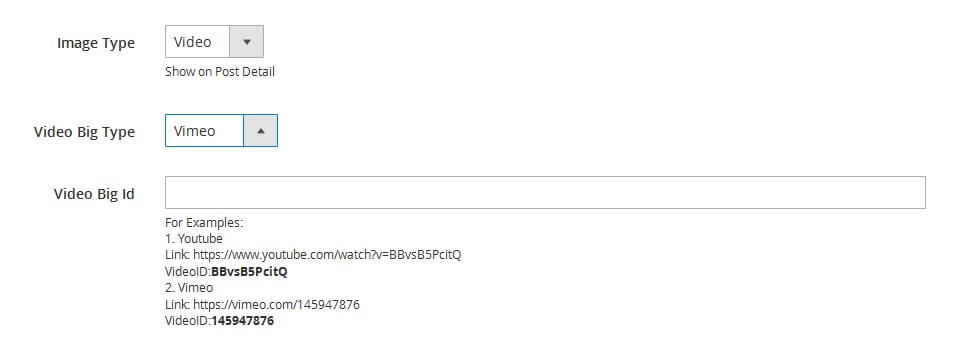
- Video Thumbnail Type: You can use Youtube or Vimeo video
- Video Thumbnail Id: Input video id
- YoutubeLink: https://www.youtube.com/watch?v=BBvsB5PcitQVideoID: BBvsB5PcitQ
- VimeoLink: https://vimeo.com/145947876VideoID: 145947876
- Image Type is Images
- Categories: Set parent categories for this blog.
- Short content: Short content of blog can show on blog widget, blog list page.
- Content: Content of blog can show on blog detail page.
- Store View: Store view to enable this blog category
- Status: Enabled or Disabled
- Tags: Use (,) to separate tags
- Meta Information Tab
 You can config Meta Keywords, Meta Description for this blog detail page.
 - Click Save button to save this post.
MANAGE COMMENT BLOCK
Go to Admin -> MGS -> [Blog] Manage Comments
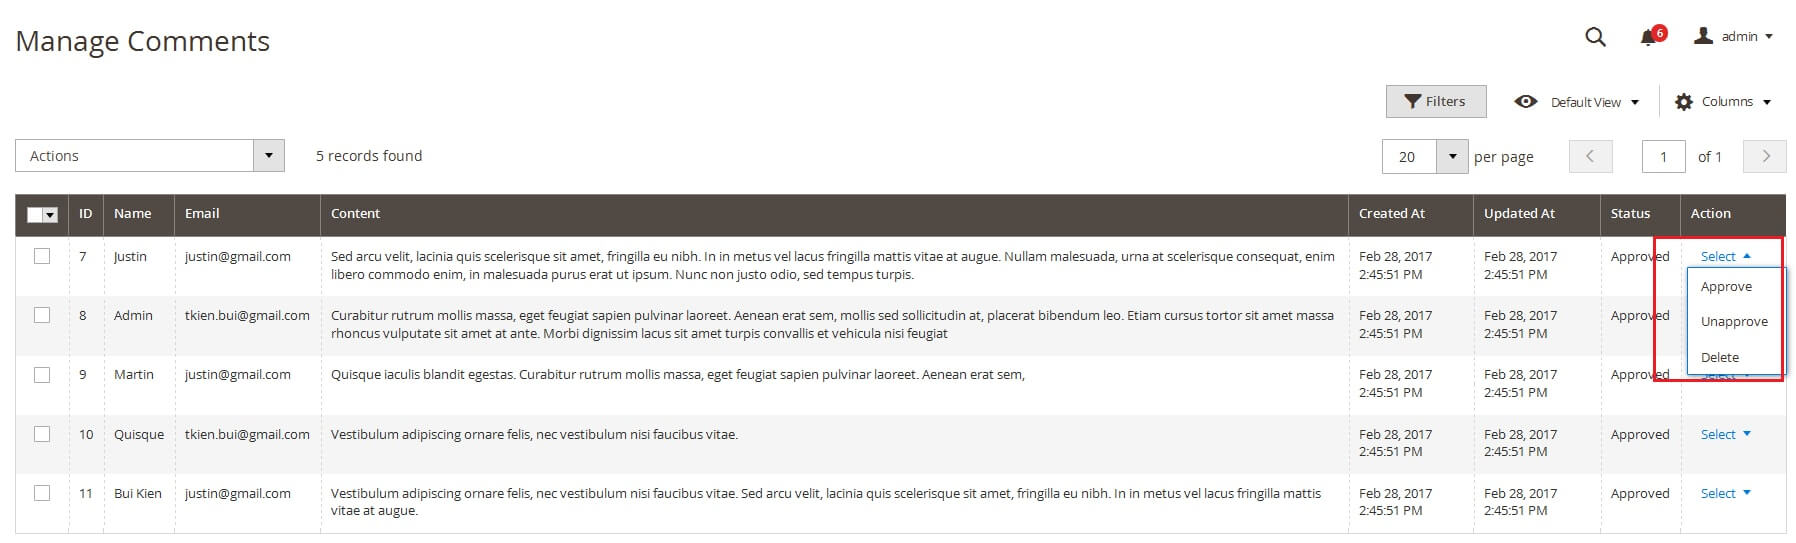
You can Approve, Unapprove, Delete customer comment on this page.
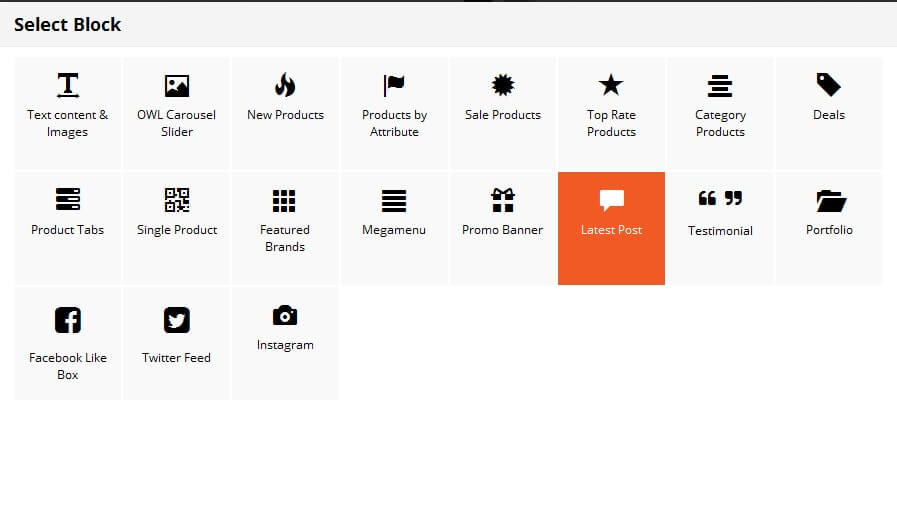
LATEST POSTS BLOCK
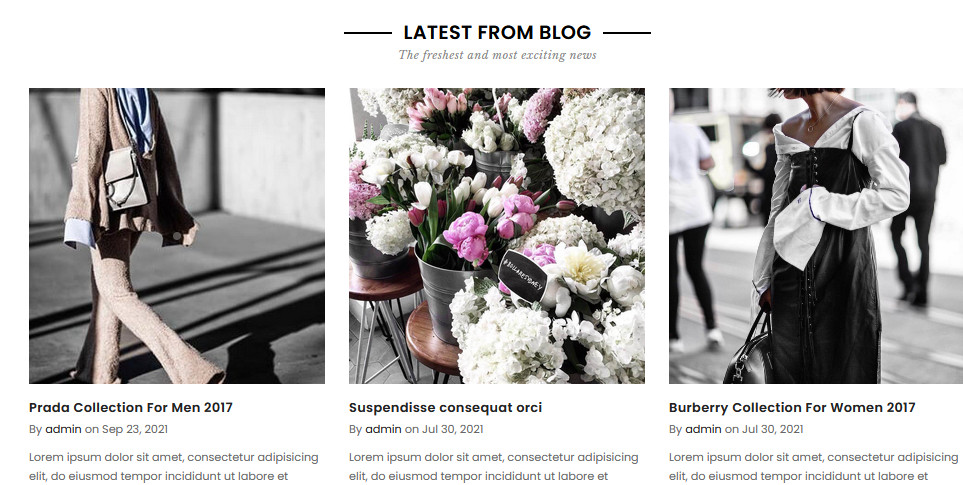
On Home page builder, click Add New Block button.
On popup list blocks, click “Latest Post” item.
BLOG CONFIG TAB
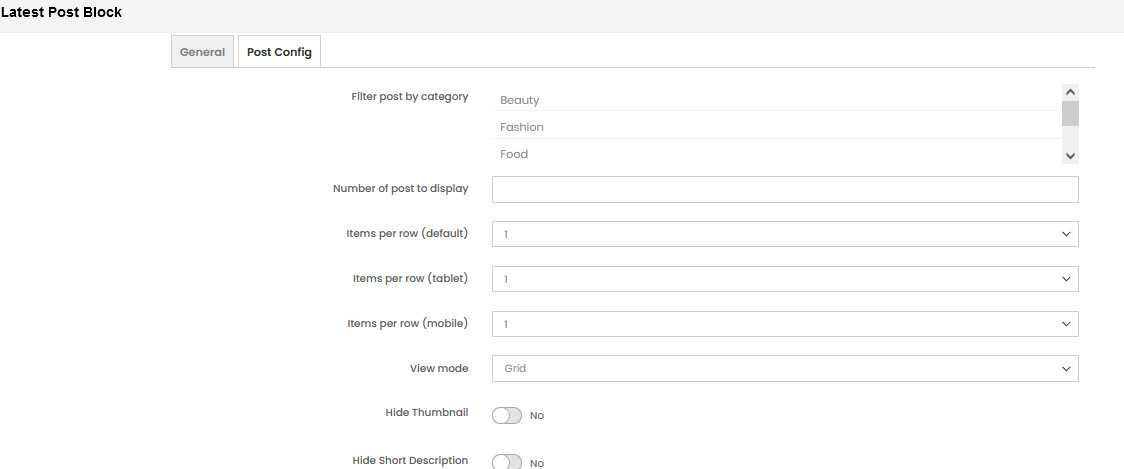
- Number of posts to display
- Items per row
- View mode
- Filter post by category: Choose category post
- Grid:
- List:
- Hide Thumbnail
- Hide Short Description
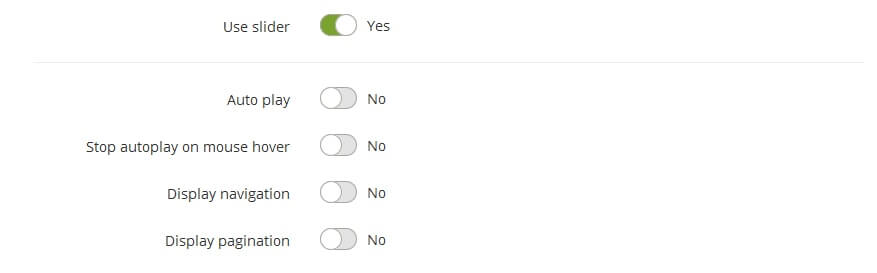
- User Slider: add owl carousel for blog block.If you use slider, you can see more config to owl slider:
- Auto play
- Stop autoplay on mouse hover
- Display navigation
- Display pagination
5. MGS Testimonial
ENABLE / DISABLE MODULE MGS_TESTIMONIAL
EDIT FILE CONFIG.PHP
Go to the root folder on your Web Server, open file config.php on path app/etc/config.php
Find row 'MGS_Testimonial' => 1, field. Edit row:
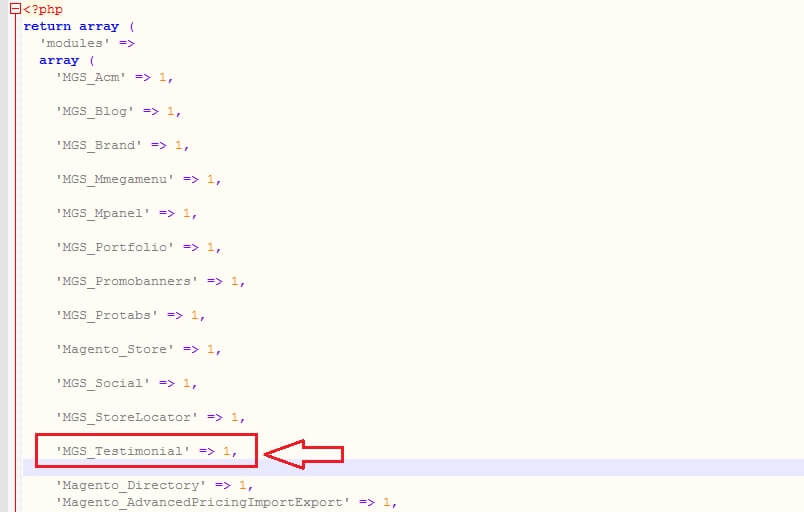
- ‘MGS_Testimonial’ => 1: Enable module
- ‘MGS_Testimonial’ => 0: Disable module
CREATE TESTIMONIAL
Go to MGS -> [Testimonial] Manage Items
Click Add Item button.
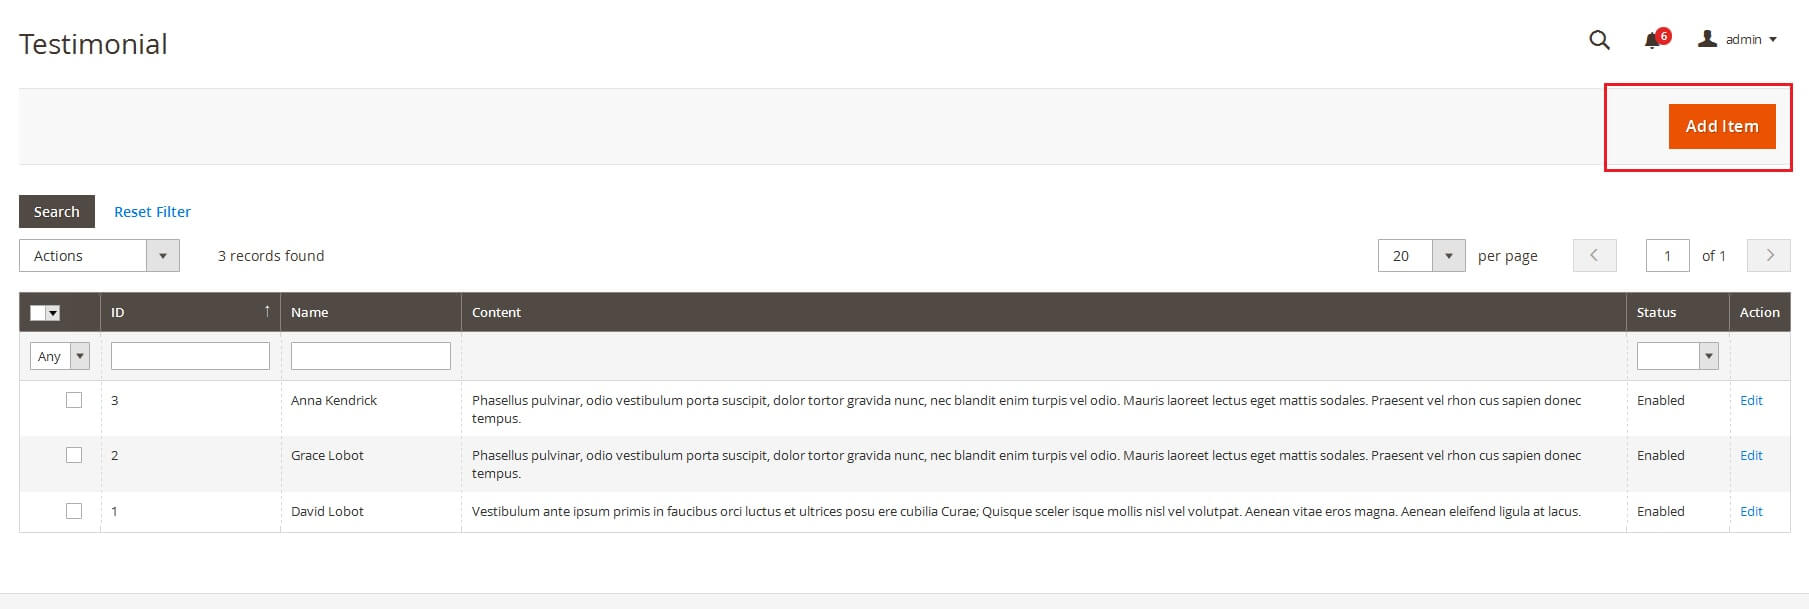
Input testimonial information
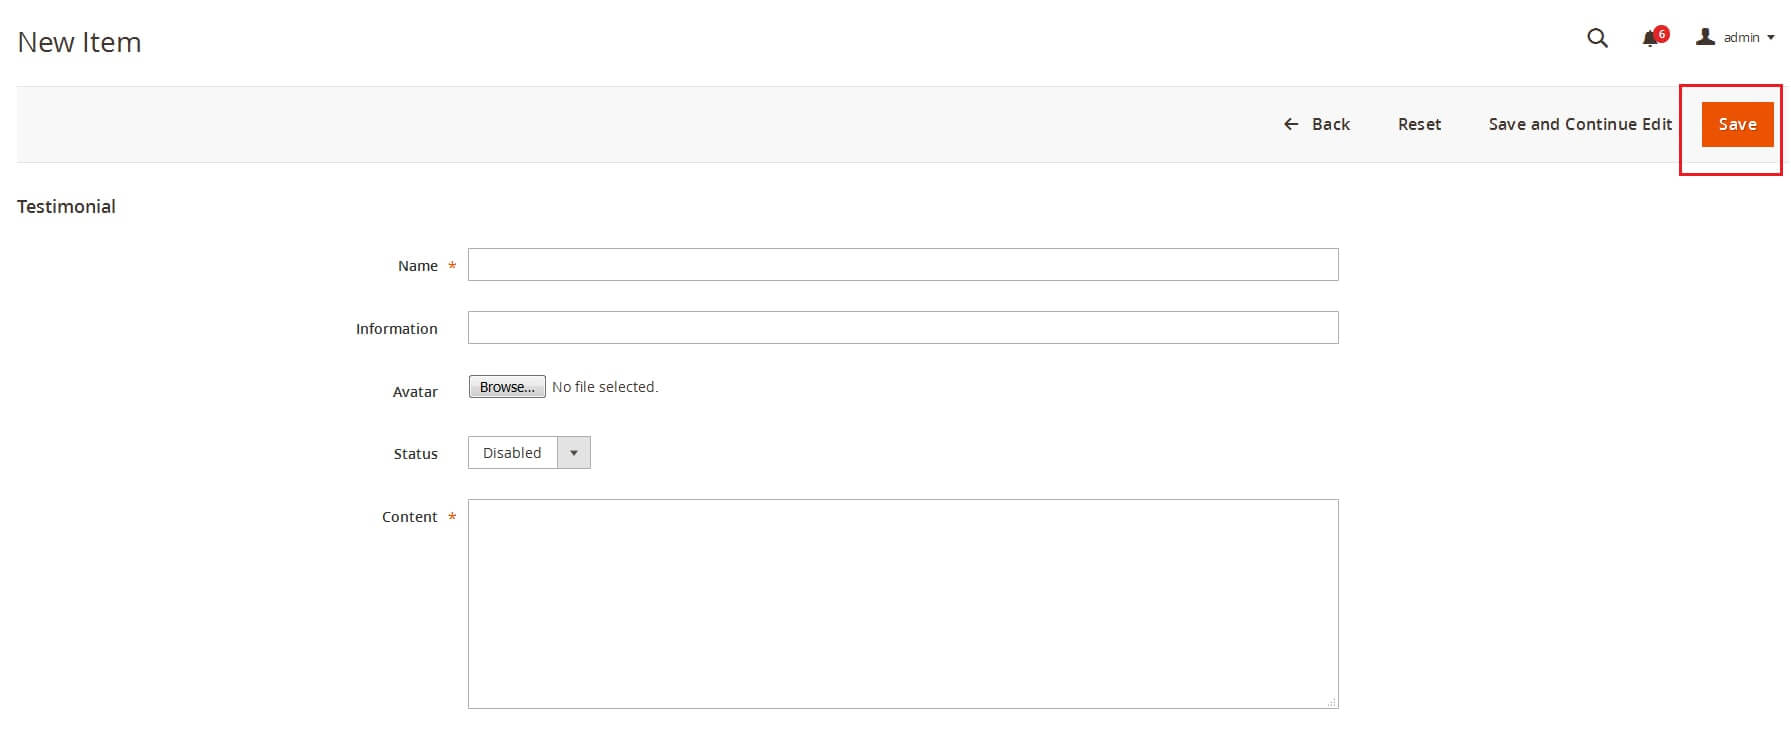
Click Save button to save testimonial item.
TESTIMONIAL BLOCK
Demo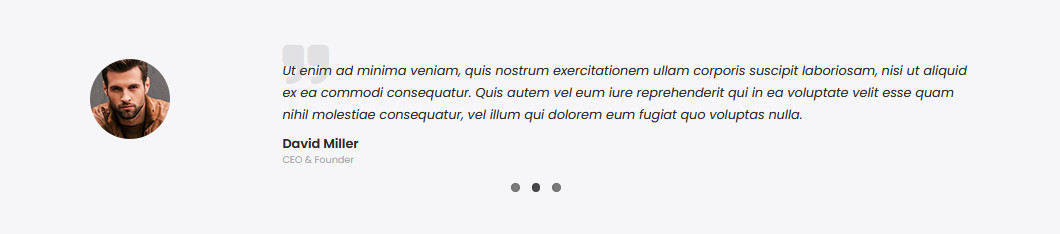
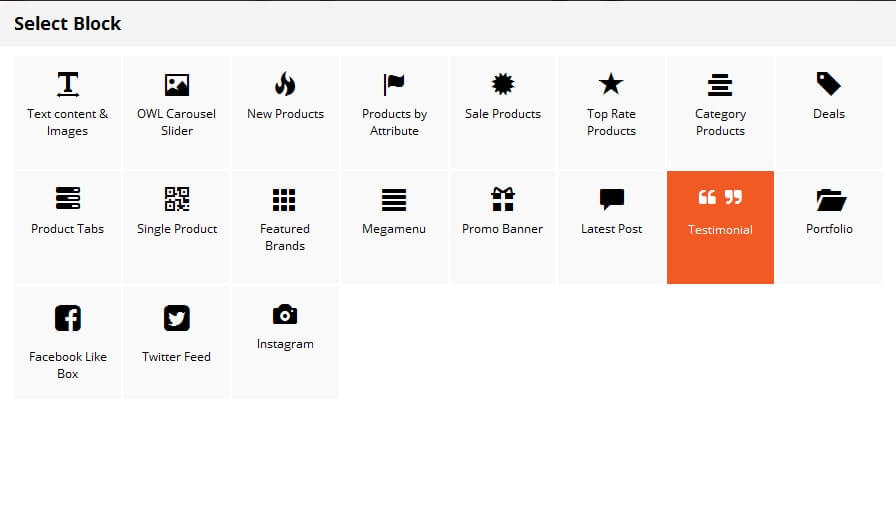
On Home page builder, click Add New Block button.
On popup list blocks, click “Testimonial” item.
TESTIMONIAL CONFIG TAB
Input value to config testimonial block
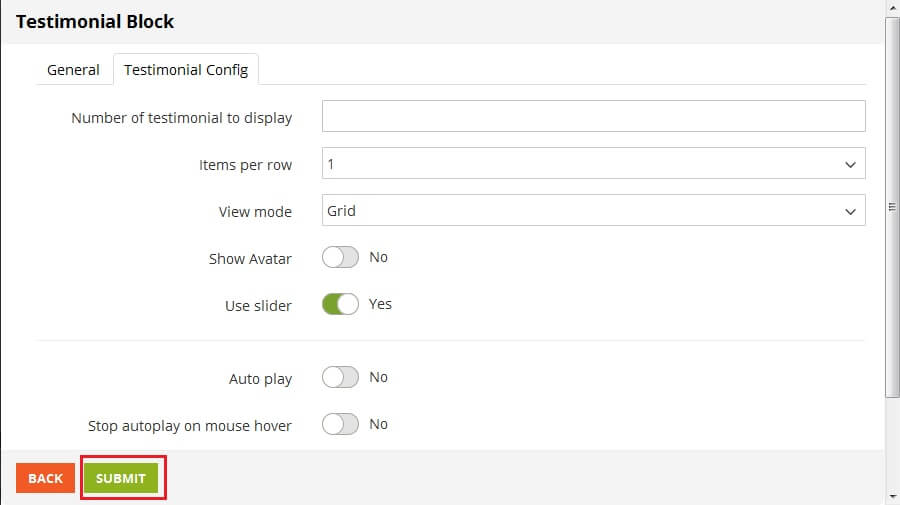
- Number of testimonial to display
- Items per row
- View mode
- Show Avatar
- User Slider: add owl carousel for testimonial block.If you use slider, you can see more config to owl slider:
- Auto play
- Stop autoplay on mouse hover
- Display navigation
- Display pagination
Click SUBMIT button to show testimonial on Home Page.
6. MGS Portfolio
ENABLE / DISABLE MODULE MGS_PORTFOLIO
EDIT FILE CONFIG.PHP
Go to the root folder on your Web Server, open file config.php on path app/etc/config.php
Find row 'MGS_Portfolio' => 1, field. Edit row:
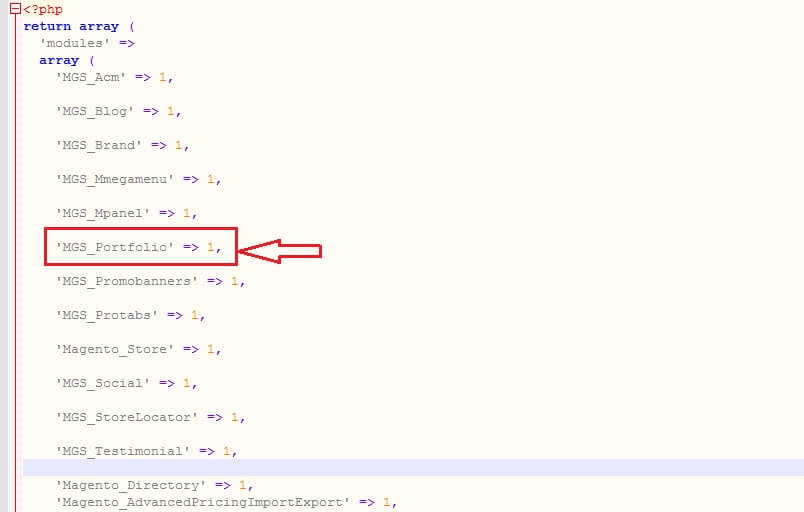
- ‘MGS_Portfolio’ => 1: Enable module
- ‘MGS_Portfolio’ => 0: Disable module
CREATE PORTFOLIO CATEGORY
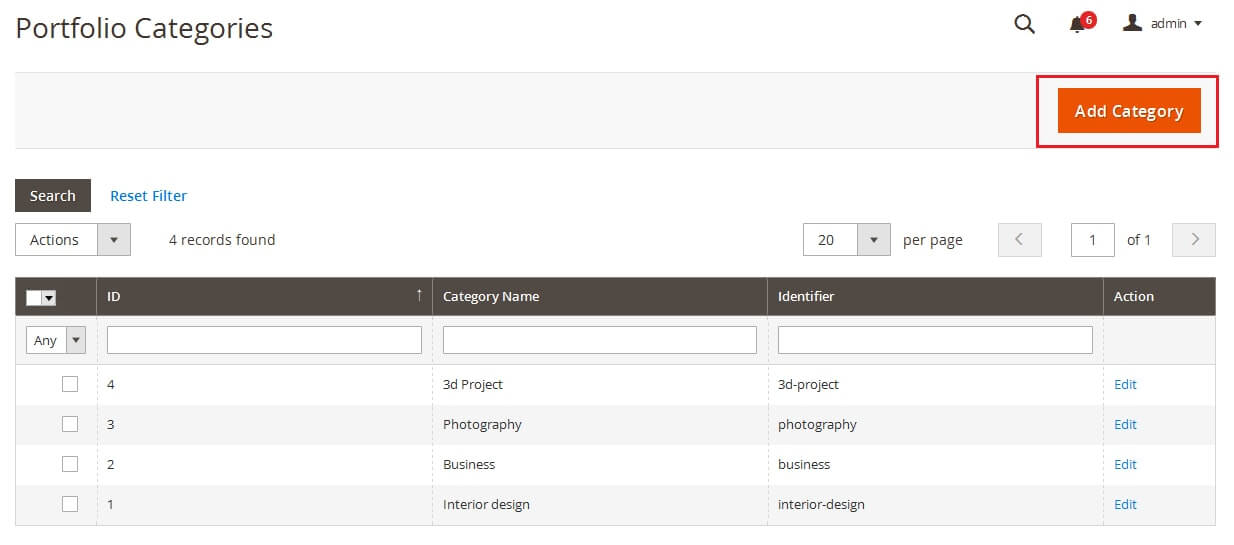
Go to Admin -> MGS -> [Portfolio] Portfolio Categories
Click Add Category button.
Input Category Information
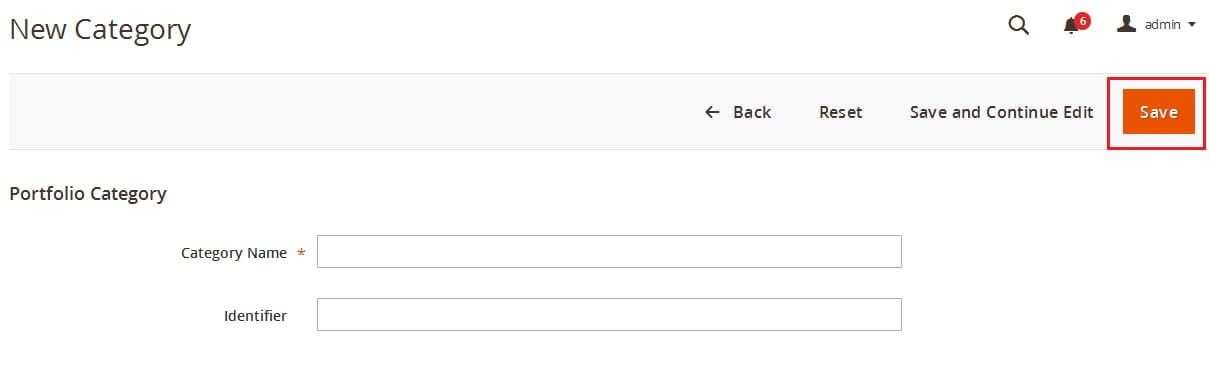
- Category Name
- Identifier: Set friendly url for this categories portfolio, if blank this field, friendly url will be auto created from category name.
Click Save button to save category.
CREATE PORTFOLIO ITEM
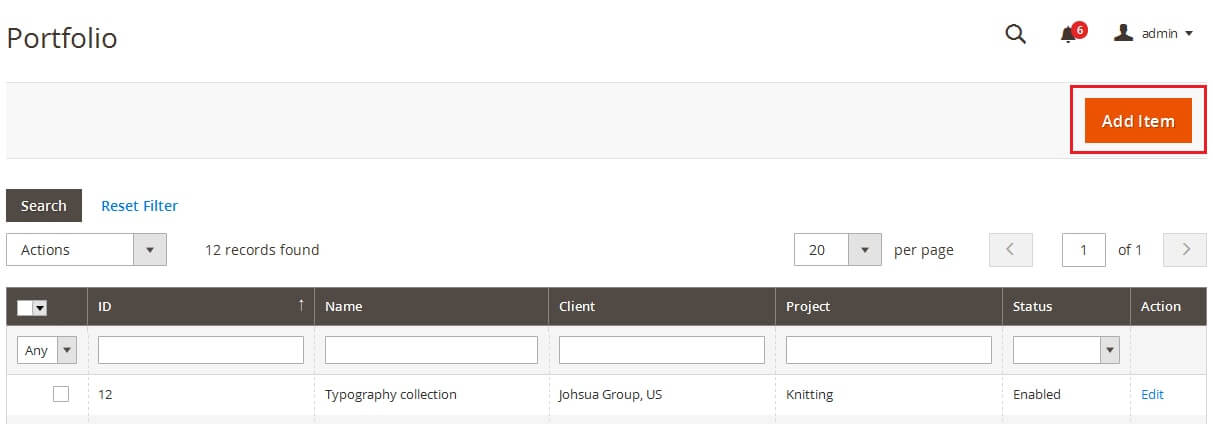
Go to Admin -> MGS -> [Portfolio] Portfolio Items
Click Add Item button.
Input Portfolio Information
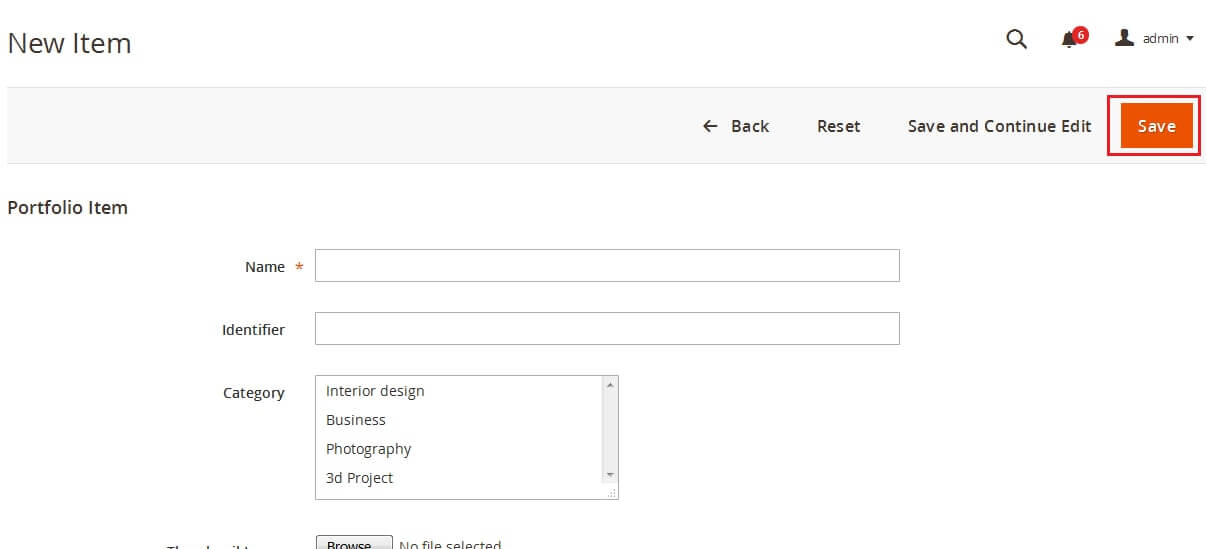
- Name
- Identifier: Set friendly url for this portfolio, if blank this field, friendly url auto will be created from portfolio name.
- Category: Choose parent categories for this portfolio.
- Thumbnail Image: Thumbnail image show on portfolio widget block, portfolio category page.
- Base Image: Gallery image for this portfolio.
- Client
- Project
- Project Url
- Date
- Skills
- Status
- Content
Click Save button to save portfolio.
PORTFOLIO BLOCK
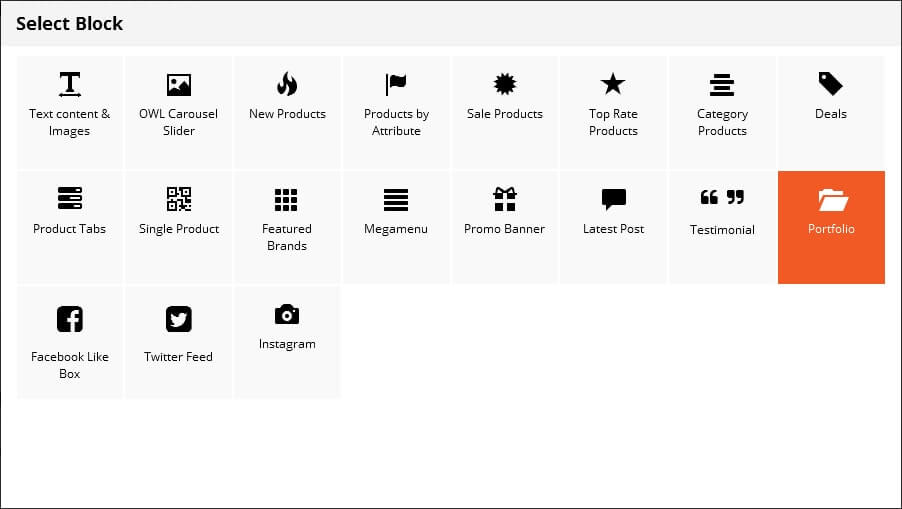
On Home page builder, click Add New Block button.
On popup list blocks, click “Portfolio” item.
PORTFOLIO CONFIG TAB
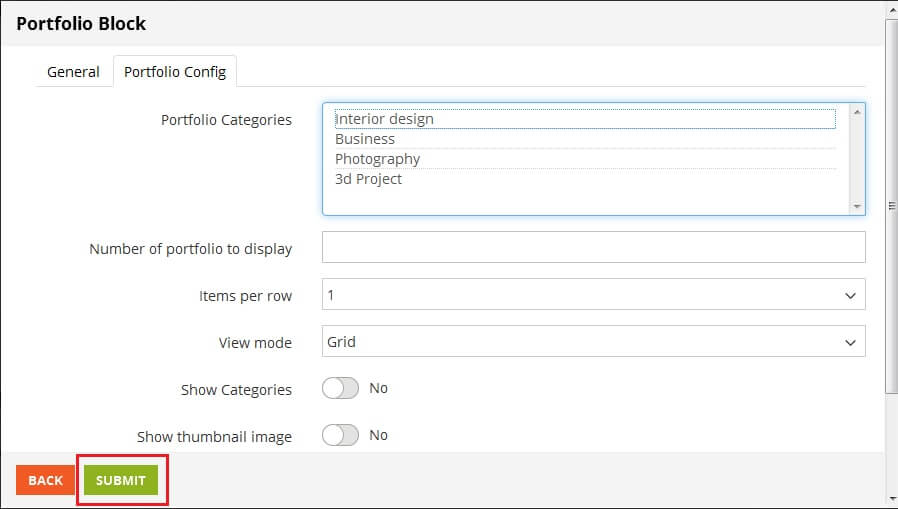
- Categories: Select portfolio categories to show portfolio form this.
- Number of portfolio to display
- Items per row
- Show Categories
- Show Thumbnail
- Show short contentIf you config Show short content is Yes you must config Summary character count (Max character for short content).
- User Slider: add owl carousel for blog block.If you use slider, you can see more config to owl slider:
- Auto play
- Stop autoplay on mouse hover
- Display navigation
- Display pagination
Click SUBMIT button to save portfolio block.
7. MGS ProTabs
ENABLE / DISABLE MODULE MGS_PROTABS
EDIT FILE CONFIG.PHP
Go to the root folder on your Web Server, open file config.php on path app/etc/config.php
Find row 'MGS_Protabs' => 1, field. Edit row:
- ‘MGS_Protabs’ => 1: Enable module
- ‘MGS_Protabs’ => 0: Disable module
PRODUCT TABS CONFIG
Go to Admin -> MGS -> [Product tabs] Tabs Settings
To enable Product Tabs, on General panel, change value of field Is Enabled to Yes
DEMO
Default tab: “Show as accordion” is No and “Show after product information” is No
Accordion tab: “Show as accordion” is Yes and “Show after product information” is No
Accordion tab after information product: “Show as accordion” is Yes and “Show after product information” is Yes
To add or remove tabs, config at Manage Tab Items
- Label: Title of tab
- Select type for tab: You can show tab content with: Attribute, Static Block, Additional Information, Reviews
- Position: config position of tab
- Value: attribute_code for Attribute type Identifier for Static Block type Blank for other types
- Remove this item: Remove this tab
- Add Tab Item: Create new tab
Click Save Config button to save config tab. Clear cache if you enable cache.
8. MGS Quickview
ENABLE / DISABLE MODULE MGS_QUICKVIEW
EDIT FILE CONFIG.PHP
Go to the root folder on your Web Server, open file config.php on path app/etc/config.php
Find row 'MGS_Quickview' => 1, field. Edit row:
- ‘MGS_Quickview’ => 1: Enable module
- ‘MGS_Quickview’ => 0: Disable module
9. MGS Ajaxcart
ENABLE / DISABLE MODULE MGS_AJAXCART
EDIT FILE CONFIG.PHP
Go to the root folder on your Web Server, open file config.php on path app/etc/config.php
Find row 'MGS_AjaxCart' => 1, field. Edit row:
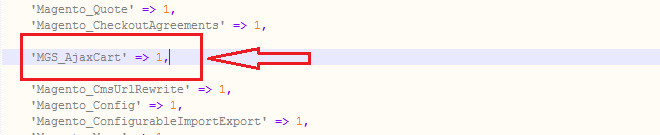
- ‘MGS_AjaxCart’ => 1: Enable module
- ‘MGS_AjaxCart’ => 0: Disable module
AJAXCART CONFIGURATION
CONFIG ADMIN
Go to Admin -> STORES -> Configuration -> MGS -> Ajax Cart.
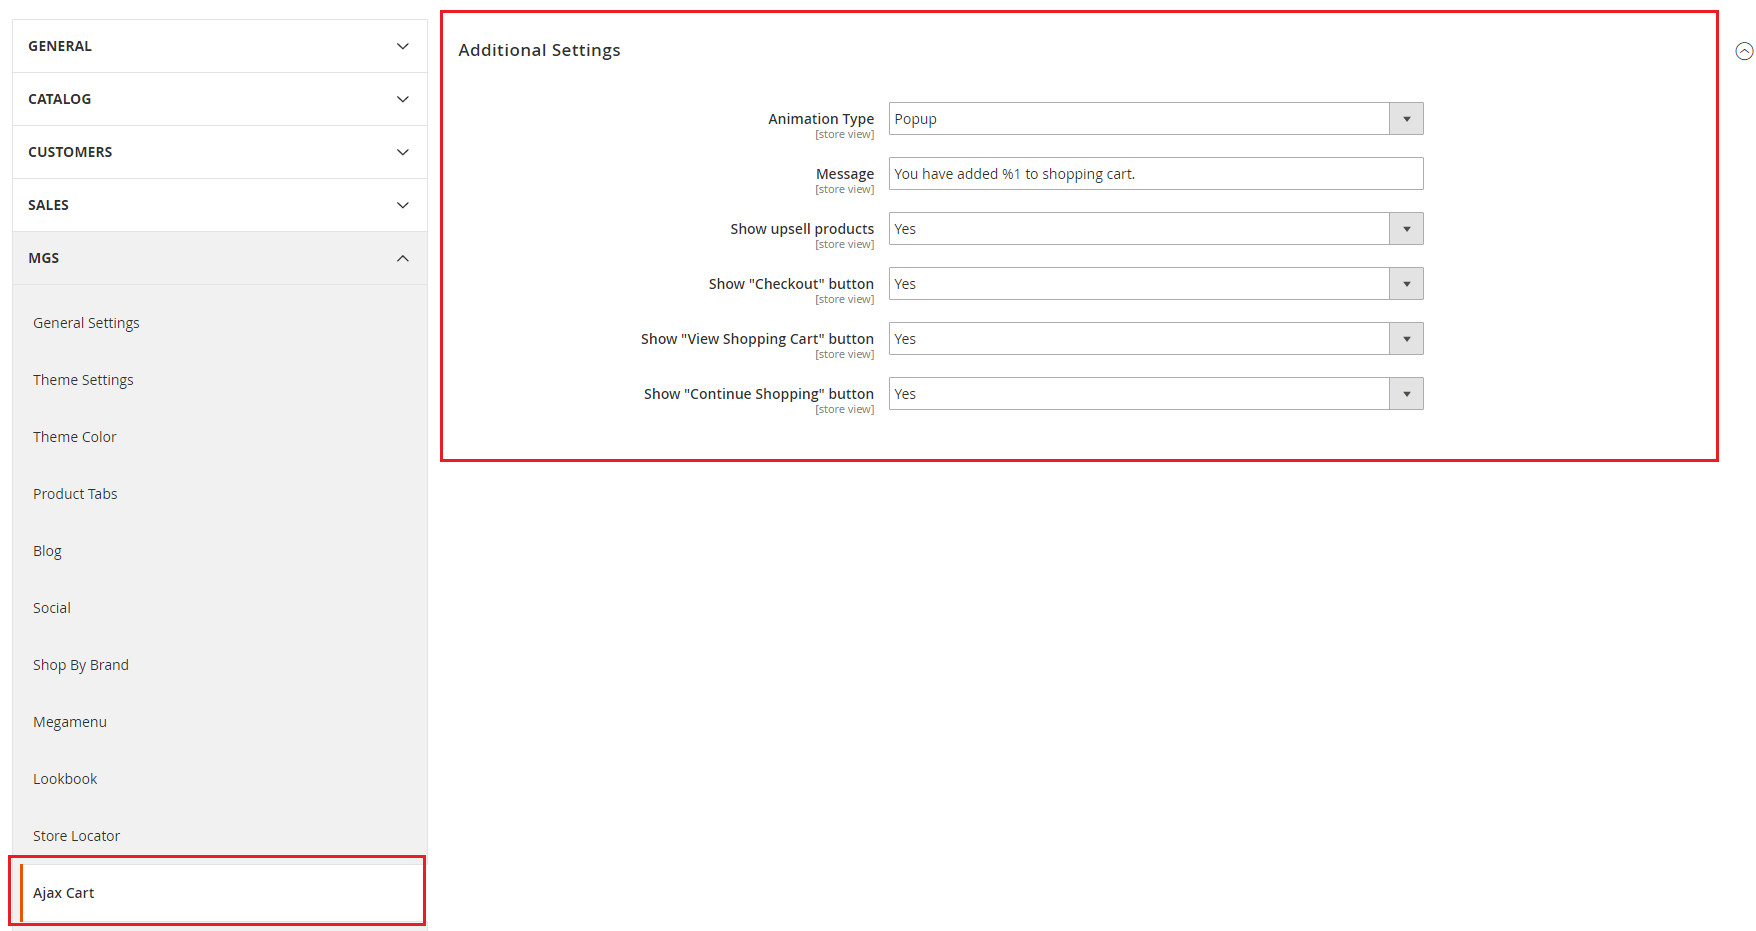
- Animation type: Choose type how minicart appear
- Message: Enter message after add product to cart
- Show upsell products: Enable or Disable
- Show “Checkout” button: Enable or Disable
- Show “View Shopping Cart” button: Enable or Disable
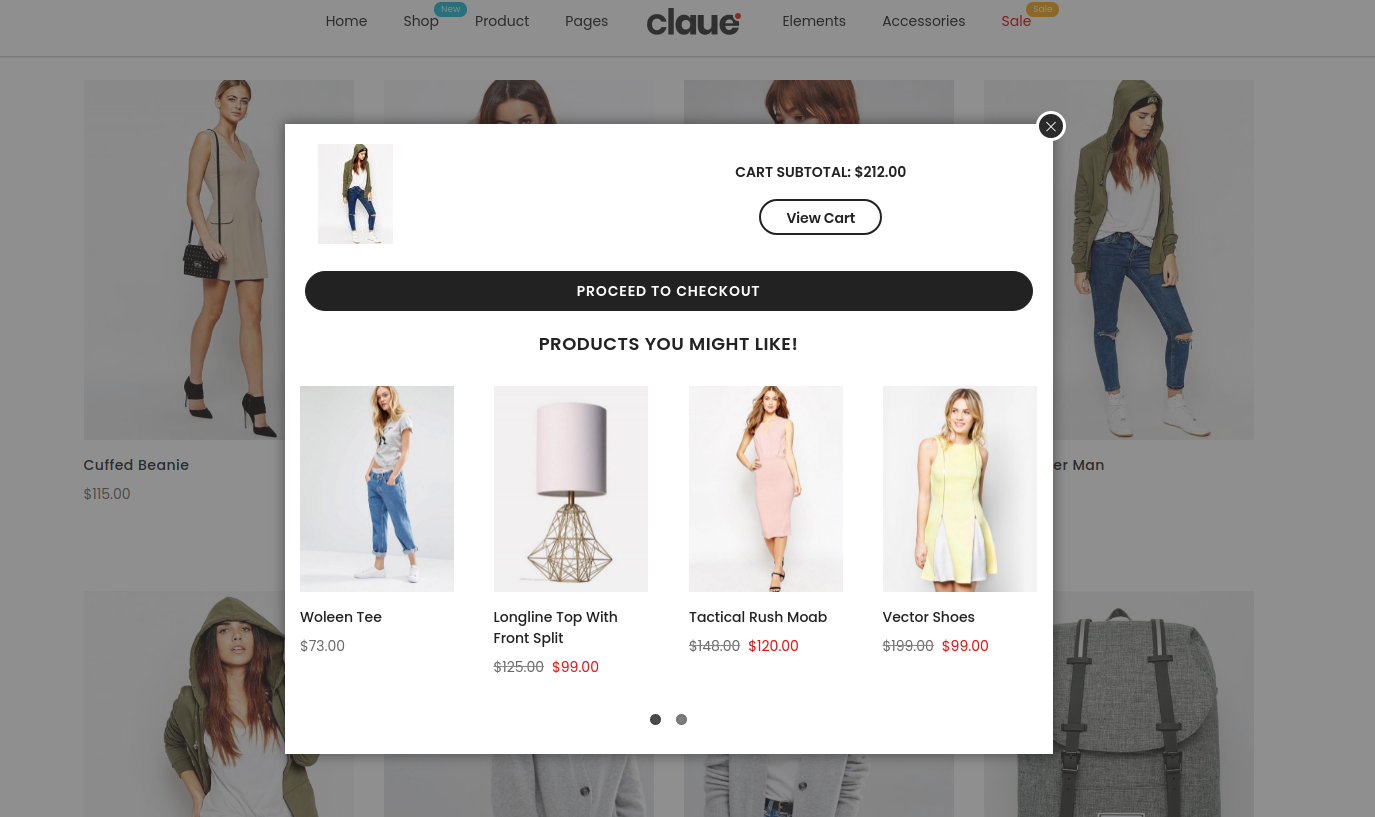
DEMO:
10. MGS Lookbook
ENABLE / DISABLE MODULE MGS_LOOKBOOK
EDIT FILE CONFIG.PHP
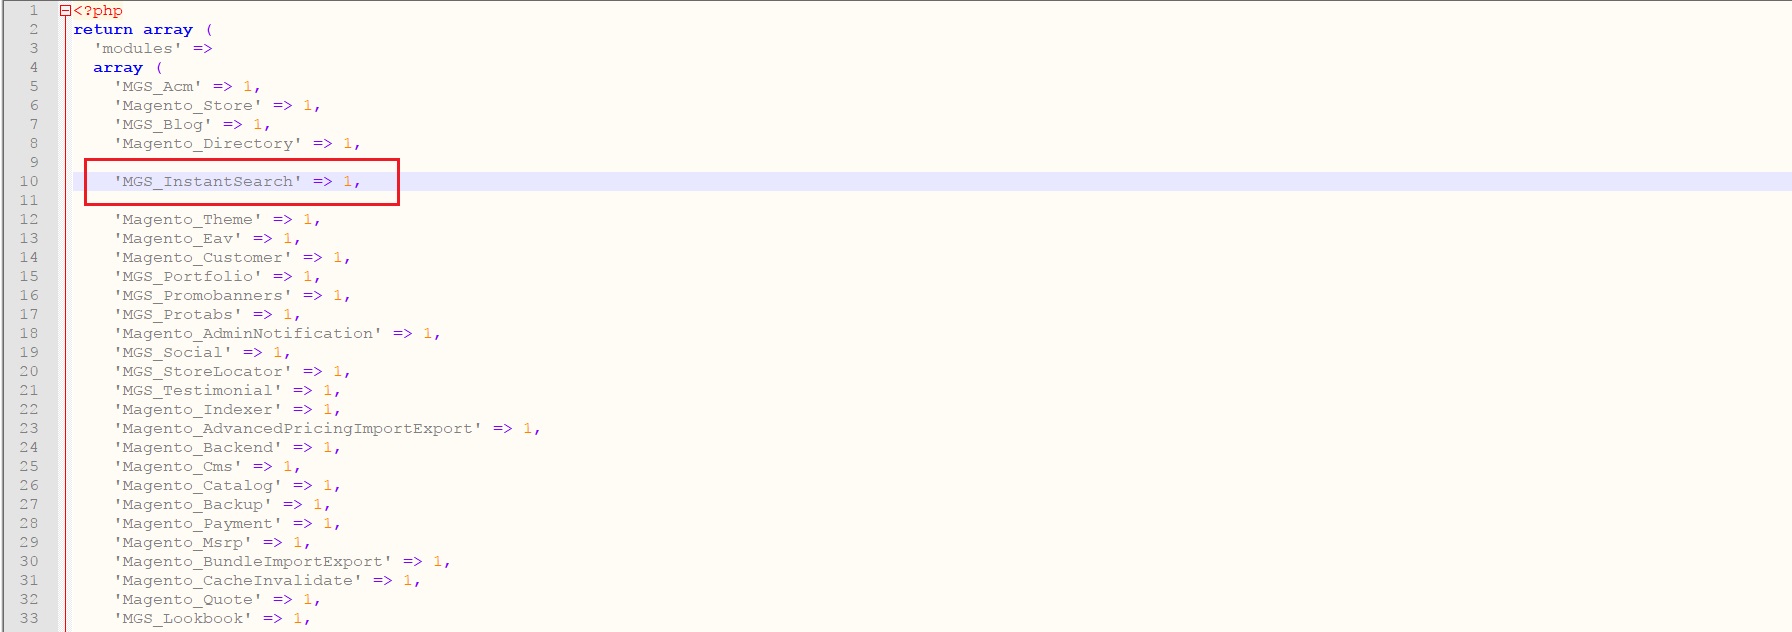
Go to the root folder on your Web Server, open file config.php on path app/etc/config.php
Find row 'MGS_Lookbook' => 1, field. Edit row:
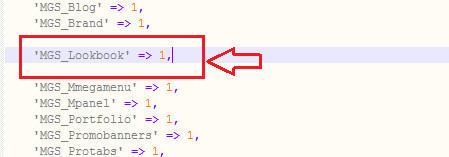
- ‘MGS_Lookbook’ => 1: Enable module
- ‘MGS_Lookbook’ => 0: Disable module
MGS_LOOKBOOK CONFIGURATION
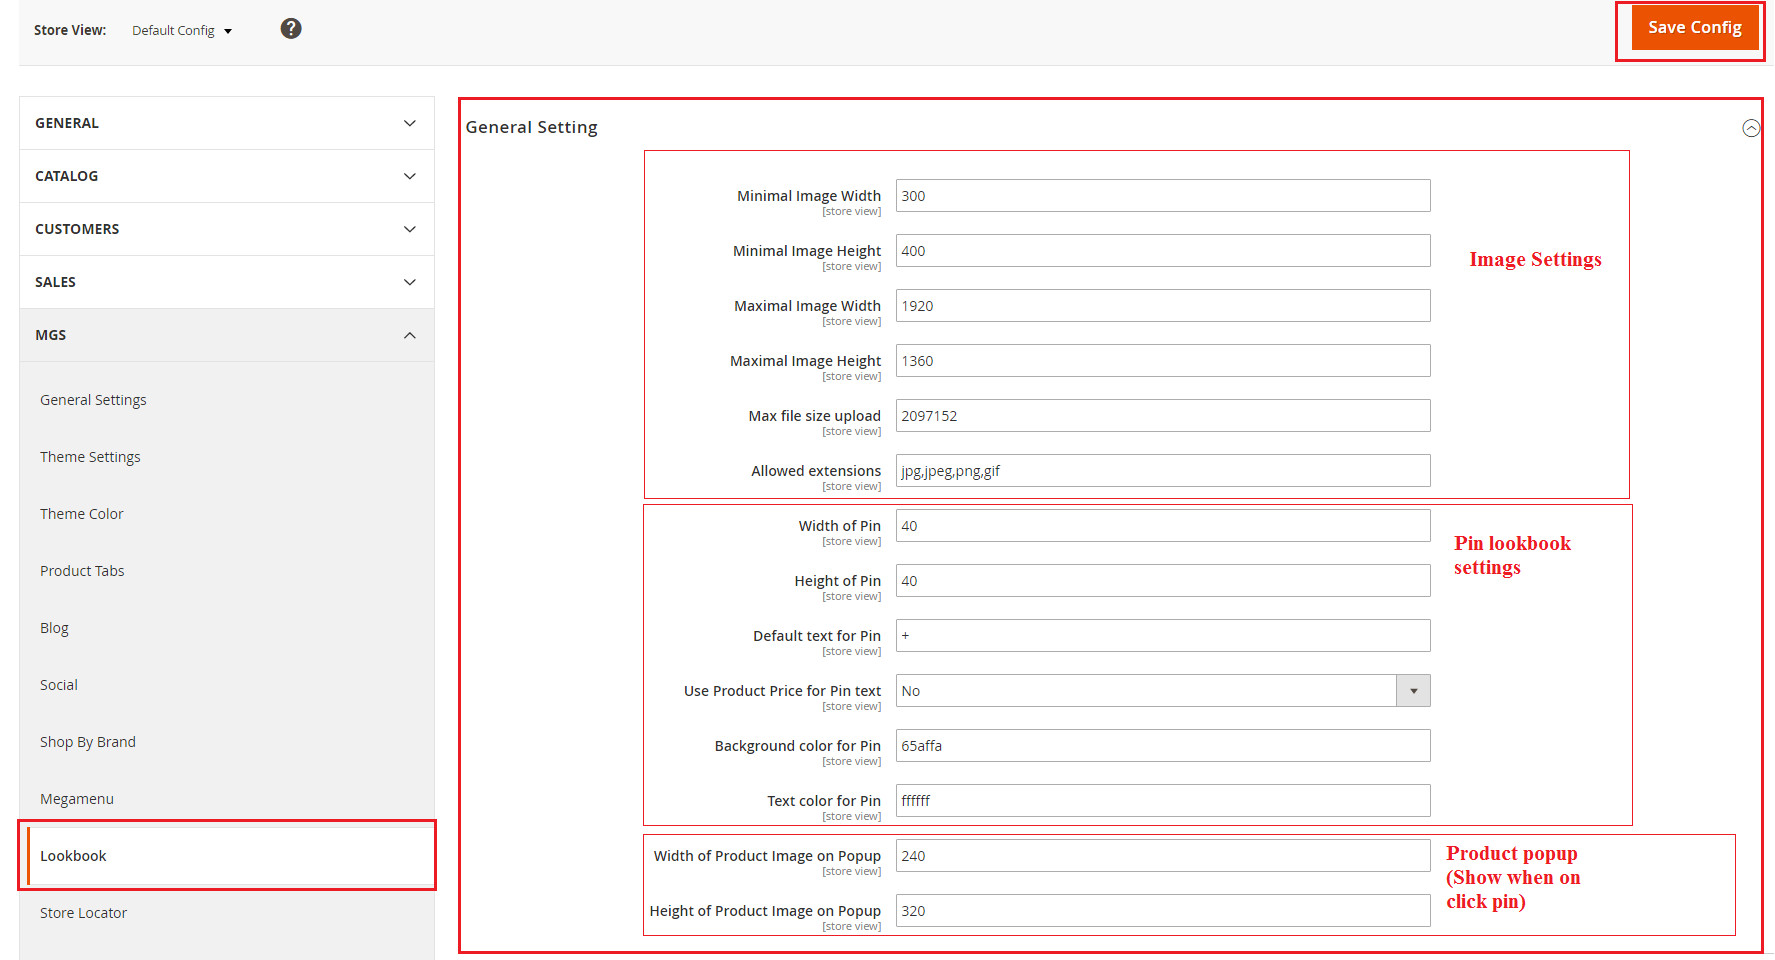
Go to Admin -> MGS -> Lookbook [Configuration]
GENERAL SETTING
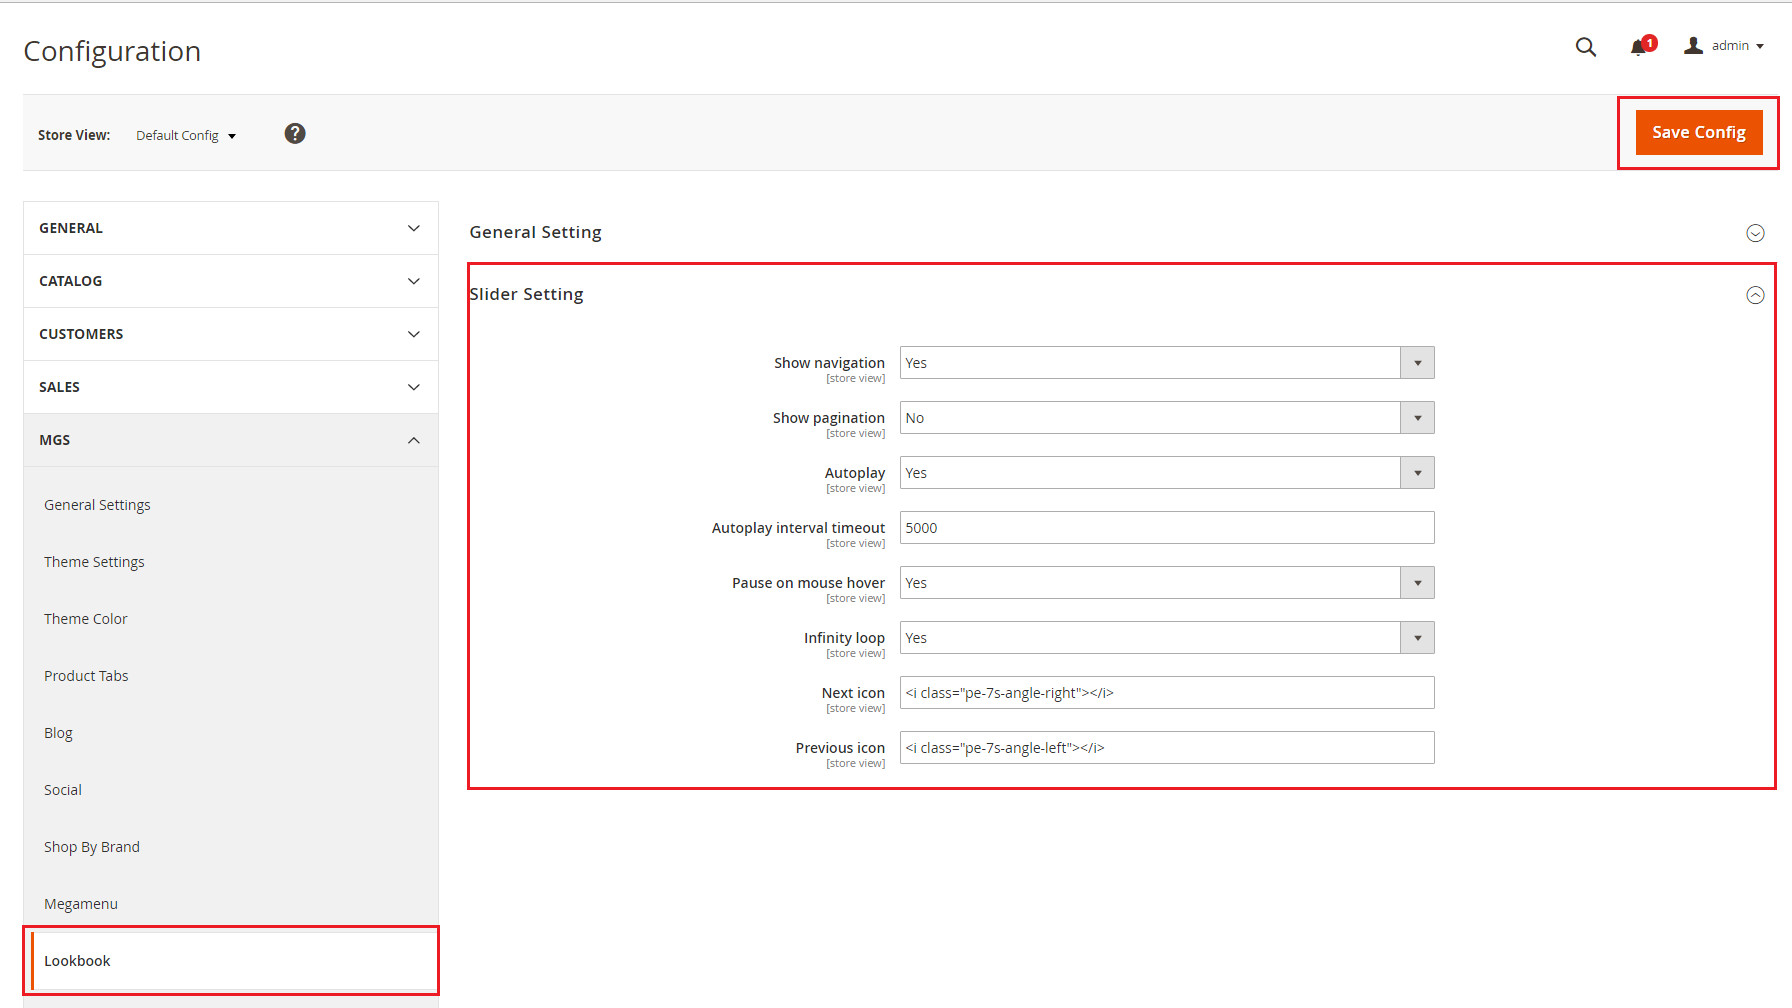
SLIDER SETTING
We use Owl carousel plugin for Lookbook slider, you can config custom options for owl carousel js.
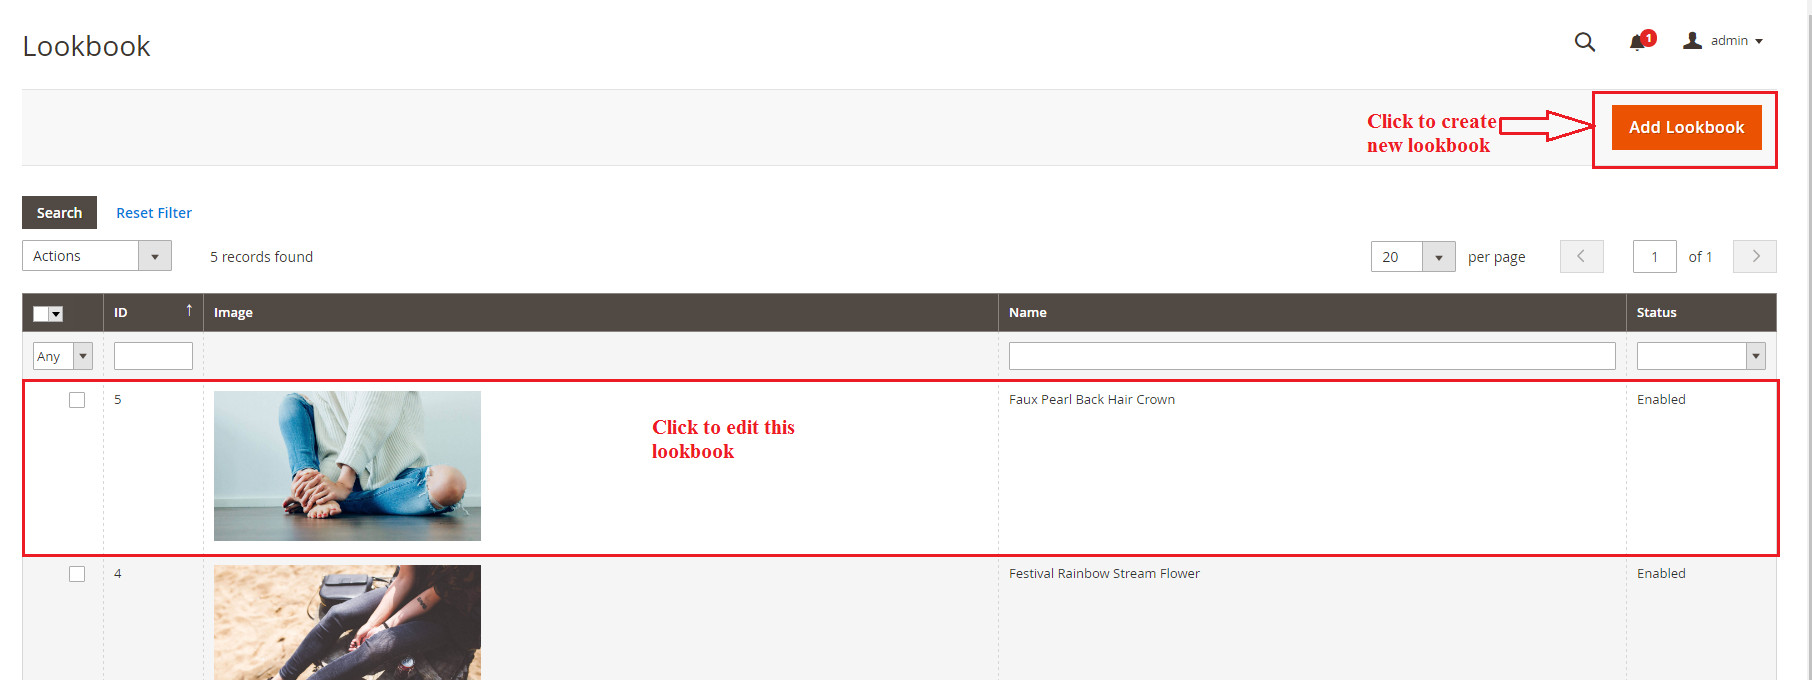
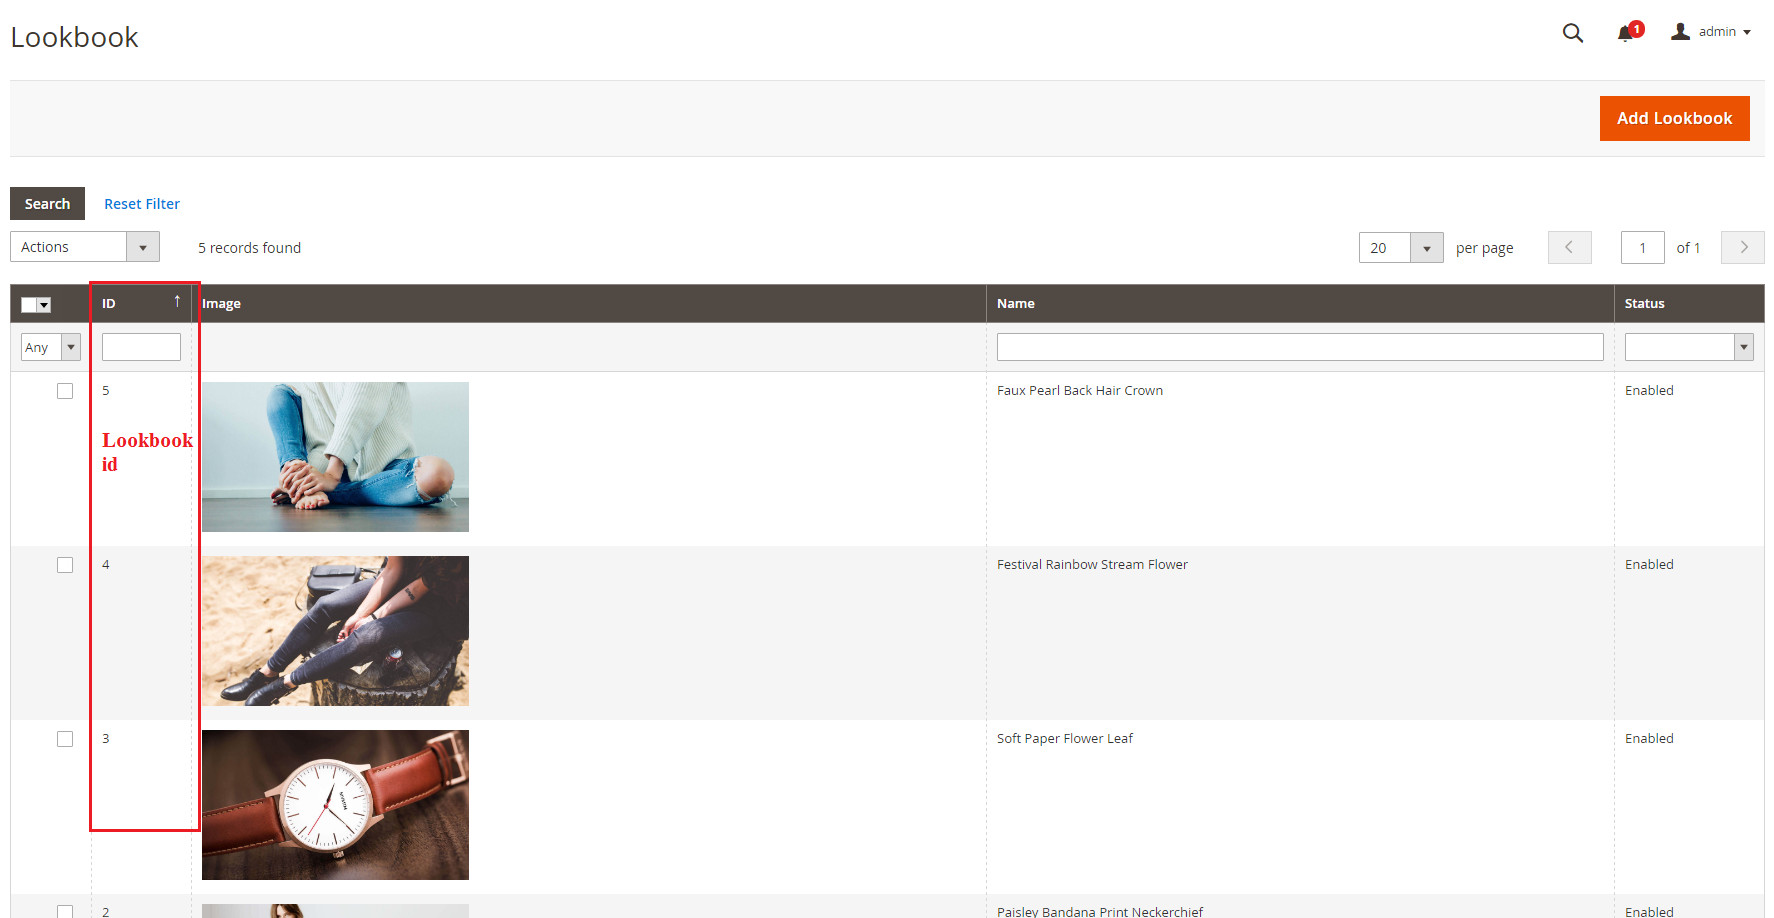
CREATE NEW LOOKBOOK
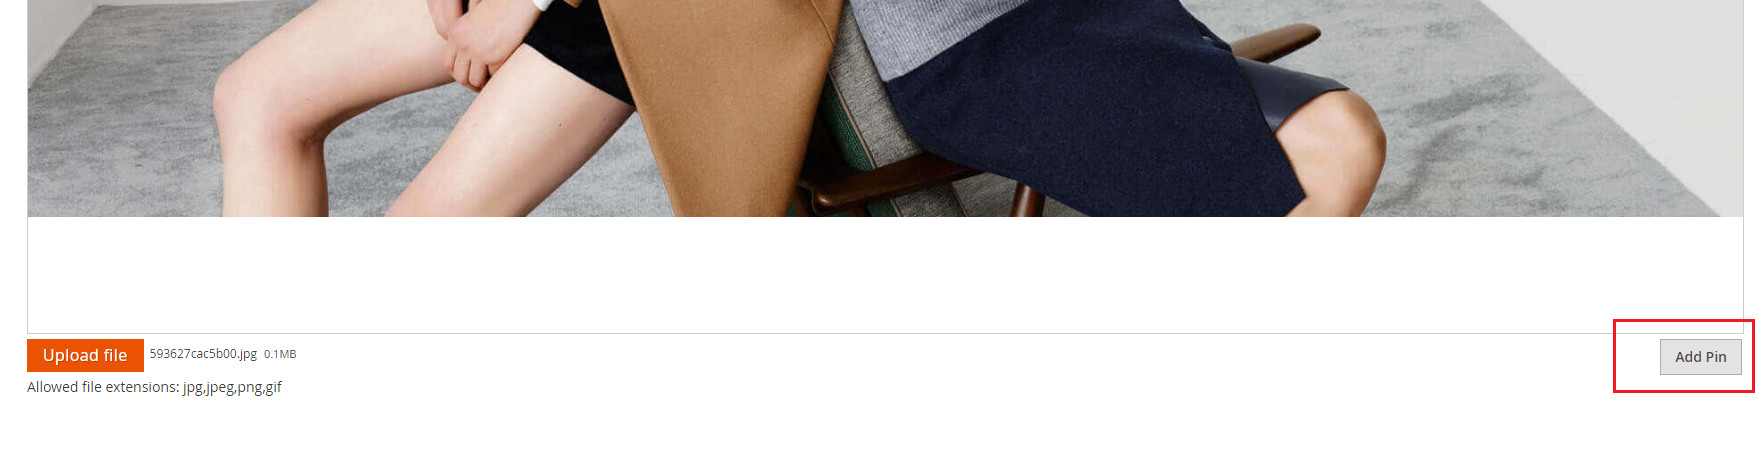
Go to Admin -> MGS -> Manage Lookbook
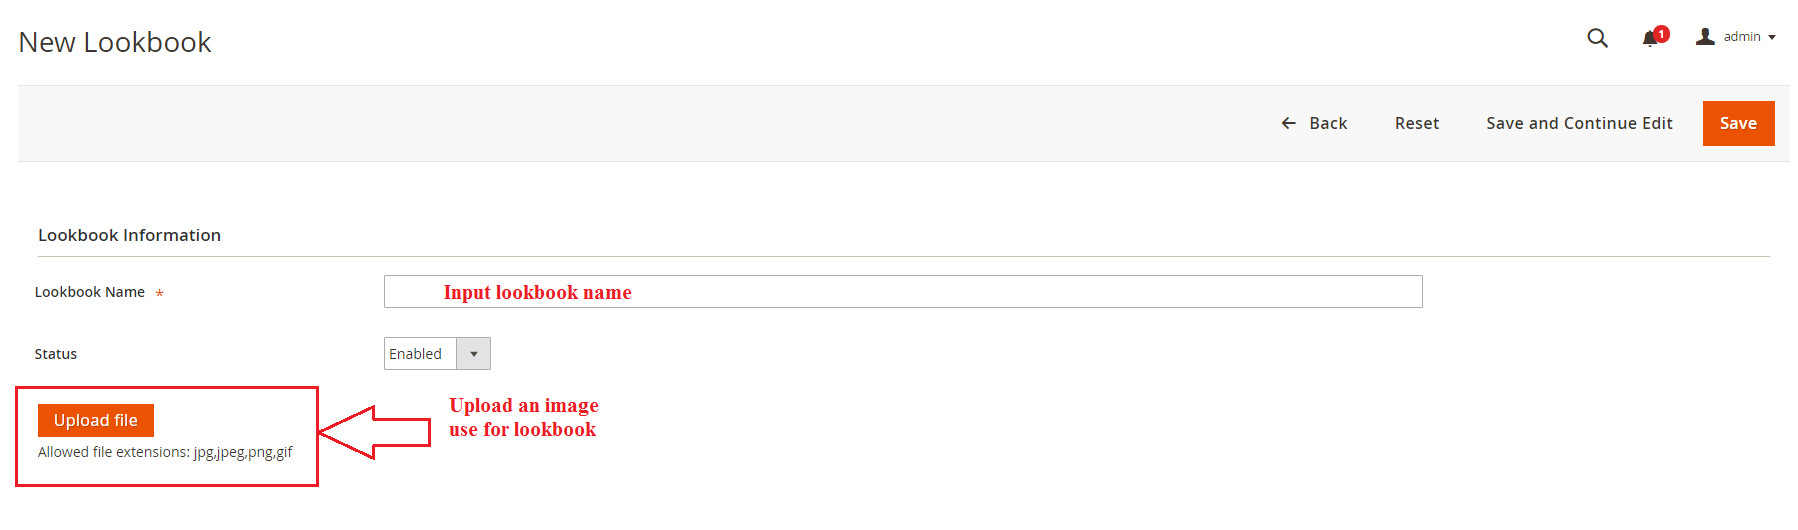
After image has been uploaded, you can see Add Pin button on bottom right image. Click it to start config pin of lookbook.
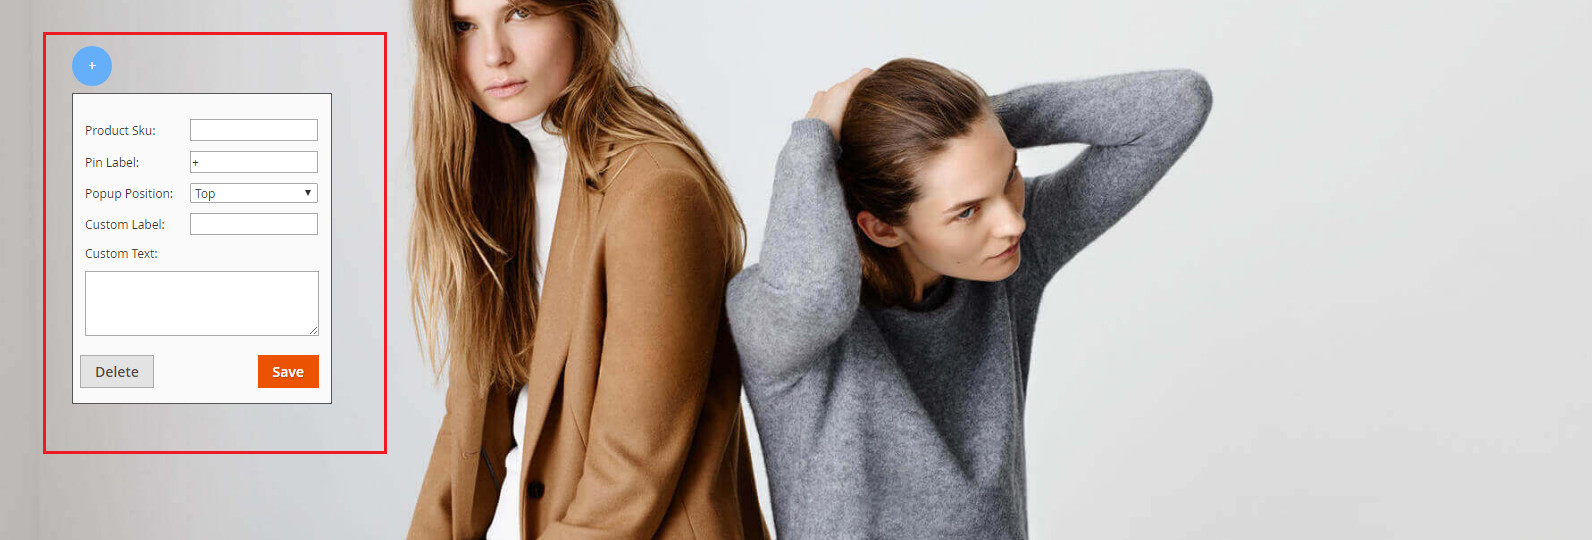
Input data for pin lookbook, you can drag pin to other position you want.
Click Save button to finish create lookbook
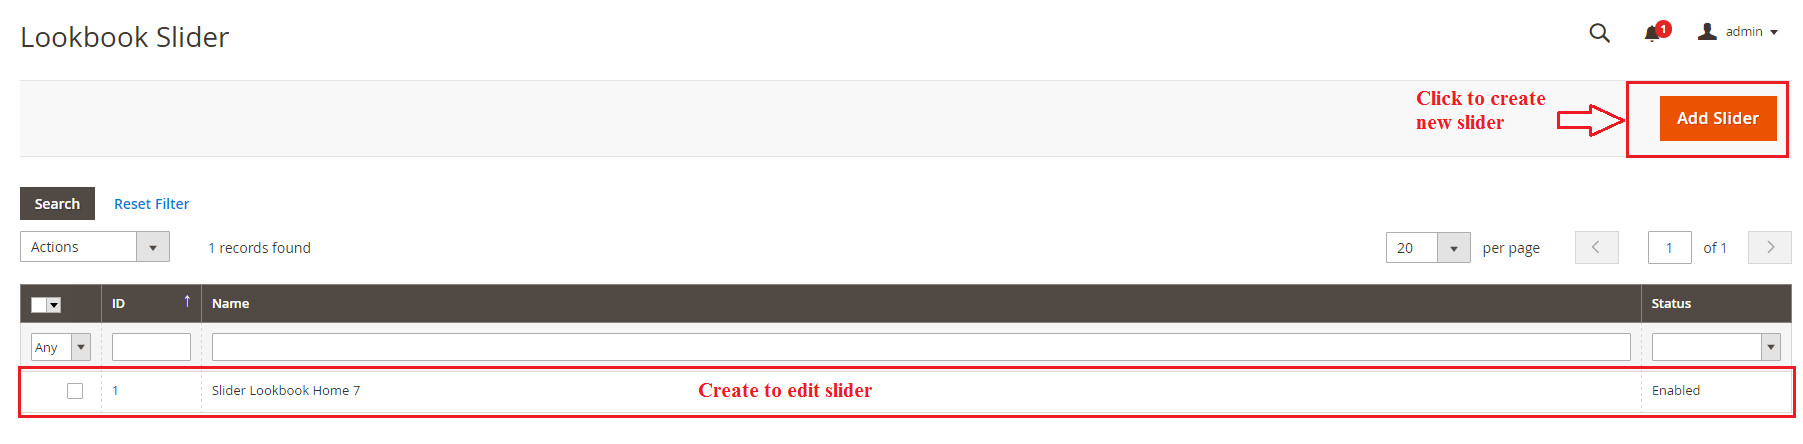
CREATE NEW LOOKBOOK SLIDER
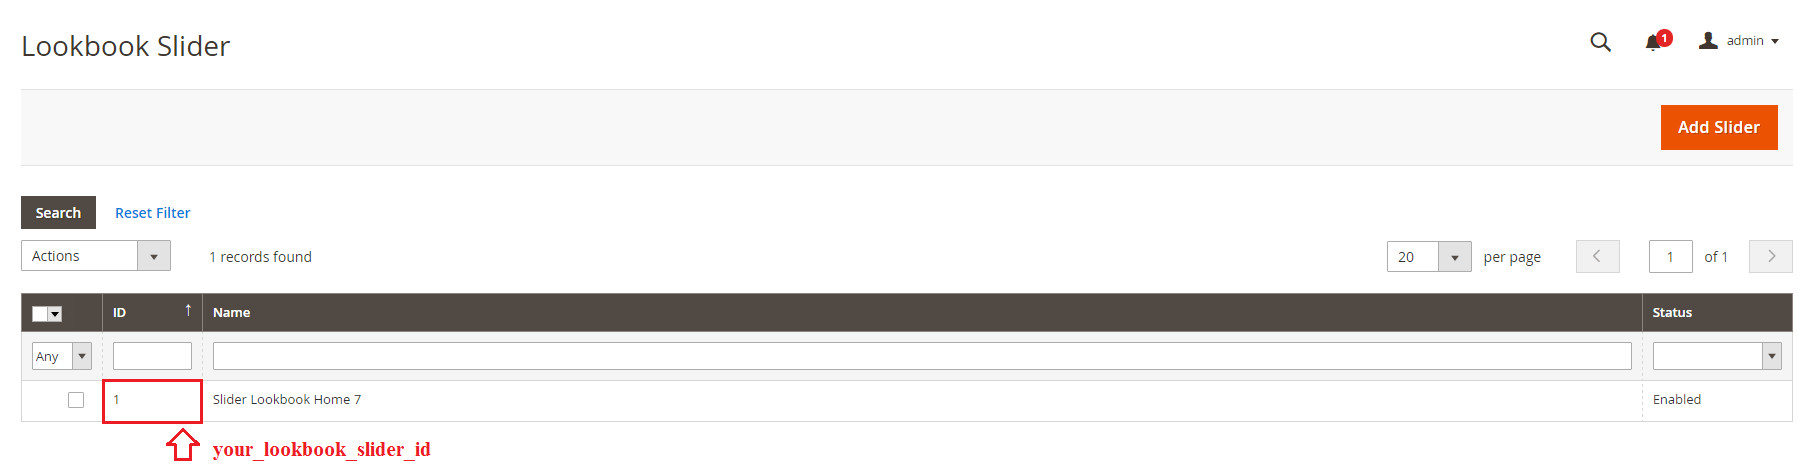
Go to Admin -> MGS -> Manage Slider
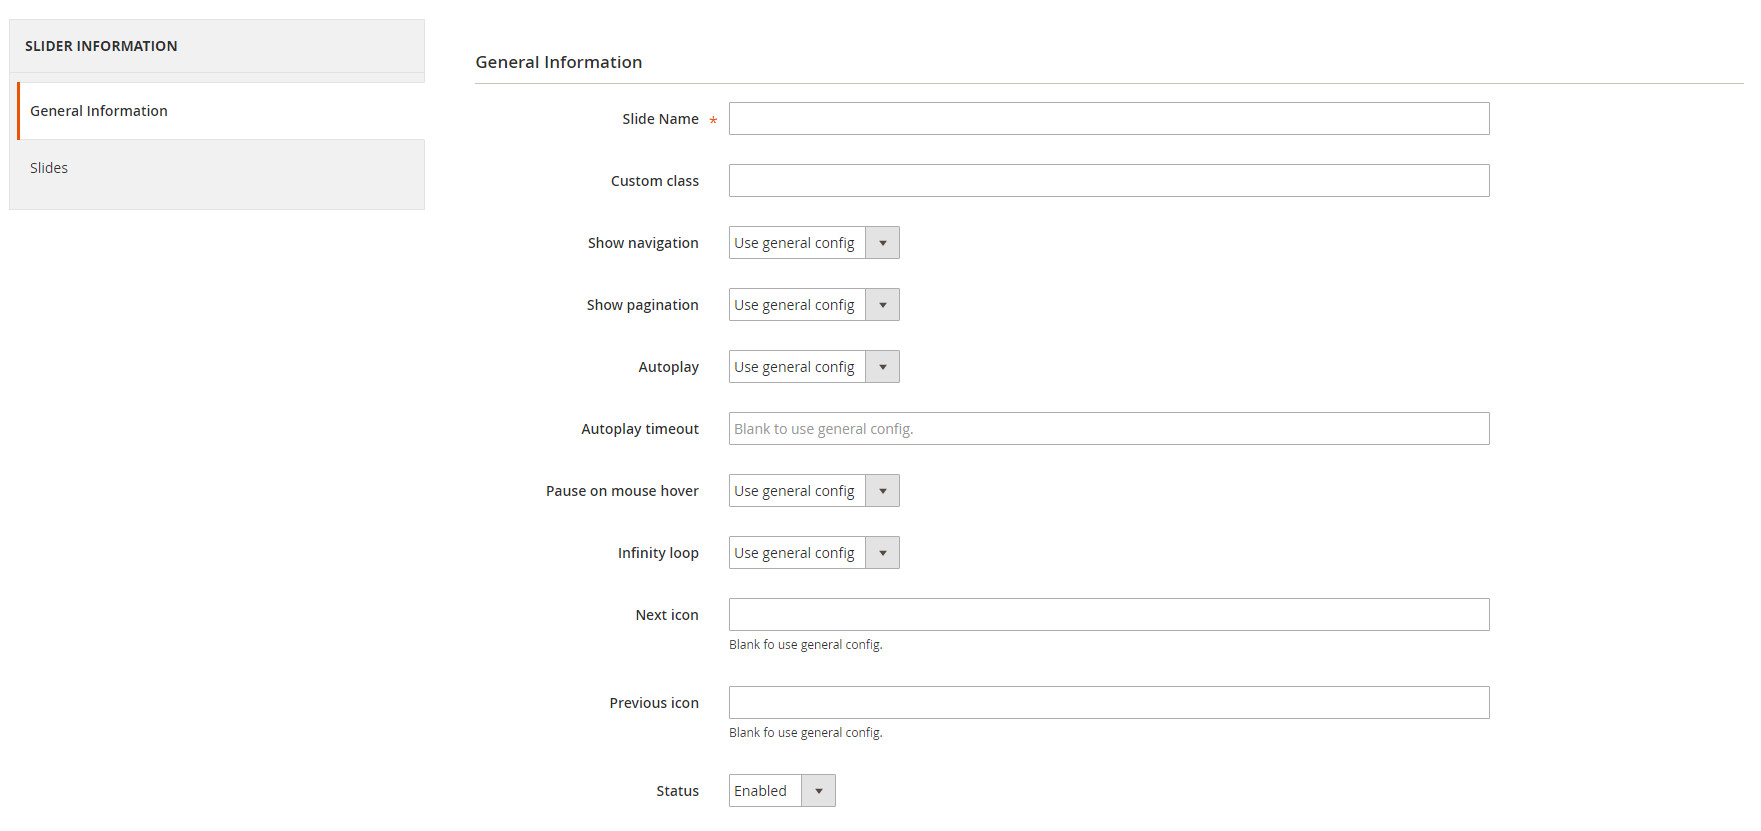
GENERAL INFORMATION TAB
Set Slider name, config owl carousel option. If you don’t config owlcarousel option, slider use general config
SLIDER TAB
Choose lookbook use for slider and set position for it.
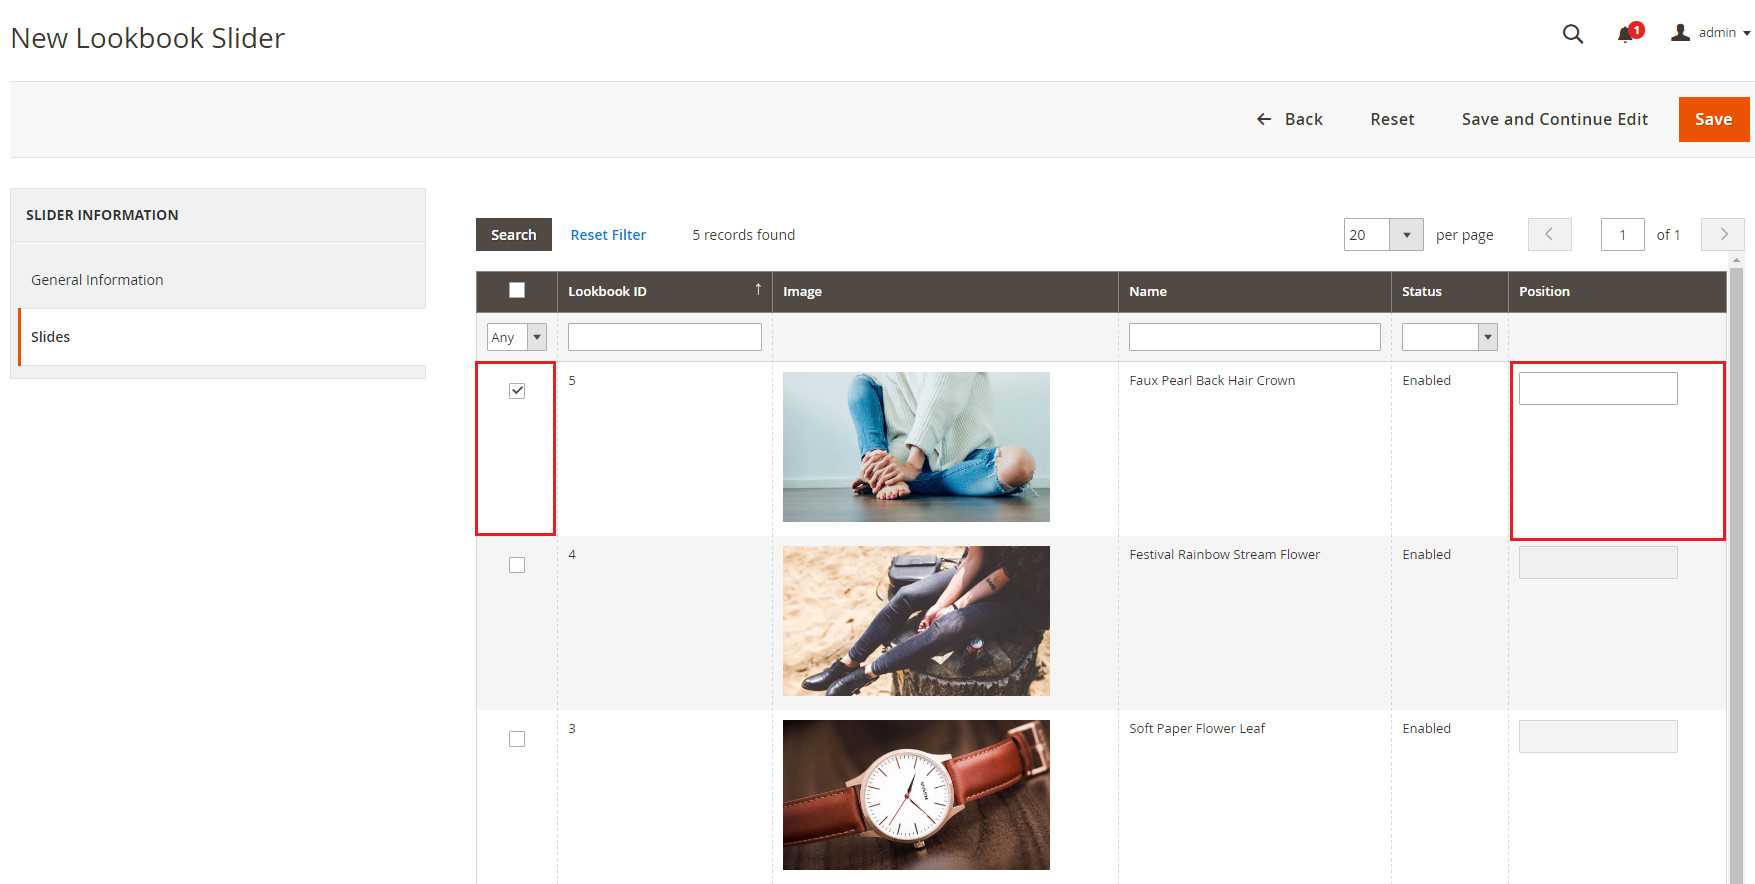
Click Save button to finish create lookbook slider
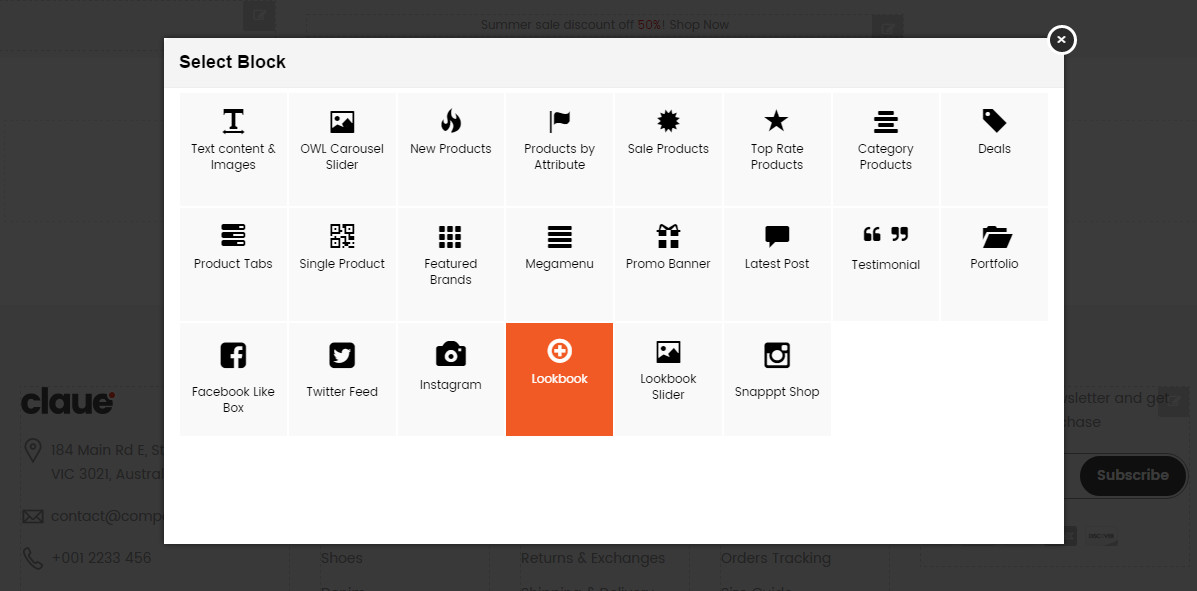
LOOKBOOK BLOCK
On Home page builder, click Add New Block button.
On popup list blocks, click “Lookbook” item.
LOOKBOOK CONFIG TAB
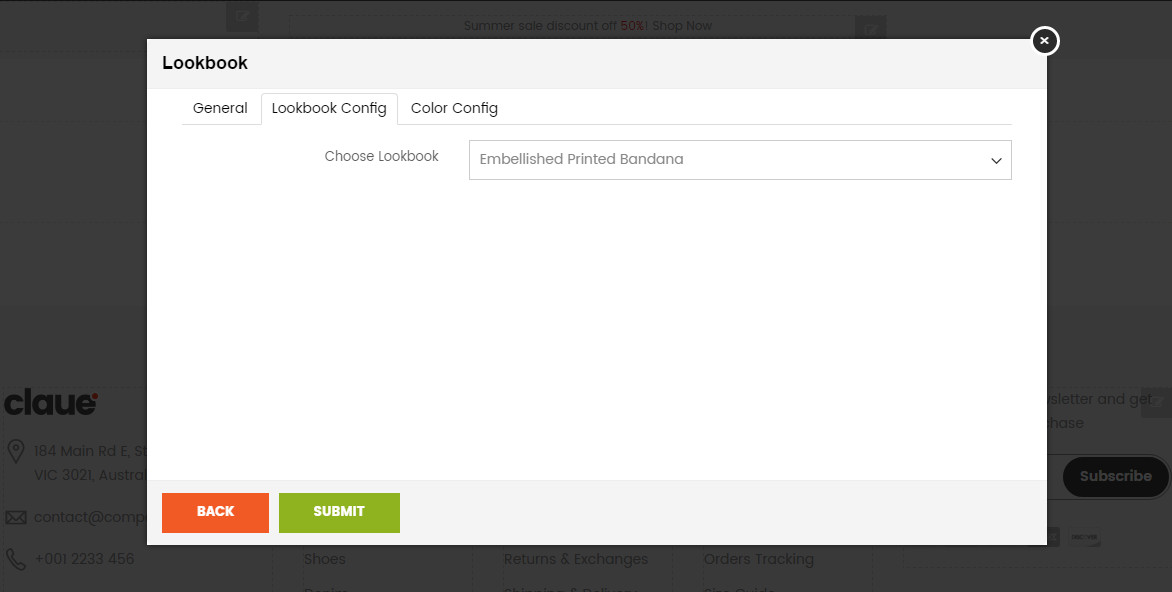
Choose Lookbook you want.
Click SUBMIT button to save Lookbook block.
You can get Lookbook block with code: {{widget type="MGS\Lookbook\Block\Widget\Lookbook" lookbook_id="your_lookbook_id" template="MGS_Lookbook::widget/lookbook.phtml"}}
LOOKBOOK SLIDER
On Home page builder, click Add New Block button.
On popup list blocks, click “Lookbook Slider” item.
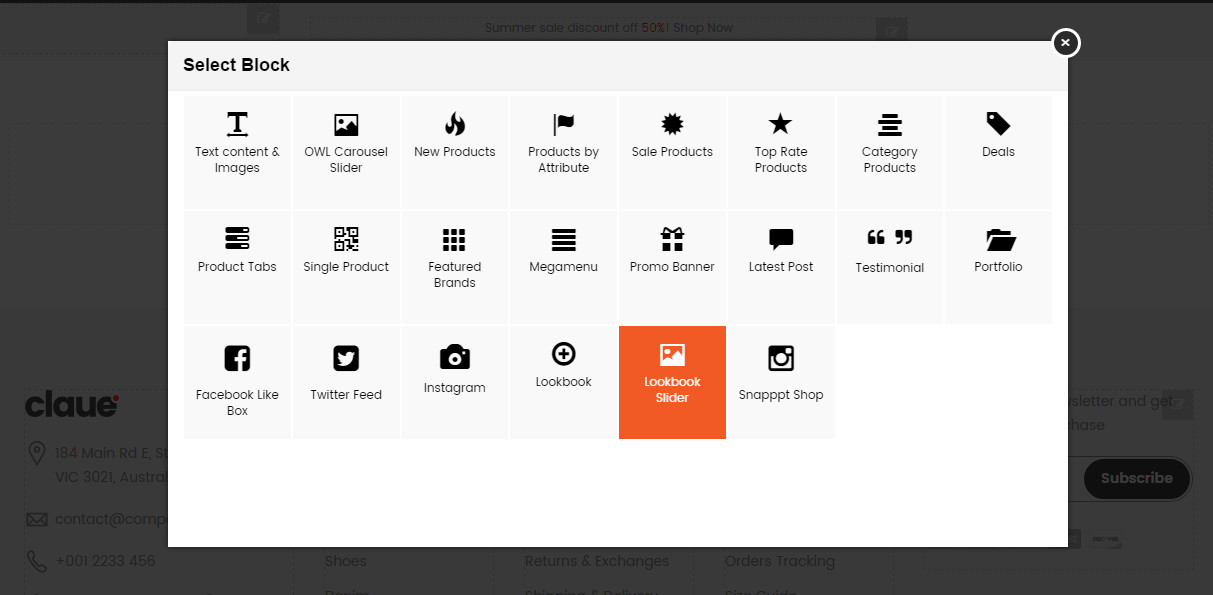
SLIDER CONFIG TAB
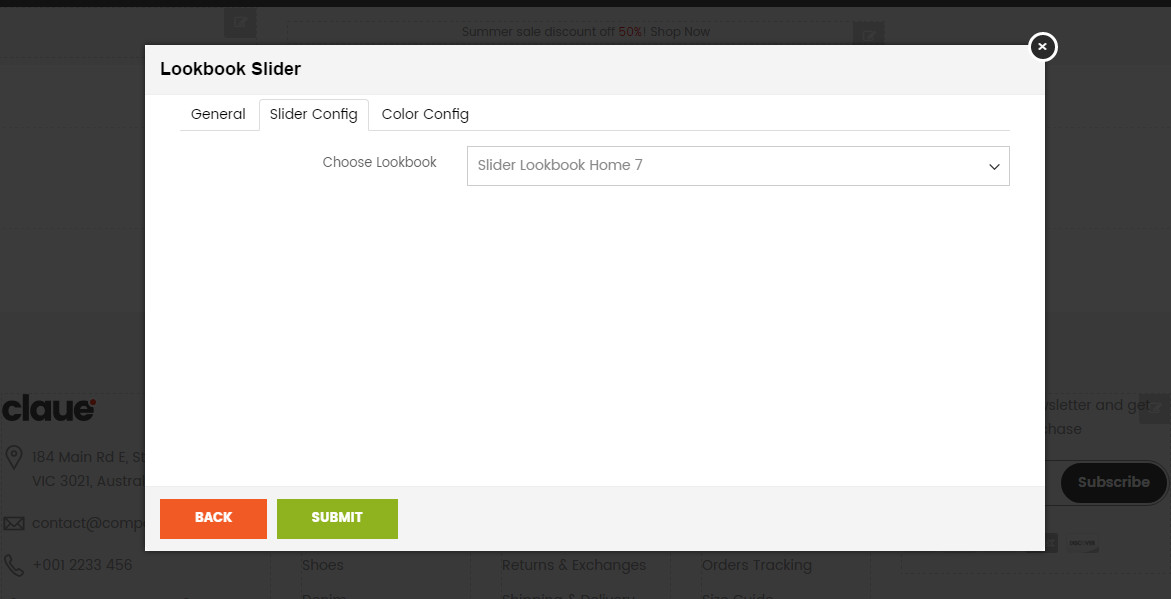
Choose Lookbook you want.
Click SUBMIT button to save Lookbook Slider block.
You can get Lookbook Slider block with code: {{widget type="MGS\Lookbook\Block\Widget\Slider" slider_id="your_lookbook_slider_id" template="MGS_Lookbook::widget/slider.phtml"}}
11. MGS Instant Search
ENABLE / DISABLE MODULE MGS_INSTANTSEARCH
EDIT FILE CONFIG.PHP
Go to the root folder on your Web Server, open file config.php on path app/etc/config.php
Find row 'MGS_InstantSearch' => 1, field. Edit row:
- ‘MGS_InstantSearch’ => 1: Enable module
- ‘MGS_InstantSearch’ => 0: Disable module
CONFIGURATION MGS_INSTANTSEARCH
Go to Admin -> STORES -> Configuration -> MGS -> InstantSearch
GENERAL SETTING
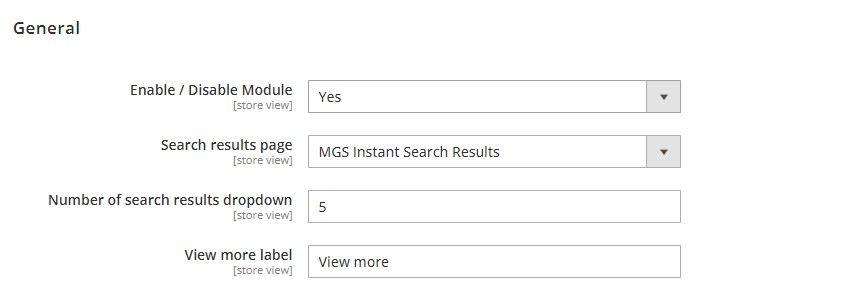
- Enable / Disable Module: Choose Yes to use module
- Search results page: There are 2 result pages, you can choose one of them
- Number of search results dropdown: Set number of search result
- View more label: Enter text of lable
ADDITIONAL PRODUCT SEARCH
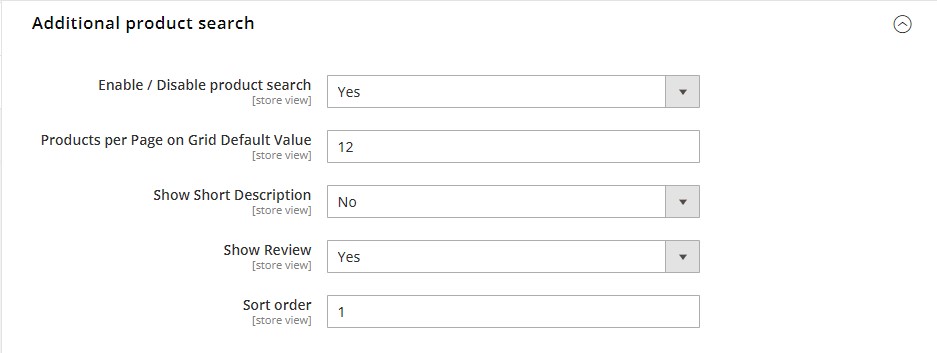
- Enable / Disable product search: Enable or Disable
- Products per Page on Grid Default Value: Set number of product per page
- Show Short Description: Enable or Disable
- Show Review: Enable or Disable
- Sort order: set order for result search
ADDITIONAL CATEGORY SEARCH
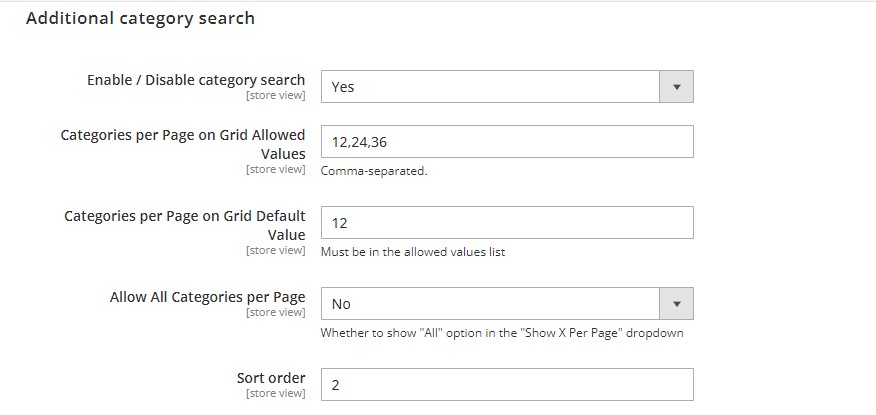
- Enable / Disable category search: Enable or Disable
- Categories per Page on Grid Allowed Values number of products per page which is allowed
- Categories per Page on Grid Default Value: number of products per page
- Allow All Categories per Page: Enable or Disable
- Sort order: set order for result search
ADDITIONAL CMS PAGE SEARCH
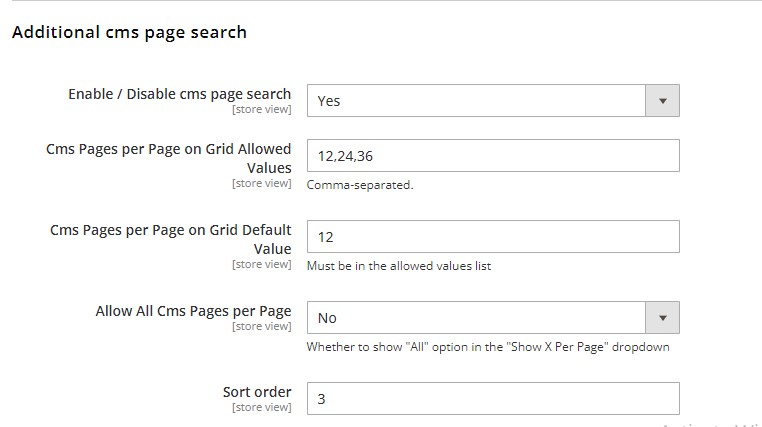
- Enable / Disable cms page search: Enable or Disable
- Categories per Page on Grid Allowed Values number of products per page which is allowed
- Categories per Page on Grid Default Value: number of products per page
- Allow All Categories per Page: Enable or Disable
- Sort order: set order for result search
ADDITIONAL BLOG SEARCH
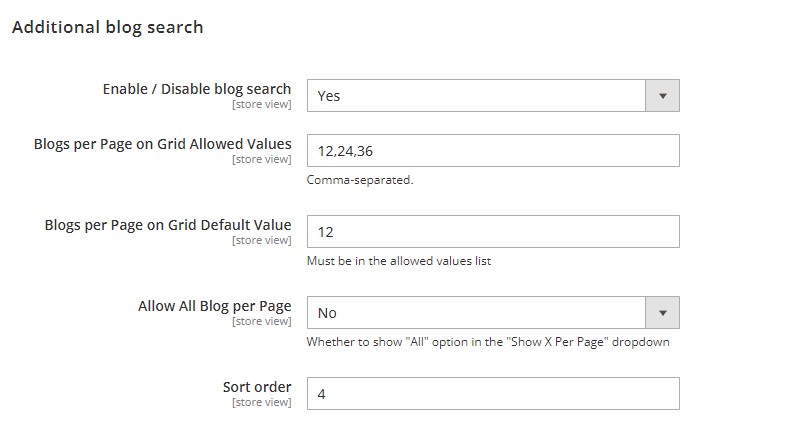
- Enable / Disable blog search: Enable or Disable
- Categories per Page on Grid Allowed Values number of products per page which is allowed
- Categories per Page on Grid Default Value: number of products per page
- Allow All Categories per Page: Enable or Disable
- Sort order: set order for result search
12. MGS Landing
ENABLE / DISABLE MODULE MGS_LANDING
EDIT FILE CONFIG.PHP
Go to the root folder on your Web Server, open file config.php on path app/etc/config.php
Find row 'MGS_Landing' => 1, field. Edit row:

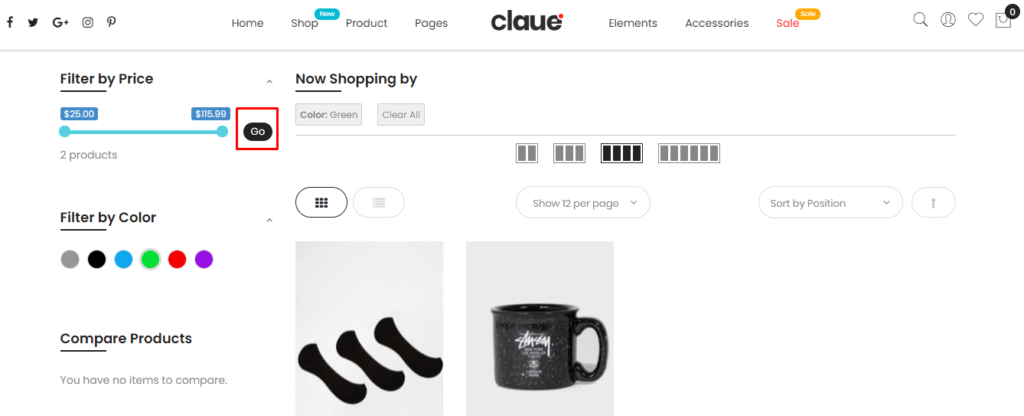
13. MGS Ajax Layer Navigation
ENABLE / DISABLE MODULE MGS_AJAXLAYERNAVIGATION
EDIT FILE CONFIG.PHP
Go to the root folder on your Web Server, open file config.php on path app/etc/config.php
Find row 'MGS_Ajaxlayernavigation' => 1, field. Edit row:
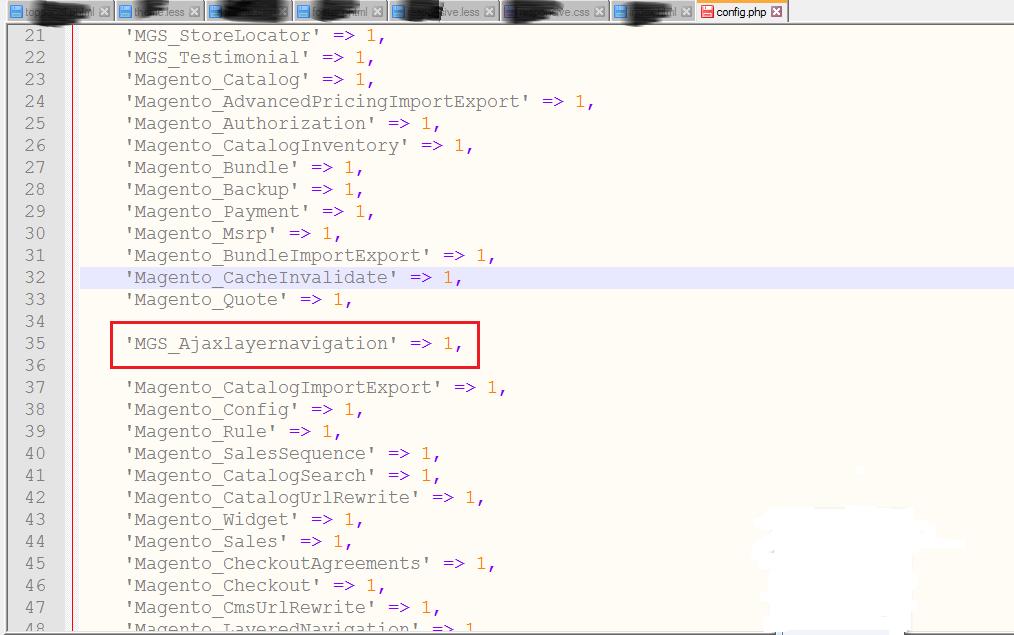
- ‘MGS_Ajaxlayernavigation’ => 1: Enable module
- ‘MGS_Ajaxlayernavigation’ => 0: Disable module
CONFIGURATION MGS_AJAXLAYERNAVIGATION
Go to Admin -> STORES -> Configuration -> MGS -> Ajax Layer Navigation
GENERAL SETTING
- Use Ajax: Enable or Disable
- Default Expanded Filter: Enable or Disable
- Remove Shopping By :
Demo:

- Filter By Text :
Demo:
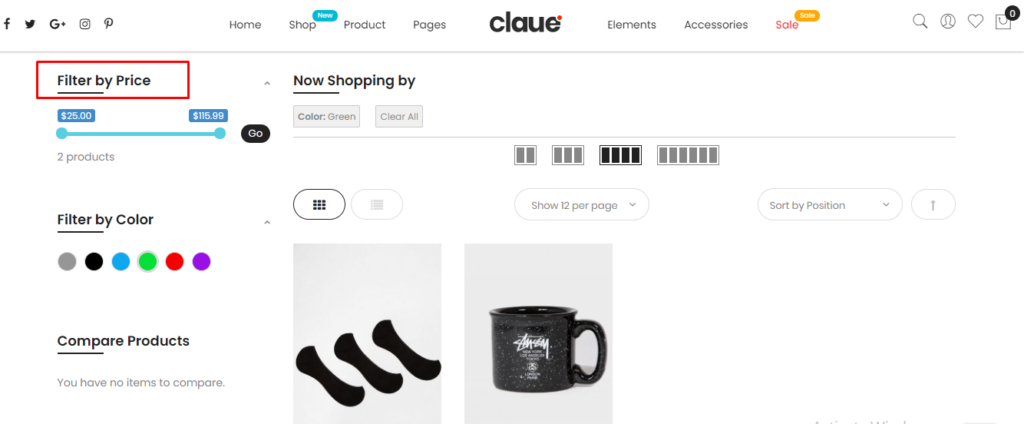
- Filter Price button text:
Demo: